

While I am a big fan of the traditional army review format, they usually only show the opinion of one person playing in one particular meta. In reality even within the same gaming group there is often a lot of disagreement over which units are top tier and which leave a lot to be desired. So I decided to format these army reviews in a way that captures that debate.
A massive thank you to Kevin, Page and Sam for all their help with this army review.
The ‘Expert’ Panel
Kevin Spear
I’m a wargamer of nearly 20 years who has maintained a focus on knight-themed armies (e.g. Bretonnia and Brotherhood) throughout his time in the hobby. I’m mostly known for my above average sportsmanship and painting scores (to which I fully put on the types of armies that I play). I’ve played Brotherhood almost exclusively since their inclusion in 2nd edition. Their unique, movement-oriented playstyle (which often projects enormous amounts of threat) allowed me to reach the 2019 US Masters where I took Best Sportsman. In their current iteration as The Order of the Green Lady, I was able to achieve First Overall in the 2020 Best of the Rest Tournament. I’ve found their blend of hard hitting knights and durable/grindy units from the Forces of Nature, creates a wealth of competitive list builds that we formerly lacked.
Page Neo
I’m a casually serious gamer from Singapore. My first forray ino table top gaming is playing Warhammer fantasy 8th Ed ETC format for 1 year, then I went on to Warmahordes for 3 years, then Kings. I also played Kill Team, God Tear, Warcry, Malifaux 2e, Guildball, Blood bowl, and touched a bit of 40K. I have a KOW Battle Reports YouTube channel called Newbie Dice (which I highly recommend for short, but really in-depth battle reports with a strong emphasis on tactical breakdown- Elliot).
I chose to play Order of the Green Lady since February 2020 because of the cool theme of nature and knights, and the amazing picture on page 38 of Uncharted Empires.

It took a while to get the hang of building an effective list for OotGL because of the unlock constraints, but once I got past that, this is a very strong army. I was top OotGL player in Call to Arms 4 and ended that tournament 10th. Also placed top 10 in Call to Arms 2 and 3.
Sam Sowden
I’ve been playing watery knights ever since the first pre Uncharted Empires beta spreadsheet went public: I saw which way the RC was going for the not-Bretonnia theme and instantly knew that it was the army for me. So I dropped my Mantic elves, stopped rebasing my GW dwarfs and started accumulating Fireforge kits. I’ve now accumulated over 5000 points of the Brotherhood (fortunately only a small part of my army was hoodwinked by the serpent tongued Basileans) and they’re the army I always find my way back to, even as I dally with other forces.
Finding that I had access to Unicorns and Beasts of Nature only increased the attraction!
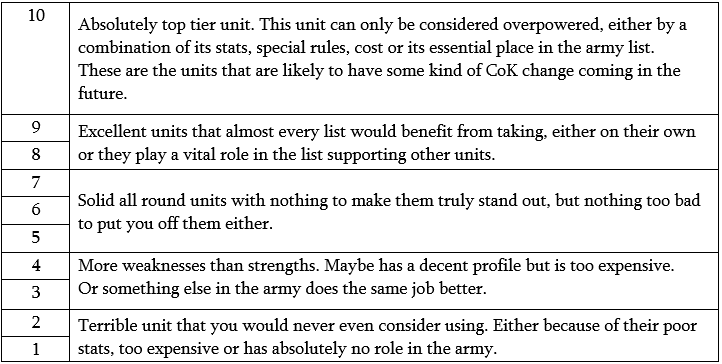
The Rating System
Each unit in the army is given a rating /10 using the scale below.
Note that the score given is how the unit compares to all other units in the game, not just compared to other units in the army. However, each unit should be considered in the context of this particular army e.g. a Phoenix in Salamanders may be rated differently to a Phoenix in the Forces of Basilea.
Men-at-Arms Retainer


Elliot – 7/10
These are a unit that do exactly what you need them to do for their price. The biggest thing they bring to the list is a cheaper unlock in both regiments and horde form. I tend to take two regiments, as they’re cheap enough that they can sit back on an objective all game and not do anything other than be Unit Strength. They’re ok as hordes, but OotGL has other units that perform better as anvils so you’ll mainly be taking them for the unlocks. The horde option is the only time that I think that Sacred Water is worth its points. Combine it with the Healing Brew and your horde can regain D3+D2 worth of damage in a single turn. Mixed in with a Heal and a Radiance of Life and that could potentially be enough to allow the horde to survive an additional round of combat than they otherwise would, not bad for 15 points.
Headstrong on them is an excellent rule for only 5 points compared to Kingdoms of Men Shieldwall. It helps them stay relevant all game and I find I tend to use it quite often to get them out of trouble.

Kevin – 8/10
For me, M@A’s are a must take as they are our only unlocking unit that comes in affordable horde size. In such a role, they are perfectly suited for the classic “big chunk of nerve” unit that are often found in the centre of battle lines.

Page – 7.5/10
Our cheapest unlock in both the regiment and horde level. Both regiments and hordes are great for unlocks, and regiments could be cheap Unit Strength, holding objectives and the horde can take a single charge and likely survive.
Headstrong is also an awesome rule for these throwaway units as the regiment at a lower nerve point and will waver easily, and the horde shaking off waver means they can counter charge and not block charge lanes from your 2nd wave units. Thematically it’s also awesome to know the regular foot soldiers are braver than other armies’ rank and file guys.
Sam – 6/10
Absolutely nothing wrong with them as a basic infantry unit. They will do all the jobs expected of regular infantry, from providing Unit Strength and a nerve block, to cheap unlocks if you need them. They are maybe a little less efficient due to the absence of war engines to unlock.
The infantry options in this list are absolutely fine, but to me they beg the question: if you want to play a combined arms infantry force, why are you playing Order of the Green Lady?
Order of the Brotherhood on Foot


Elliot – 6/10
A perfectly decent unit that gets a lot of value for its fairly modest point level. My only issue with them is that they don’t tend to fill much of a role in my lists. The only combat infantry units I take in OotGL tend to sit back on an objective all game and not get involved in much fighting. In that regard, Men at Arms can do the exact same job but for much cheaper. If you have 40 points spare then by all means ‘upgrade’ one of your Men at Arms regiments, but personally I don’t tend to bother.

Kevin – 7/10
Classic Heavy Infantry block. Although it can’t swap out for two-handers like other armies’ foot knights, it’s a great piece that can either hold the pivot point of your battle line or play weak side to keep your enemy from flanking you.
Page – 5/10
While it’s great that they unlock, not having the 2 handed option restricts their use to defensive purposes. The middle of the road price point is not worth a unit that just takes hits and maybe survives, as armies are often equipped to be able to dispatch Def 5, 15/17 nerve.
Sam – 6/10
Much the same as the Retainers.
Naiad Ensnarers


Elliot – 5/10
I’m going to introduce a word here that I’m going to use a lot in this review; context. Context is king. In a Forces of Nature or Trident Realm army I would rate Ensnarers as an 8/10. The reason that they’ve fallen so low in OotGL is that they’re irregular, something that is particularly an issue in this army where unlocks are often expensive and OotGL has soooo many awesome monsters and heroes that you want to be unlocking.
The troops and regiments are too expensive to be worth taking as you don’t get the value from their Regeneration (you can’t regenerate if you’re dead), so if you are going to take them stick with the horde. If you find yourself in a position where you’re flush with unlocks and you want an anvil in your army, the Ensnarers are definitely a decent option.
Kevin – 6/10
A great infantry block if you can afford it. I’ve seen these give premier offensive units fits when they are charged either in a forest or behind a wall. Unfortunately, its irregular status makes it difficult to include when this army has so many amazing unlocks.
Page – 4/10
Biggest issue is that they are irregular in an army that is craving unlocks, especially when you buy them in hordes to take advantage of Ensnare.
Sam – 4/10
All the nice things that the guys said in the Trident Realms review about these guys still apply here. But they’re irregular in this list, and that makes them quite difficult to include in a list that has quite a few expensive things to unlock.
Naiad Heartpiercers


Elliot – 8.5/10
Context is king. Heartpierecers are good in any army that can take them, but I honestly feel that they shine the brightest in Order of the Green Lady. The reason for that is how well they synergise with the rest of the army; their 18” range allows you to set the tempo for the game. If your opponent wants to sit just outside of your cavalry’s 16” charge range, then fine you’re going to get shot to bits by harpoons. Want to advance in to kill those pesky Heartpiercers that are shooting you from a distance? No problem but you’re going to get flanked by Beasts of Nature, Exemplar Redeemers and cavalry. For me regiments are the superior size as they allow you to get the maximum value from your Regeneration. 9/11 can easily be killed by a single Lightning Bolt, but 13/15 take a good amount of investment to kill, investment that can easily be counteracted by one good Regeneration roll. Plus they unlock now, which is fantastic (see Ensnarers above).
I take three regiments for a total of 30 Ra4 Piercing (1) shots per turn. On average, that’s 7.5 damage per turn to a Def5 unit. If that spikes just a little over average they can easily take out a large infantry horde in one round of shooting. I deploy the three regiments together in the middle of the board, with fast hard hitting units watching over them and daring my opponent to go after them.

Kevin – 7/10
This is an excellent unit but only comes into its own when you take multiples of them. If you do, you’ll find the “shoot and scoot” method combined with other units that have large threat projects (e.g. Beasts of Nature) protecting them puts extreme pressure on your opponent to find away out of their Ra 4+ Piercing 1 .

Page – 8/10
A shooting unit in our army and one of the best too, 4+ regen is great and forces people to take them out in one go or see their efforts getting regenerated back. Great to hold objectives backfield, and Steady Aim means they can keep moving every round, to be chaff or charge things that expose their flank and rear to them in late game as they have to face bigger threats. You can take one unit to be able to clear chaff and chip some damage, or bring more to really threaten some damage, synergizing with Lightning Bolts from your Druid/Unicorn.
Naiad Heartpiercers being unlocking since CoK21 also opens up list building options which is very welcome in this army.
Sam – 7/10
These are nice, I like them. Along with Unicorns, Order of the Green Lady can actually put out some very nasty shooting, and has the fast hitting power to punish the enemy who try to get close.
Order of the Brotherhood


Elliot – 7/10
For me this unit is the epitome of a 7/10. A good solid unit that is fairly costed and does the job it is designed to do.
They’re good in both regiments and hordes, but both sizes play quite differently. There are others who can go into the detail of how to use a cavalry horde better than I can, but the general gist is that you should just think of it as a super infantry horde that happens to have Speed 8. Accept that it’s going to get bogged down, but it will kill pretty much anything it touches whether it is disordered or not.

The Banner of the Green Lady is a decent upgrade as Pathfinder is most people’s go-to item of choice for cavalry regiments anyway and this way the regiment can get it for 5 points cheaper. I know that it also means that you can stack another item on top of the Pathfinder but I would advise caution here. The unit can get very expensive very quickly and when you’re adding Pathfinder and Brew of Strength – you need to be very sure that you’re going to be able to get the value out of the unit.

Kevin – 9/10
An excellent unit but I’ve found that it has diminishing returns the more regiments you take (my sweet spot is 2). I cannot imagine a list without at least one as the combination of the Banner of the Green Lady plus other artefacts gives you huge tactical flexibility. When building an army list, I like to wait until the end to choose the artefact as I can tailor this unit to fit a role that I need it to fill.

Page – 7/10
A run of the mill cavalry unit with a Pathfinder option that is 5 points cheaper, and doesn’t take an item slot. Allows you to customize your regiments on top of taking the mandatory Pathfinder with other armies’ cavalry, and they also unlock! I’m not a fan of running them in hordes but if you do you can choose to give them Pathfinder and another item as well. Lastly, you save the Caterpillar Potion for another unit, if you need it elsewhere.

Sam – 7.5/10
Horde 8/10, Regiment 7/10. (I’ve split the difference for the averages – Elliot)
The horde is awesome. Being able to give it Pathfinder in addition to another item the Brew of Strength makes this unit a force to be reckoned with, albeit at a whopping cost of 400 points. But a horde of knights charging out of a forest crushing everything in its path is the entire rationale for playing this army isn’t it?
The regiment is nice (especially with the 15 point Pathfinder upgrade), but I struggle to get it in, since I usually find that its single unlock is insufficient, and I gravitate to the Water Elementals instead for this reason, especially since I will always want to include the next unit in the list.

Order of Redemption


Elliot – 8.5/10
Such a good unit. The Order of Redemption really are the poster boys for Order of the Green Lady, I love the idea that each one of them is the equivalent of a hero in most other armies (or at least that’s my head-canon for why they have so many attacks and Inspiring). The fact that they’re Inspiring seriously helps out OotGL who can sometimes struggle to fit in enough Inspiring sources to properly cover the army. One of the key strengths of this unit is the ability to stay relevant and dangerous at all points of the game. A standard hammer unit will often have picked up enough damage by turn 5 or 6 that they’re just one more tap away from breaking. Or your Inspiring sources have been killed or are needed elsewhere. This isn’t an issue for the Order of Redemption.
This is a unit that is absolutely worth investing heavily into artefacts, as their 20 attacks means that they’re getting proportionately more bang for their buck than any other cavalry regiment in the game. The Brew of Sharpness is an absolute must for me.

So with all that said why I have I only rated them an 8.5/10? Two reasons. One, Thunderous charge. If these guys had CS1 TC1 then they would be a 10/10, but with only TC2 their effectiveness can be really hampered if your opponent has the right tools. Phalanx or a flying individual to disorder them can really ruin their day.
The second is the fact that they’re not only irregular, but they’re such a key part of your battle line and irregular. This unit is one of the main reasons that every other irregular unit in the list has been rated so poorly. In order to afford enough unlocking units to get the much needed heroes and monsters into your list, you can usually only afford to be spending big point on one irregular unit. If you can only afford one irregular unit, is it going to be Order of Redemption or Naiad Ensnarers?

Kevin – 8/10
Another excellent choice. I find I take these most often in 2000 pt lists when hero unlocks are hard to come by and I need that Inspiring bubble. However, they need to be used with finesse (read as “know when to charge!”) as they are still only 15/17 knights with no Crushing Strength. Play them with a specific battlefield role and they are hard to beat.

Page – 9/10
They are irregular, but have Inspiring, so they save a hero slot to make up for them not unlocking. Also, if you add the cost of Inspiring flag bearer and a Knight regiment, You will realise you’re getting the 20 attacks and Regen 5+ for free. Downside is their high cost for the same Def 5 15/17 nerve. You would hope that they survive the opponent’s counter attack after your initial charge so that regeneration can do its magic and win the grind game. I’ll recommend Brew of Strength or Sharpness for them for the grind game, or Elite/Vicious if you’re short on points. Pathfinder/Strider is also viable I suppose.

Sam – 8.5/10
This is one of my favourite units in the game, it gets so much for the extra 50 points over the regular knight regiment. It’s not getting a 9 because it is rather pricy. But it gets so much for the extra 50 points over the regular knight regiment – Regen, Inspiring and 4 more attacks. 20 attack regiments in general I’m very fond of, since they allow you to get the most out of combat upgrades like Sharpness or Strength. They bring their own Inspiring, which partly offsets them not providing unlocks, and can grind with the best of them. I think the Brew of Strength is the best item for them, unfortunately this will usually be taken by the horde in my lists.

Water Elementals


Elliot – 7/10
Another unit that for me personifies a 7/10. The best of the Elementals and one that fits really nicely into the Order of the Green Lady list. Their Speed 7 helps them keep up with all of the cavalry and flyers, allowing your entire army to project overlapping threats from all angles. Having a surgeable unit in the list also lets you remain flexible and can help if an enemy flyer does manage to get behind your lines.
Def5, Regeneration and Fearless is a really sturdy combination that will survive a lot of punishment. They’re not all that impressive offensively however; I tend to find that if you go into each combat expecting them to do absolutely no damage, you can only be pleasantly surprised.
Don’t overlook the regiments either. These are some of the best thicc chaff (© Ashley Mowat) in the game, -/14 and Regen 5+ means that your opponent has to really commit to killing them.

Kevin – 8/10
Excellent all around choices. Consider them your “Jack-of-all-trades” unit. They are manoeuvrable (Strider!), tanky, and can give an okay punch. Although I lean towards hordes (especially for the unlocks), they are useful in either form.

Page – 8/10
Speed 7 Elementals to keep up with your cavalry. Regiments work as thicc chaff, while hordes make good unlocks. Having Surge in your army will keep enemies on their toes as well. Regen once again is great for the grind. They will often find themselves in lists as one of the horde unlock options.

Sam – 8/10
Hordes are mobile anvils that are an important source of unlocks, and, importantly in a list that relies on Thunderous charge for a lot of its damage, doesn’t care in the least about terrain or Phalanx. Me4 is a weakness, as with all elemental type units. Regiments are decent Thicc Chaff.

Earth Elementals


Elliot – 5/10
Context is king. Once again in a Dwarf list I would rate Earth elementals an 8/10. In the Order of the Green Lady I just find them a bit of a burden, at least in the style I play. For me OotGL works best when it is projecting threat from every angle at once, applying constant pressure to your opponent to force them to play on your terms. Earth Elementals are just far too slow to contribute to that.
That being said, in as of themselves Earth Elementals are a solid unit. I just feel that you would always be better off taking Water Elementals in OotGL.

Kevin – 6/10
Contrary to other armies, hordes of Earth Elementals just don’t make the cut. Their speed is just too slow for how incredibly manoeuvrable this army is. But, regiments are cost effective anvils that (if correctly deployed) play absolute havoc on opposing battle lines.

Page – 6/10
Problem with them is that they struggle to keep up with the rest of the army. Not only are they speed 5, but they are also Shambling which means no moving on the double on turn 1. While the Water Elementals are shambling too, spd 7 means they threaten 21” by turn 2, while Earth Elementals are usually not in position till turn 3 or 4. Still I appreciate them for providing unlocking Def6 units in our army which can be useful in the right situation.
Sam – 6/10
Very tough, but are perhaps a bit slow in a cavalry centric army
Order of the Forsaken


Elliot – 6/10
Another very iconic, cool unit.
The big strength of this unit is threat projection. A 20” range extending out from a 150mm frontage covers a significant chunk of the board in one go.
However they do have a couple of downsides. They are a horde which means that despite having all of the same combat potential and defensive ability of cavalry regiments, they pay horde costs for items. They also have a very big foot print which can limit the amount of cheeky flank charges they can pull off, and it limits their ability to reform in a way that puts them out of arc/LoS of enemy units.
These are a unit that is perfectly good and probably fairly costed, but once again they’re competing with the Order of Redemption as the ‘bloody expensive irregular’ choice. More often than not the Redemption win.

Kevin – 7/10
I love this unit. In an army that is becoming known for projecting threat, this is one of our best. Place them about a 1/3rd the way into your deployment zone to have them dominant 2/3rds of the board space. What will put many off from including them, however, is their high cost (they really need to take the Brew of Str. to make them a hammer) and their Irregular tag.

Page – 6.5/10
While having TC2 is not ideal for an expensive hammer unit, the Forsaken Knights is the only unit in the army that fulfil the role of speed 10 hammer, which I sometimes find important to have in an alpha strike army. It is sad to bring a cavalry alpha strike army only to be faced with a flying speed 10 alpha strike army on the opponent’s side. Sadly, you can often expect them to do little after the initial charge, so I take mine with JBoots to make sure they do their job in the alpha charge.
Sam – 5/10
Shouldn’t compare with units in other armies, but it’s impossible to look at these side by side with Elf Drakon Riders and not feel really quite hard done by… Especially given that Drakons aren’t even irregular anymore. I painted a couple of regiments, don’t see myself including them unless I’m playing a huge 3000+ point game.
Woodland Critters


Elliot – 6.5/10
I’m not a fan of them as a regiment, as 9/11 nerve is just so easy to waver and because they have Fly, they also lose Nimble when wavered meaning that they can’t pivot before backing away. This means that they’re almost as likely to get in your own way then the enemies.
In hordes however, they’re a surprisingly vicious (get it?) little package. 24 attacks is still 24 attacks no matter how you look at it. They play nicely into the OotGL ethos of putting continuous pressure on your opponent from multiple angles. They’re cheap enough to throw out there on their own and threaten a flank, but if your opponent ignores them in place of facing down something scarier like a knight horde, they can do serious damage if they get in a flank or rear.

Kevin – 6/10
A unit I’m warming up to. The horde’s sheer volume of vicious attacks makes them an ever-present threat if they can get into the flank. Regiments work okay as chaff but are outshone by other units (cough…Pegasus… cough!).
Page – 5/10
It’s not great chaff, especially at def2, as that makes them vulnerable to goblin bow fire and other chaff’s attacks. But with our best chaff the Pegasus fighting for a monster slot sometimes you must make do with these critters.
Sam – 6/10
On paper this unit looks quite good, it is excellent chaff. But the Pegasus exists. Painted up a pair of regiments, never used them. The go to chaff unit when Monster slots are full.
Greater Water Elemental


Elliot – 6/10
These are…. Ok.
There isn’t too much negative to say about them, they’re a very study package in a small foot print. They make excellent anvils that can get in the way and be a pain for your opponent, plus they have a decent speed of 7. But with only Me4 and 8 attacks they’re not going to kill all that much, even in flanks.
But I struggle to see the point of them compared to a Beast of Nature. A Beast of Nature without wings is 175 points, the same speed and has a significantly better damage output. In a list where two of your best units (Beasts of Nature and Pegasi) are taking up scarce monster unlock slots, the Greater Water Elemental is unlikely to find a home. Very nice Mantic model though.

Kevin – 5/10
It’s not bad but in a list that struggles for unlocks, it’s hard to justify spending one on this guy when you have other units that play anvil just as well.
Page – 1/10
With Beast of Nature and Pegasus taking this slot the Greater Water Elemental is just not worth a second look.
Sam – 6.5/10
Perfectly decent monster, but it competes for slots with two of the best monsters in the game, the Pegasus and the Beast of Nature.
Greater Earth Elemental


Elliot – 5/10
Say it with me… context is king. Perfectly good unit in other lists, with a tonne of Def 6, Fearless nerve and a very respectable combat profile. But see all the comments above about the Greater Water Elemental taking up an unlock slot. The Greater Earth Elemental then commits the greatest sin of costing the same as a horde of Elementals. So not only do you use up an unlock slot, but you also take up the points that could be spent on more unlocks. So in reality this guy actually costs you three unlock slots instead on one. Maybe it should be a 4/10…
Page – 7/10
The Greater Earth Elemental is Spd 6, which is a world of an improvement from the Earth Elementals. It is also has Strider, is more resilient and deals more damage to def4 or higher units than the Earth Elementals. Only issue is once again the unlock, but because this takes a titan slot, it might be unlocked from a Large Infantry Horde, which allows you to take a Monster and Titan.
Sam – 6/10
I feel the list builds that the GEE would work best in wouldn’t really take advantage of the unique elements that OGL brings to the table, and would be better off in a Forces of Nature list.
Beast of Nature


Elliot – 8/10
First of all I think it’s important to say, the Beast of Nature is not a dragon and should not be treated like one. The Beast is a scalpel, not a sledgehammer. If you try throwing the Beast of Nature in head on and expect it to break units on its own, you’re going to be very disappointed. That being said, the Beast of Nature is awesome!
For me the additional attack upgrades and wings are an absolute must take. I’ve tried ‘on foot’ versions before and they’re perfectly decent, but Fly is such a force multiplier that’s it’s hard to ignore. I don’t tend to bother with the shooting attack upgrade, my Beasts are so often flying ‘at the double’ to try and get into flanking positions that I’d never get to use it.
The phrase I use to describe the Beast of Nature is ‘just good enough’ and I certainly don’t mean that as a criticism. It’s just good enough that your opponent can’t ever risk giving it a flank because it has a good enough chance of killing you in one. It’s just defensive enough that even a dedicated combat unit like a regiment of knights can’t confidently rely on killing it in one turn. It’s just good enough to be constant pain in your opponent’s arse for the entire game.
Take your time with the Beast of Nature. Do your best to get behind your opponent’s lines even if that means not getting into a position where it can charge until Turn 4 or 5. Trust me, it’ll always be worth the wait.
They do have some weaknesses. While Def5, 15/17 are excellent stats the Beast doesn’t have any kind of Waver or Damage mitigation, so it can be susceptible to chip damage and lucky rolls. Play them cautiously and charge on your own terms wherever possible.

Kevin – 9/10
It’s not a gamebreaker but I’d be surprised if I didn’t see at least one in every Order of Green Lady list. And for good reason. The Beast of Nature will often find itself at the extreme ends of the board, trying to turn flanks or jump enemy lines. You should always include wings as it gives you both Fly and Nimble. It’s not a melee god, however, so try not get locked into a head-on-head. It’s the threat that counts more.
Page – 9/10
The premier flank threat without breaking the bank. I love BoNs with flying and 7 attacks. 2-3 are always welcome in an alpha strike list. Vicious makes them more consistent while Pathfinder means enemies get no benefit from hiding in difficult terrain.

Sam – 9/10
Oh, man these are good. The Wings upgrade is almost obligatory, as is increasing the attacks to 7. All these combined with built in Vicious and Pathfinder make the package one of, if not the best, fliers in the game.
A barebones Beast of Nature may be worth trying, as a 150 point def 5 15/17 nerve block, but a regiment of foot knights would provide much the same without taking up a slot, and US3. The breath upgrade is a trap. The only time the beast should ever be close enough to breathe on something is when it’s in combat.
Pegasus


Elliot – 8/10
Chaff-tastic! The Pegasus is fantastic unit, speed 10, Nimble, Fly with Pathfinder means that it can get wherever it wants to go. These are brilliant chaff, they’re great at grabbing late game objectives and adding a few points of damage to key combats.
They really are a brilliant unit. So why haven’t I rated them a 10/10 like I did Gargoyles in the Twilight Kin? Ahem… context is king! In a vacuum the Pegasus is probably equal to or better chaff than Gargoyles. However, Gargoyles are a troop, probably the easiest thing to unlock in the game, whereas Pegasi are monsters. In an army where the vast vast majority of unlocks cost >200 points and the most powerful (and expensive) units are irregular.
The fact that Pegasi are monsters dictates the entire rest of the list; you’re constantly having to walk the tightrope of unlocks. They’re the reason that Greater Elementals are unviable. They’re the reason that you pretty much NEED to include some horde unlocks. So to conclude, good unit but a pain for army creation.

Kevin – 9/10
Another “monster” choice that will find a place in most Greenhood lists. This little guy is your “get-out-of-jail-free” card as it manoeuvres around the board looking to swing those key moments in every game your way. The number of times this winged white horse has flown onto a objective in the last turn to win the game is probably beyond count.
Page – 9/10
Best chaff with our army, only issue is BoNs are taking up the monster slots. I’ll try to squeeze 1 in as they are great. 3 attacks 3+ and TC1 makes it more reliable in dealing at least 1 damage, and in a pinch able to help out in a flankcharge. They are also height 4 which allows them to see past hills and sometimes block LOS from the charged unit, in case you failed to do damage.
Sam – 8/10
Very good fast chaff piece that can shrug off light shooting. Height 4 on a narrow base can be very useful to block enemy lines of sight without blocking your own.
Exemplar Redeemer


Elliot – 9/10
The 9/10 rating I’ve given here is very much assuming that you have taken the Winged Unicorn upgrade. See everything I said above about the Beast of Nature, except that these do have damage and waver mitigation. This unit gives me the warm and fuzzies.
People often focus on the fact that this unit has two less nerve than the Beast of Nature and I think that’s a mistake. For one thing, you need a 15 to break the Redeemer and a 15 to waver the Beast. But as the Beast has no waver or damage mitigation, a waver is pretty much a death sentence anyway. Whereas when the Redeemer wavers he has a 2/3 chance to pass his Headstrong, run away 20” and Regenerate all that damage back before returning to be a late game pain in the arse.
In exchange for those two points of nerve and Vicious the Redeemer gets Headstrong, Regeneration 5+ and Inspiring. That’s a bloody good trade in my opinion, and the Redeemer leaves your monster unlock slots free for Pegasi. I admit at 13/15 he isn’t going to last long in a fair fight against most combat units, but he should never be in a fair fight – not very chivalrous I know!
I use these in the exact same way as Beasts of Nature, they’re scalpels that use their Inspiring, Regen and Headstrong to more reliably get themselves in position and then charge only when a perfect opportunity presents itself.
Yes, they can be wavered/killed by concentrated shooting. But if all of your opponents shooting has turned to deal with the flanking Redeemer, it isn’t shooting your Knights. What you need to do as an Order of the Green Lady general is make your opponent regret no focusing on the knights.
People frequently sing the praises of the Kingdoms of Men General on Winged Beast. Well this is a Regenerating, Headstrong version.
For a less powerful but still funny option, the Boots of the Seven Leagues is great on the horse mounted version for a 16” Scout move which lets you charge turn 1 with seven CS2, Me3 attacks – beautiful.

Kevin – 7/10
I like the Redeemer in either of its forms. On horse, it’s a wickedly mean piece that reminds me a lot of slightly less effective Herja. It can take a host of different artefacts to drive home the power. On Winged Unicorn, I am slightly less sold (but only just). For me, the Beast of Nature’s “play it with finesse” rule applies here, but even more so as it lacks the Nerve to take a strong counter punch from enemy units.

Page – 7/10
Both the cavalry and flying options are strong, although one would make comparisons with the Beast of Nature at the same points. You will pick this if you need an Inspiring source and regen for the long term grind, or you can take one BoN and this for a horde unit.

Sam – 6.25/10
7/10 on a Horse, 5.5/10 on a Winged Unicorn. (I’ve split the difference for the averages – Elliot)
On a horse he is an attractive hitty individual that can reliably ground any big fliers, will make mincemeat of war engines and is quite tough, with regen. Give him the Mournful blade, and he’s essentially a slightly cheaper mounted vampire, and everyone rightly loves them.
Mount him on a Winged Unicorn and things can only get better, right? Not in my view. He comes in at the same price as a beast of nature, for worse combat stats, and a whole two points fewer of nerve. He’s not *bad*, and I want to like him, but I don’t. I want my Exemplar Forsaker back.

Exemplar of the Brotherhood


Elliot – 5/10
Here we are again… context is king! This a unit based upon the Kingdoms of Men Hero, which is an excellent 8/10 unit. However in Order of the Green Lady where your unlock slots are at such a premium that I’ve never found a use for an Exemplar of the Brotherhood and doubt I ever will.

Kevin –4/10
In your everyday-competitive list, it is incredibly hard to justify spending an unlock slot on this piece. In 2nd edition, it was common for me to run 2-3 of these as my chaff pieces. But with their lack of Mighty rule and the ability to get a nearly as mobile/scoring piece for 5 points more (cough… Pegasus… cough), I’ve never taken one in 3rd edition.

Page – 4/10
The cheap hero for disordering enemies. But the mounted version is only 5 points cheaper than the Pegasus, so the Pegasus is usually better.
Sam – 5/10
Occupies the same sort of role as something like a pegasus, and a unicorn can do the same job just as well (better, actually) at a pinch.
Devoted

Elliot – 5/10
Seriously cool concept for a unit that I wish was better than it is. On her own, she’s a decent-ish wizard with access to some ok spells, slightly higher nerve than a regular wizard and Headstrong (which admittedly is pretty pointless as you’re Disordered after passing Headstrong and so can’t cast spells).
But, she’s not a Druid. Which means that she’s taking up points and a hero slot without contributing either Bane Chant or Inspiring – both of which this army needs in spades. Radiance of Life is a very powerful rule, but in order to get much use out of it you need to either only take Sacred Water units, which you can do without hamstringing yourself but you’re limited to using two or three units (in which case what was the point in limiting it?) or you invest in overpriced Vials of Sacred water. I’ve spoken in the past about how I’m not a fan of units that funnel list design like this.
Anything she can do, others can do better.
Kevin – 5/10
There is a place for the Devoted in some armies, but only just. I can see her being used if you either (1) can’t afford the Avatar of the Green Lady or (2) are running a “Sacred Water” Battlegroup (Order of Redemption + Reg/Horde of Water Elementals). But, outside of that, you have to pay a lot of points for something a cheaper hero (the druid) can do nearly as well.
Page – 4/10
Not having inspiring is a deal breaker. The conditional Radiance is also a huge point sink as you need to purchase over costed vials for some units. Might still have a workable and thematic list if you build your list around her Radiance Aura with units that come with sacred water.
Sam – 6/10
Oh, if only the Devoted Inspired! She would almost be an auto-include for me. Really nice support piece, but once you start tooling her up with Inspiring, extra Healing, and Radiance of Life, gets expensive quickly.
Exemplar Adjutant


Elliot – 7/10
Your usual Army Standard Bearer, except this one also has Headstrong which can be useful in ensuring that your Inspiring is where you need it.
This unit with the Lute of Insatiable Darkness is the cheapest way to get Inspiring and Bane Chant in your list. There are other reasons to take a Druid, but if you’re on a really tight budget, the Adjutant is perfectly solid choice.
Kevin – 7/10
I think in a lot of other armies, the BSB + Lute is an auto-include. But when you have a Druid that can do the same thing AND Heal for 10 points more, why not take him? To be fair, you’ll probably want to spend additional points on artefacts on the Druid so if you can’t spare the points, this flag-waver is your knight!
Page – 4/10
Flag bearer that’s overshadowed by the druid. You will also probably not need this if you have Order of Redemption.
Sam – 5/10
Druids exist.
Druid


Elliot – 8/10
A really nice cost effective wizard. The Druid doesn’t do anything spectacular, but it doesn’t need to. My go-to build for these guys is Bane Chant, Surge and the Conjurors Staff. However, there is also merit in giving them Shroud of the Saint for a 95 point Heal (5) Inspiring source (although at that stage maybe just pay 30 points more for a Speed 10 Unicorn that can also fight in combat). Or the Boomstick and Lightning Bolt for a cheap character/ chaff sniper (again, maybe just take a Unicorn).

Kevin – 9/10
I. Love. Druids. In an army list filled with relatively expensive units, these are your discount bin heroes. You want a healer? Slap a Shroud of Saint on this bad-boy and you’re off. Want a Lightning Bolter with the Boomstick? That’ll be 40 points. Wanting to help keep Heartpiercer spam safe? Shoot the buggers then Wind Blast out of their charge range with the Druid’s Wind Blast. I personally don’t think they need to be put on horses, but if you have the points, I can see the appeal.

Page – 8/10
Cheap Inspiring source, with cheap weaker spells allow you to take multiple spells for utility. Surge at a low cost is really great for threatening surge shenanigans without committing a lot of points.

Sam – 7/10
Good cheap Inspirers and casters, with the added benefit of Pathfinder so that they can get their Inspiring where it’s needed quickly. Go to character if you’re not building around unicorns. And even if you are, there can be a place for them.

Unicorn


Elliot – 9/10
What is there to say… we know the Unicorn is too cheap. Look at how much Lighting Bolt (5) costs in literally every other unit in the game (hint: its more than 20 points).
The only reason they’re not a 10/10 is because I don’t feel that you’re punishing yourself if you chose not to use one. You just get a very powerful option if you do. An Order of the Green Lady list can obviously do well without Unicorns, in fact I don’t take any as I prefer to use my hero slots on combat characters. But they are clearly very very (probably too) good and they make all the other wizards in the list (and the game for that matter) look worse by comparison.
I’d urge caution in investing too heavily into them if you keep them without wings however. You can easily sink close to 500 points into three of them, which is a massive investment in units that have no Unit Strength.
I’d say take one and specialise it, either stick to just Lighting Bolt and the Boomstick or just Heal with the Shroud of the Saint. That way you’re keep them as efficient as possible and not spending points on spells that you’ll only be using half the time.

Kevin – 7/10
Personally? I have never taken a Unicorn although I can see their appeal. Their Lightning bolt is undercosted, they Inspire, Fly, have a bit of combat power to them and are a scoring unit. Yet, I always seem to find that I can wiggle an additional unit into my list if I bring them down to a Druid that does relatively the same thing. For me, that splitting of roles/units is more important but it is definitely worth a try.

Page – 9/10
Unicorn is great for its points. I love them with Lightning Bolt instead of Heal. It comes “mounted” by default and has decent defence and combat power (CS1 TC1), so I highly recommend keeping them cheap and make use of their combat ability since you’re paying for them (albeit at discount).
I run mine with LB instead of Heal, and Blade of Slashing, making it more reliable in dealing damage. This gives it multiple roles:
- Inspiring source
- Lightning Bolts
- Adding 1-2 damage to a combat,
- Ground flyers
- Chaff up hammer units by charging them
With already so many things it can do and probably not being able to do everything in a game, having Heal or flying to me is just adding points and more capabilities which it might not make use of. Ultimately, they play a supporting role and will not win you the game on their own. So, a fair warning that running multiple kitted up unicorns can quickly soak up a lot of points for these support units.

Sam – 8.5/10
This was the unit I built my list around when Uncharted Empires came out. 3 of them, kitted out to the max. Expensive, but they do so much. They Inspire, they’re super mobile, they dish out Lightning Bolt and Heal, they can take a punch, and they can give a punch.
I’ve taken half a point off because the changes to hex could really damage them. I haven’t seen all that much hex so far, but once events get going properly again, I wouldn’t be surprised if they became far too expensive for something so easily shut down.
I’ve never bothered with the wings, but some people swear by them. I think they just make them more vulnerable and less mobile. Height 4 and unit strength are valuable, I will admit.
Naiad Stalker

Elliot – 6/10
And for the final time… context is king. The Stalker is a really nice unit that doesn’t have much of a home in Order of the Green Lady. I think that a lot of people under estimate these assassin style characters that can realistically do 2 points of damage every single turn of the game, but their strength really lies when they’re adding chip damage on top of lots of other shooting threats. If you’re going heavily into Lightning Bolt and Heart Piercers, then I can see a place for the Stalker. But that’s also assuming that you’ve got a hero slot free.
Nice unit. Wrong army.
Kevin – 5/10
I actually really like this piece. It’s not a straight up killer but can reliably put 1 point of damage onto a unit each turn throughout the entirety of the game. If you can get the mournful blade on him, he becomes a “dual” threat (get it? hah) though his speed is just a bit lackluster.
Page – 2/10
No role in the army. If it had Scout at least that would make it interesting.
Sam – ?/10
I honestly wasn’t even aware this unit was available until I sat down to write this.
Avatar of the Green Lady


Elliot – 7/10
I’ve been consistently using the Avatar of the Green Lady in a lot of my recent lists and really enjoying her. I have her in a list that is entirely regenerating (Heart Piercers, Water Elementals and Order of Redemption) and between a good regen roll, Radiance of Life and Heal (6) she can entirely undo a round of combat on a key unit. On a small elite army like Order of the Green Lady, that is a massive force multiplier as it effectively gifts you back a fresh Knight regiment. Having Cloak of Death on a speed 10, Flying, Pathfinder, Individual is huge as well. Ask any Ogre player how often Brutal tips combats over the edge, well Cloak of Death is like Brutal that hangs around. One of my favourite tricks with her is to fly behind the enemy’s lines, Cloak of Death all their units and then Heal my height 3 knights over the top of my enemy’s units.

Kevin – 6/10
With her recent points reduction, I cannot deny the Avatar’s appeal. If you are leaning towards a list that grinds, she is a great choice as her Balance ability really comes into her own. Combine that with her Fly ability and she can act as a “Jonny on the Spot” type, getting herself exactly where she is needed. But, again, that gosh darn druid (or Unicorn) can do almosttttt the same for 30 points less.
Page – 4/10
At a 150-price point with no ability to trigger nerve checks on its own is too costly for me, as support units that can’t cause nerve checks should be around the 100 point mark. Perhaps the Avatar should have an offensive spell.
Sam – 7/10
The CoK change made the Green Lady an attractive proposition at 150 points, I really like her. Cloak of Death is one of the best rules in the game, and stuck on a flying individual who can get behind enemy lines and dish wounds out all game can be very valuable.
Summary
Overall average ratings /10: 6.6/10
Most agreed upon unit(s): Order of Redemption, Order of the Brotherhood, Water Elementals, Beast of Nature, Pegasus, Exemplar of the Brotherhood (1 point of difference between highest and lowest scores)
Least agreed upon unit(s): Greater Water Elemental (5.5 points of difference between highest and lowest scores)


Elliot’s Beer Fund
If you’ve enjoyed the blog and you’re feeling generous, you can buy me a pint. Please dont feel any obligation to do so, I’ve started this blog because it’s fun, not to make any money. Any money received will go towards hosting costs. Or my beer fund… ok mainly my beer fund.
£3.00


