A PDF version of this page can be found here. A blank scoresheet for use in your tournaments can be found here.
What is it? It is a system for determining the score each player achieves following a game of Kings of War.
It is predominately for use in tournaments to determine the winner of the tournament, but there is no reason it couldn’t be used in friendly games as well
How is it different from other systems? We’re not shy in saying that we’ve taken our favourite parts of lots of other scoring systems and put them into one system, so nothing in here will be completely new. We’ve not tried to re-invent the wheel, just bring together all of the bits that we think are the best from other systems.
The main difference to most other commonly used scoring systems, is that our system uses positive only scoring. This means that you only ever score points based on what you do, you don’t take points away from your opponent and you can’t conserve points through inaction (also known as running away!).
How does it work? The details of how the scores are calculated are explained further on, but put simply your final score is made up of three criteria.
1.) Did you Win, Lose or Draw? 2.) How well did you do on the scenario? 3.) How much of your opponents army did you kill?
The two main pillars of the system are; it’s a POSITIVE ONLY scoring system and there is ALWAYS something to play for, even when you know you can’t win the scenario.
Unlike some other system, in the Northern Kings scoring system you score points for how much you kill, not the difference between what you and your opponent kill. This is to encourage players to go all out!
If its getting towards the end of the game and you know you can’t win, then you can always score some points by seeing how much of your opponents army you can kill. There’s no risk to you, because you don’t lose anything if your opponent kills your units, you can only gain points.
Where you finish in a tournament is made up of two factors – your Tournament Points (TPs) and Kill Points. Players are ranked first by their Tournament Points (TPs) and then their Kill Points will be used to decide ties. At the end of each game, players report the results of their game to the Tournament Organiser (TO) using their score sheet.
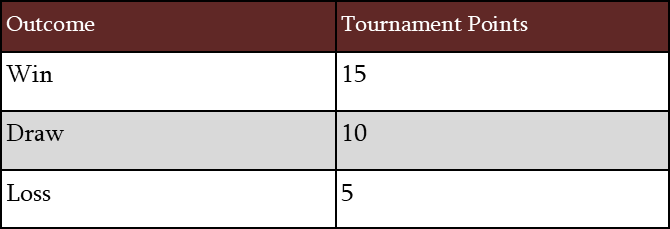
Tournament Points (TPs) The amount of Tournament Points (TPs) you have scored in your game is calculated using three criteria:
Win, Loss, Draw
Scenario Points (SP) Calculate the number of Scenario Points (SP) you scored from the scenario at the end of the game. For example; the total objectives you hold at the end of the game in Pillage. Each scenario has its own way of scoring Victory Scenario Points (SP).
Scenario
How Scenario Points (SP) are scored
Pillage
Use 7 Objective Markers. Score one bonus SP for each Objective Marker that you control at the end of the game.
Loot
Score two bonus SPs for each Loot counter that you hold at the end of the game.
Push
Use 2 tokens per player. Score one bonus SP for each loot token you hold at the end of the game (this increases to two if the unit holding it is entirely within your opponent’s board half).
Dominate
Score one bonus SP for each scoring unit that has the majority of its footprint within 12” of the centre of the playing area at the end of the game.
Invade
Score one bonus SP for each scoring unit that has the majority of its footprint on the opposing player’s half of the board at the end of the game.
Control
Score one bonus SP for each zone you control at the end of the game Score an additional +1 SP if you control the middle zone in your opponents half.
Kill
We recommend that you do not use the Kill scenario in the Northern Kings scoring system.
Raze
Score one bonus SP for each ‘Claimed Objective Marker’ that you scored throughout the game. Score a bonus two SPs if you hold the central Objective Maker at the end of the game.
Plunder
Score one bonus SP for each Loot Counter you hold at the end of the game. Score two SPs for each Primary Loot Counter you hold at the end of the game.
Fool’s Gold
Score bonus SPs equal to the number of Victory Points you scored at the end of the game.
Smoke & Mirrors
Score bonus SPs equal to the number of Victory Points you scored at the end of the game.
Salt the Earth
Score one bonus SP for each Objective Marker that you control at the end of the game.
For each Scenario Points (SP) earned, add a Tournament Point (TP) to your total to a maximum of +5 Tournament Point (TP).
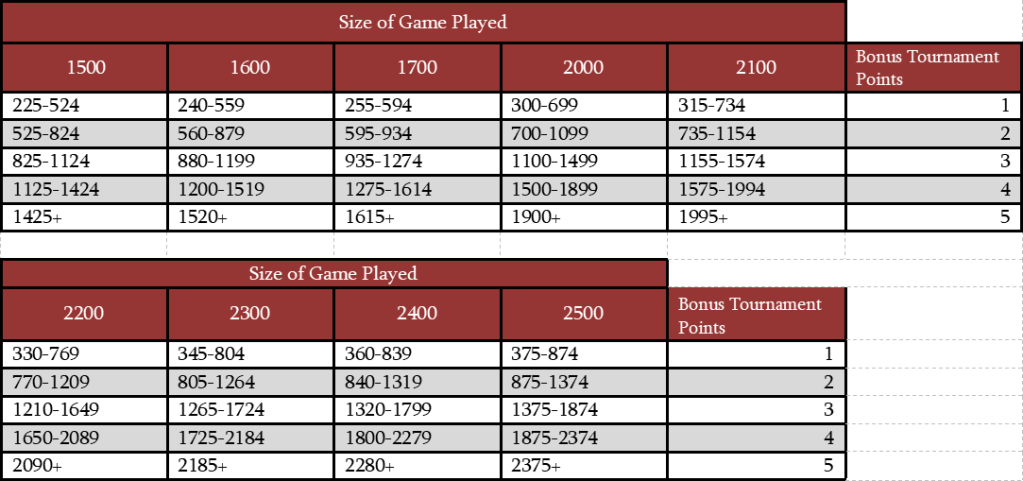
Kill Points
Calculate the total value of your opponent’s army that was routed during the game. Compare this total to the table below.
A PDF version of this page can be found here. A blank scoresheet for use in your tournaments can be found here.
At that point I only had two units painted, the Abyssal Horsemen. Since then I’ve been painting my socks off and have somehow managed to get the majority of the army finished – only four characters left to go.
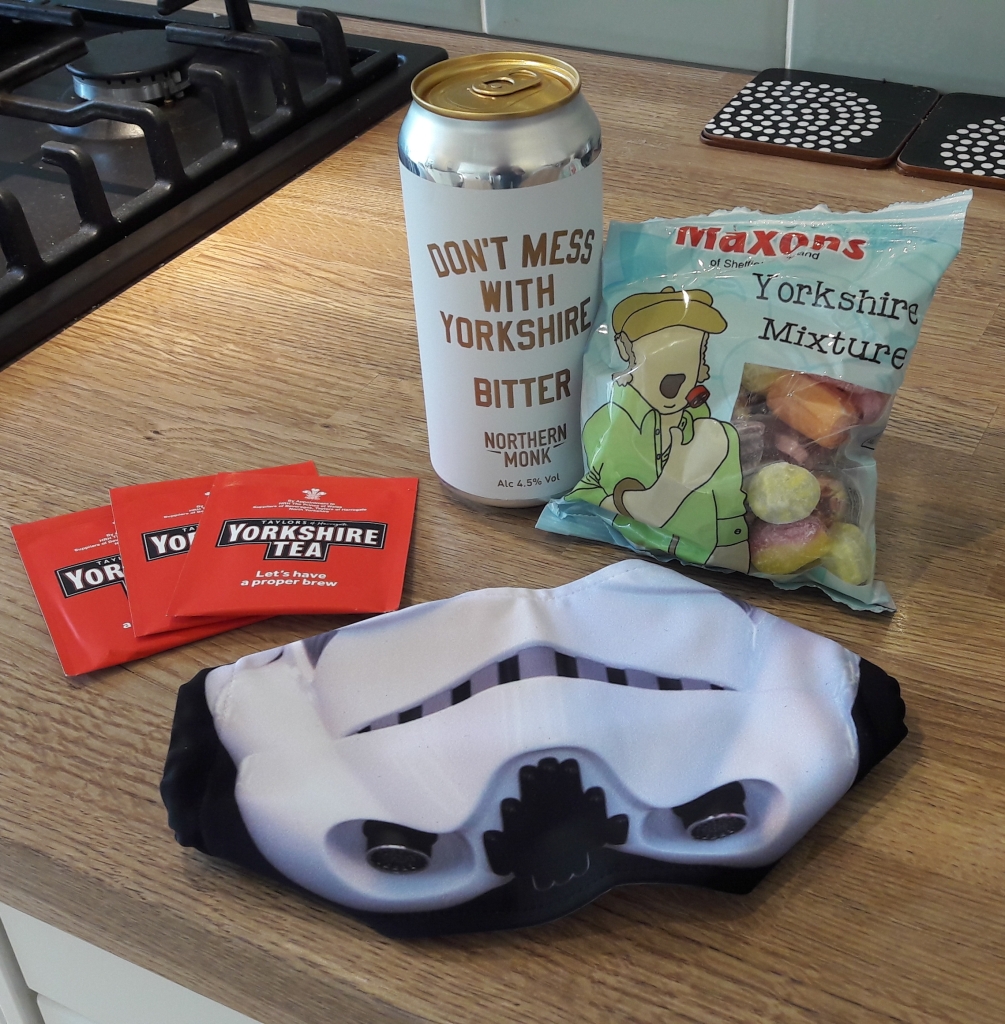
Gifts From a Foreign Land
One of the things that I’ve always enjoyed when other players go off to tournaments abroad, is the tradition of bringing gifts to hand out to your opponent – a sort of cultural exchange.
Alongside the usual custom dice, I’ve decided to share some of the fine produce of Yorkshire. Or at least, things that I can fit in my suitcase that has Yorkshire written on in!
I’m very tempted to whip up a batch of Yorkshire puddings in my AirBnB the morning of the tourament.
One part of tournament prep that has changed since my last event, is having to decide what facemask to bring. Masks are required throughout the event, along with a few other restrictions like not standing around tables etc. I have to give a big shoutout to Wolfgang the TO, who has done an excellent job of keeping us all up to date with the most recent situation and requiremts regarding COVID.
Masks are uncomfortable and I don’t like wearing them, but they’re a very small price to pay if it means we can safely meet up to play games again.
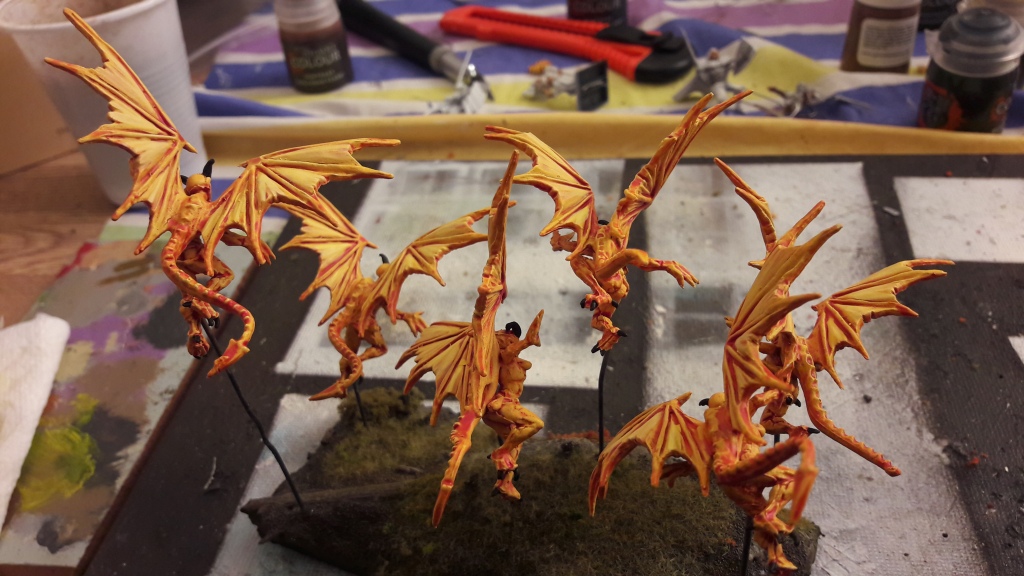
The Army
I’m not much of a painter and even by my standards this isn’t my best work, but seeing as I painted all of the models below in under a week, I’m pretty happy with the results.
This is my first 100% Mantic army and I have to say I’ve been constantly surprised by how good their models look when you get them in your hands. The Elf range was the biggest surprise as I’ve always been put off by the photography on the Mantic website in the past.
I’ve got a warm up game this Thursday where I’ll be using the army (and the list) for the very first time so I’ll grab some photos of the completed army then.
And then it’s off to the airport Friday morning – I genuinely can’t wait.
It’s been quite a while since I last posted anything on here. In between an international global pandemic and much more mundane real life stuff, I haven’t had as much time to sit down and write out a blog post for a couple of months now.
But in 10 days time I’m going to be setting off to an actual real life Kings of War tournament. And not just any old tournament, this is going to be my first trip abroad for Kings of War (or any wargame for that matter) – I’m going to Cologne, Germany.
The Kings of War scene in Germany has been slowly growing pace over the past few years with several one day tournaments taking place across the country. The Kings of War Germany GT, run by The Privateer Poza Boyz wargaming club is going to be the country’s first two day GT style tournament which is a massive milestone in growing the game.
As this is my first tournament since the start of lockdown and my first international tournament, I’ve decided to keep a of record of the build up and the event itself here on my blog.
In this first post I’m going to go over how I came up with my list, including a bit of a breakdown of each unit I’ve taken.
Then in future posts I’ll show you updates on my painting (I’ve currently painted 2/19 units…), some of the ‘cultural exchange’ gifts I’m putting together to take with me and finally photos and reports from the tournament itself.
My List
I always knew that I wanted to paint a brand new army to this event because weekend GTs have always been my main motivator to get painting – sadly that motivation hasn’t really kicked in this time so now its more going to be a panicked rush to the finish to get them all done.
I started thinking about what army this would be months ago and decided that this would be the perfect opportunity to take the Twilight Kin off Universal Battle and proxy bases and into a real physical army.
The list I’ve gone with is the current iteration of my constantly evolving Twilight Kin. You can see some similarities to my first few Twilight Kin lists but I’ve actually moved the bulk of it around.
The biggest change for this tournament is the inclusion of the Shadow Hounds. To fit them in I’ve had to drop a troop of Gargoyles and the Bolt Thrower – the Bolt Thrower was an easy decision in the end, the Gargoyles I may live to regret.
The list isn’t designed to be uber competitive and there are definitely a few unit choices that are in there more because I think they’re cool rather than being the ‘best’ choice. But its a good solid all round mixed arms list that I have a lot of fun using and showcases Kings of War at its best in my opinion.
Bolt Throwers(that have now been dropped) I still believe in Bolt Throwers, I think they’re incredibly reliable damage dealers that can be fairly well trusted to do a couple of points of damage every turn. They’re best suited to either picking off chaff or piling in with other shooting to tip nerve checks over the edge.
But there were a few things that held them back in my list.
The two Tallspear hordes mean that I have two very wide foot prints blocking the Bolt Thrower’s line of sight. As most chaff is height 2 (Gargoyles, Gur Panthers, Snow Foxes etc) this meant that the Bolt Throwers couldn’t effectively do their chaff clearing role without me having to position my entire army in a way to give them clear shots.
The Bolt Thrower also couldn’t do its second role of adding on to other shooting, because I haven’t really got that much shooting in this list. At least not above 6-12″.
I haven’t fallen out of love with Bolt Throwers and I’m sure I’ll add them back in future Twilight Kin lists, but for now they’re out.
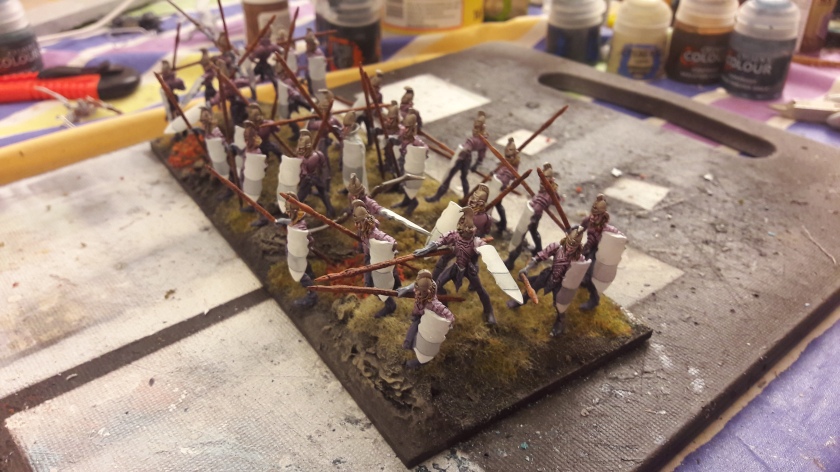
Kindred Tallspears & Army Standard Bearer w. Lute Who needs Palace Guard hordes when you can have Tallspear hordes with Brew of Strength?!
I love these two units they’re absolute work horses in the list acting as both hammer and anvils. Thanks to phalanx and high nerve they can absorb a charge from pretty much anything (so long as they’re not too badly multicharged) and backed up with Bane Chant and Drain Life, there isn’t much in the game that they can’t kill in one go.
Combine that with Speed 6 and between them they can threaten a huge area of the board at a time. I’ve bundled them together with the Army Standard Bearer with the Lute because they’re pretty much always going to be together – Bane Chant tips these hordes over the edge in terms of killing power.
These two units form the battle line that the rest of my army plays around, so they’re probably my most important units in terms of deployment.
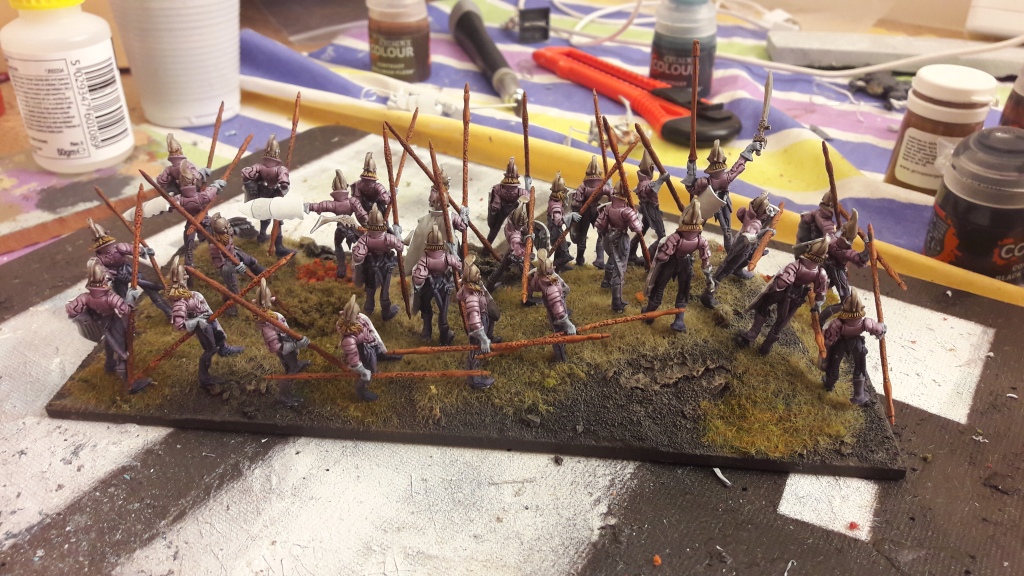
Abyssal Horsemen Two regiments of Abyssal Horsemen are the only thing that has stayed completely consistent in every Twilight Kin list I’ve used, I love these units that much.
The two Horsemen regiments are the main mobile punch in my list. They can’t take a charge anywhere like as well as the Tallspears, and at 14/16 they’re surprisingly vulnerable to shooting. But when they get an unhindered charge off they hit like a train. Yet again when stacked with either Drain Life, Bane Chant or the Soul Bane these units can one shot pretty much any threat – notice a pattern emerging?
I’ve gone for the Brew of Sharpness and Blessing of the Gods on mine, rather than the usual Pathfinder/ Strider you see on a lot of cavalry options. The reason for this is that I like to get the maximum efficiency out of my items, especially when using Twilight Kin because they’re usually so out numbered. Sharpness/ Elite do something for you every single combat you’re in whether you’re hindered, counter charging or charging ‘cleanly’. Pathfinder/ Strider are both excellent rules but you’re paying points for something that only works some of the time – I prefer to take something that works all of the time.
I tend to run one regiment alongside the Tallspear hordes and one out on the flank with the Soulbane. I’ve had quite a few games where a regiment of Horsemen and the Soulbane have managed to hold a whole flank down on their own the entire game – even if not they tend to take a lot of stuff down with them.
Soulbane A slightly more paired down Soulbane than I’m used to because I didn’t have any points left for the bells and whistles. But even without any artefacts or upgrades he’s still one of the best mounted individuals in the game.
He’s just an all round solid and reliable combat character. The best part about him is definitely his Dread special rule, letting him contributes to multiple combats at once. Like lots of stuff in this army, he’s all about being as efficient as possible.
Twilight Assassin I love the Assassin, I think it might be more heart than head, but I love them.
Fitting with the theme of being an incredibly point efficient unit the Assassin has the very real possibility of doing a consistent 2-3 damage for 7 turns of the game. That’s if I can learn to use them properly and keep them out of harms way!
The turn 1, 14″ Scout charge is very tempting but it is usually the wrong tactical decision…
Summoner Crone I absolutely love Summoner Crones. In terms of game play and fluff wise they’re one of my all time favourite units in Kings of War.
In previous lists I’ve had as many as three fully tooled up Crones, but I’ve paired that back considerably here, simply because I’ve reduced the amount of Cronebound units in my army.
The value of the Summoner Crones is directly proportional to the amount of Cronebound units you’re taking and when I was running three Summoner Crones, I also had two Cronebound Butcher hordes and a horde of Cronebound Fiends.
I’ve talked in the past about how the Summoner Crones can cause ‘list design funnelling’ for the Twilight Kin, pushing you away from the Elf choices in the list. Who knows, maybe that’ll change in the next Clash of Kings book…
This time round I’ve gone for one Crone with the Sceptre of Shadows (for Drain Life (9)) and the Boots of Levitation. I always find it a fairly 50/50 toss up between the Boots or the Wings of Honeymaze on the Summoner Crone. I went for the Boots this time because the extra 2″ range and +1 Defence is nice, and I already have a decent amount of Inspiring in the list so I’m less likely to need to be flying 20″ in order to Inspire an at risk unit
Cronebound Shadowhound These are a brand new unit for me so I’m not sure how they’ll work. On paper I really like the look of them.
I added them into my list to try and solve a problem. All of my units are very very killy but also very expensive – this means that I’m constantly outnumbered and have to use expensive units to kill cheap ones. The Shadow Hounds are there to go chasing after the stuff that isn’t worth the Horsemen’s time but is too important to ignore. I’m thinking of things like a Zombie regiment sat at the back of the board on an objective, or a troop of archers that are plinking wounds off here and there. Add in to that the potential for a cheeky 18″ nimble flank charge and the fact that they’re unit strength 3 – I think these may be a really helpful addition to my list.
Gargoyles Probably still the best chaff in the game – what else can I say about them that hasn’t already been said.
I’m going to regret dropping down to one troop, I know I am, but I really wanted another combat unit in the list and the Gargoyles were the only ‘spare’ points I had without totally compromising the list elsewhere.
But I know there’s going to be a moment in the tournament where I’ll kick myself for not having two troops…
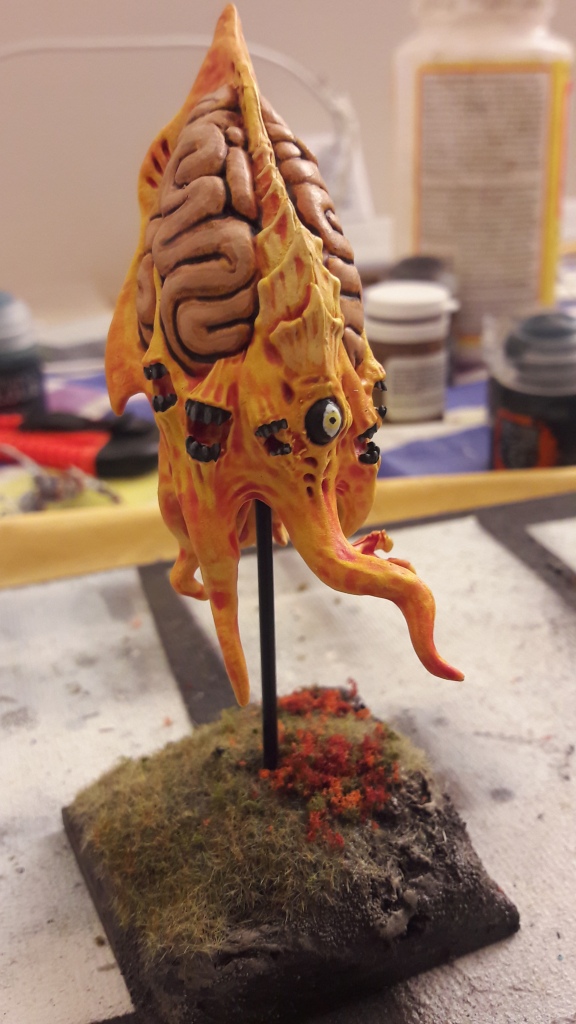
Cronebound Mindscreech I’ve included one Mindscreech in the list to act as a chaff/individual hunter – one Lighting Bolt (6) isn’t going to do anything to a regiment/ horde but is just enough to pick off some key targets.
The biggest strength of the Mind-screech isn’t actually its Lightning Bolt, its the flying unit strength. The Mindscreech is able to fire pot shots all game and then fly out at the end and claim an objective – yet again very efficient unit that is adding value every single turn.
So that’s the list. Hopefully I’ll be back in a few days time with a painting update – wish me luck!
The penultimate round of Call to Arms has just wrapped up with another 70 games taking place this round – that brings us up to a whopping 357 games played so far.
We haven’t quite hit the 1,000,000th kill point yet, but we’re close! The spreadsheet keeps a record of when each result is added so I’ll be able to give a special mention to the players who scores the 1,000,000th point.
After the end of Round 6 I’m going to be using the stats to hand out some extra awards (no prizes except bragging rights!). So far the awards I’m going to hand out are;
Bloodiest General (highest kill percentage)
Pacifist (lowest kill percentage)
Best in Race
If anyone has any ideas for other awards they’d like pulling out, let me know on the Facebook page or in the comments below.
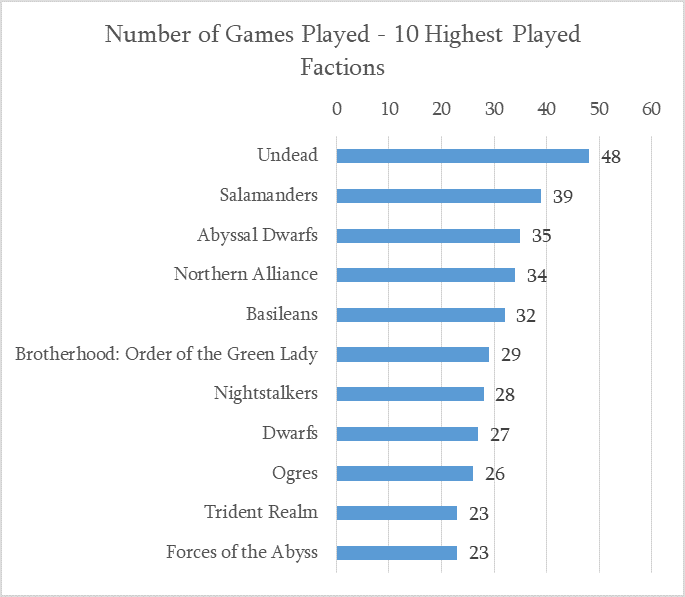
Tournament Stats
The scenario this round was Invade.
This was the first round where not every race was played. The poor Free Dwarfs have clearly fallen out of favour following their glorious two victories last round.
Undead had their most popular round in round 5 – clearly as we get to the end of the tournament people are wanting to play on easy mode!
Order of the Brothermark have seen a small surge in popularity, but still remain at the bottom of the list.
I was a little concerned that Invade might be another scenario where we saw lots of bonus points being scored (like last round), but this doesn’t seem to have been the case.
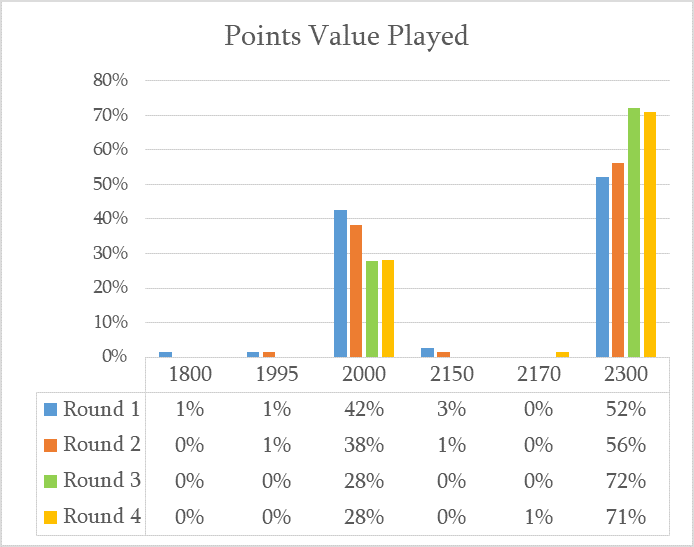
There also doesn’t seem to be any significant correlation between higher bonus points scored in games played at 2300 points as opposed to 2000. The Northern Kings scoring system was developed in a tournament scene that uses predominately 2000 points and I was a little worried that more units on the board would equal more points scored. But either the additional 300 points doesn’t buy enough units to shift things much or both sides having the additional points cancels each other out in the end.
2300 continued to be the overwhelming favourite points level. We’re very aware that this will partly be due to the fact that its easier to score higher points for kills at 2300 due to the way that the scoring system scales.
It’ll be interesting to see if this preference for 2300 holds in future Call to Arms once we’ve fixed the scaling problem.
The percentage of games ending in a Draw this round held at well below 10%, showing that the spike in round 3 was almost definitely due to the Kill scenario and not a balancing of player skills from Swiss ranking.
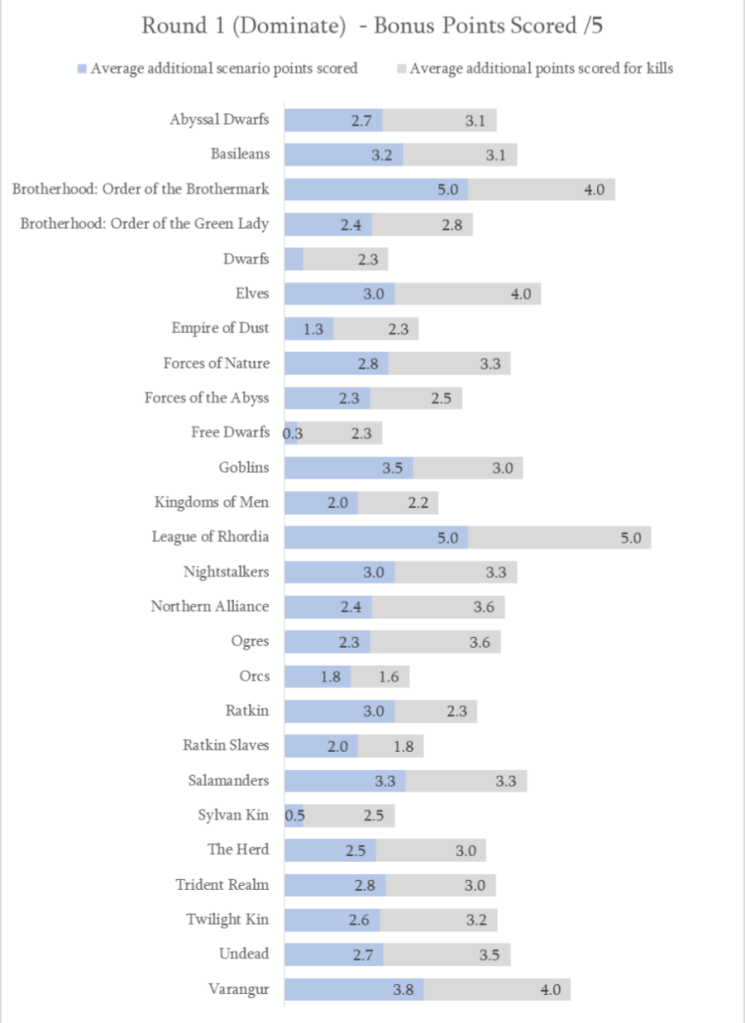
Round 1 – Dominate – Draw percentage – 3%
Round 2 – Pillage – Draw percentage – 8%
Round 3 – Kill – Draw percentage – 21%
Round 4 – Push – Draw percentage – 3%
Round 5 – Invade – Draw percentage – 7%
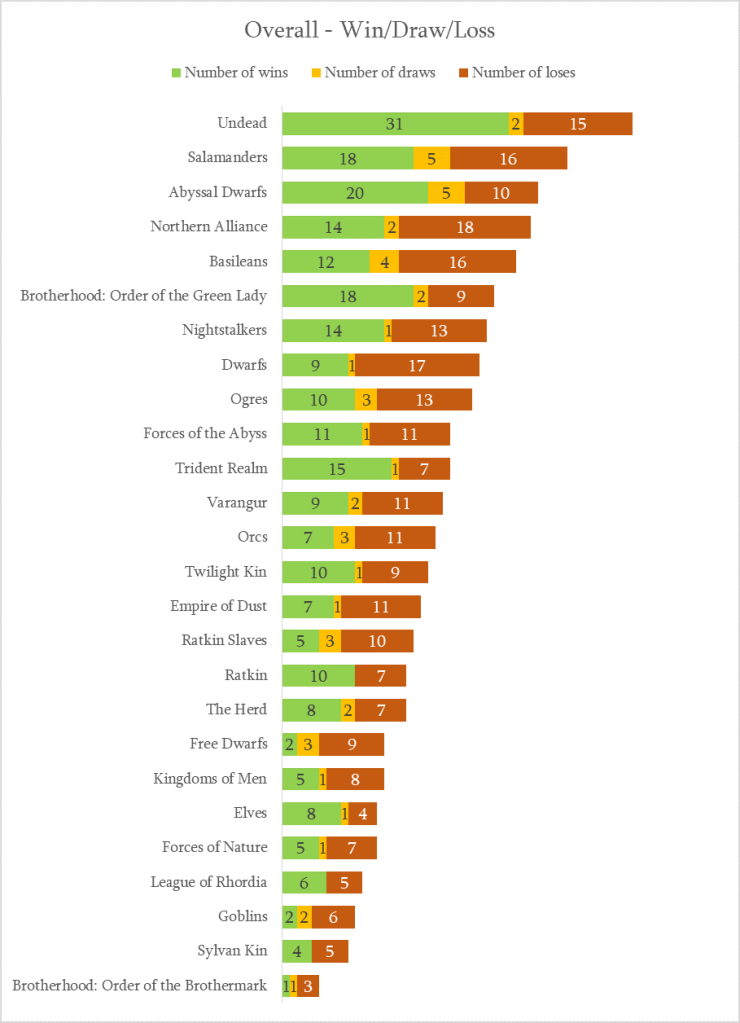
Army Stats
So in case you missed it Undead had 3 wins, 2 draws and 10 losses in Round 5! Come on people you’re playing with Undead, its supposed to be an easy win!
I wonder if this is a result of the big spike in the number of players choosing to use Undead this round. It stands to reason that some players will be less familiar with the list and will be coming up against players who are more experienced with the lists they’re using.
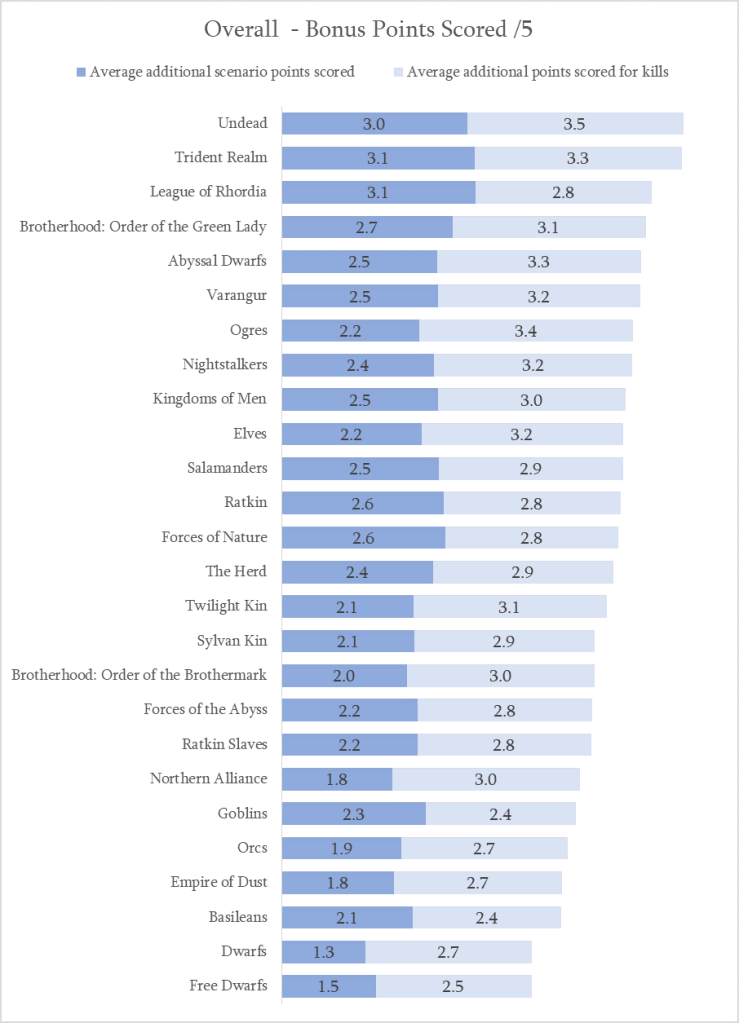
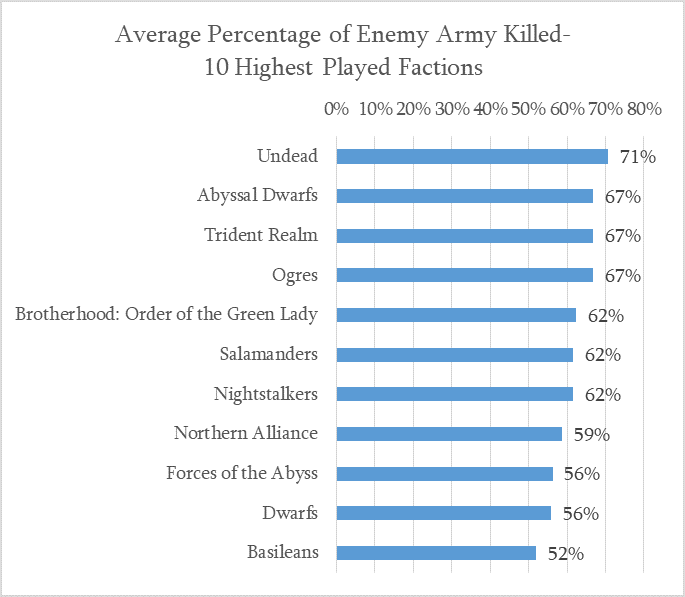
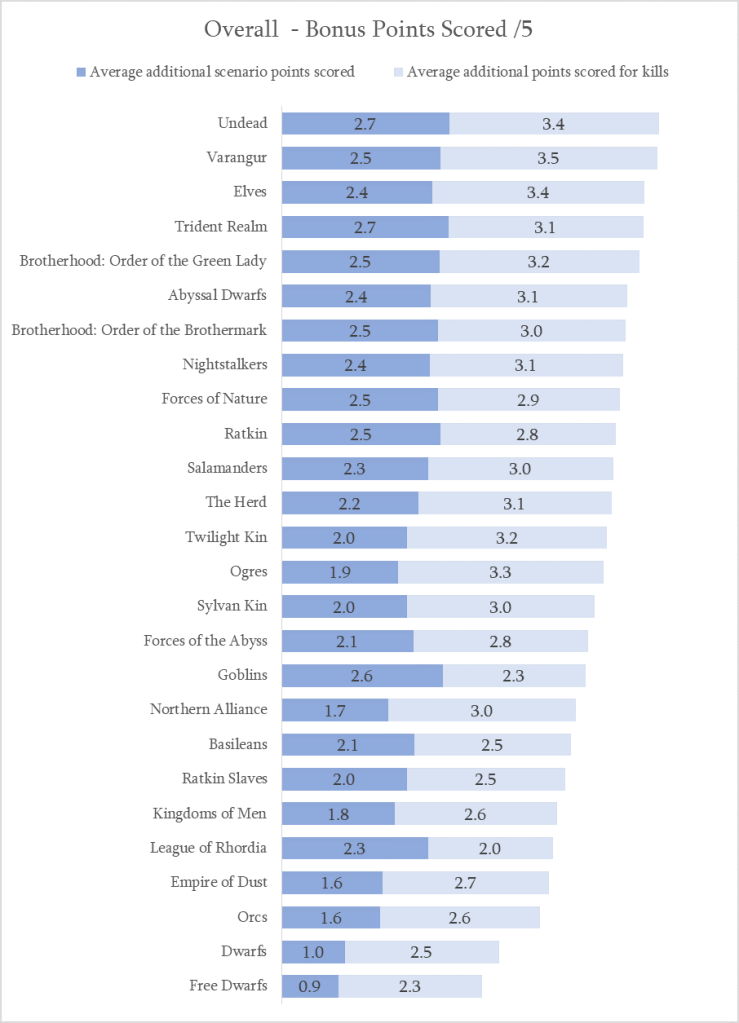
Following their poor showing this round, Undead have slipped to second in the average number of bonus points scored, taken over by Trident Realms.
And Undead almost lost their top spot in percentage killed after just regaining it last round. Undead are now just 0.4% ahead of Varangur in the fight for the killiest faction.
As usual, I’ve pulled out the same stats as above showing only the Top 10 most played armies. These are the armies with enough results to prevent the averages being skewed too much by a single player.
Trident Realms have retained their 1st place for win percentage, whilst Undead have slid down to 3rd. Abyssal Dwarfs have moved up from 4th to 2nd.
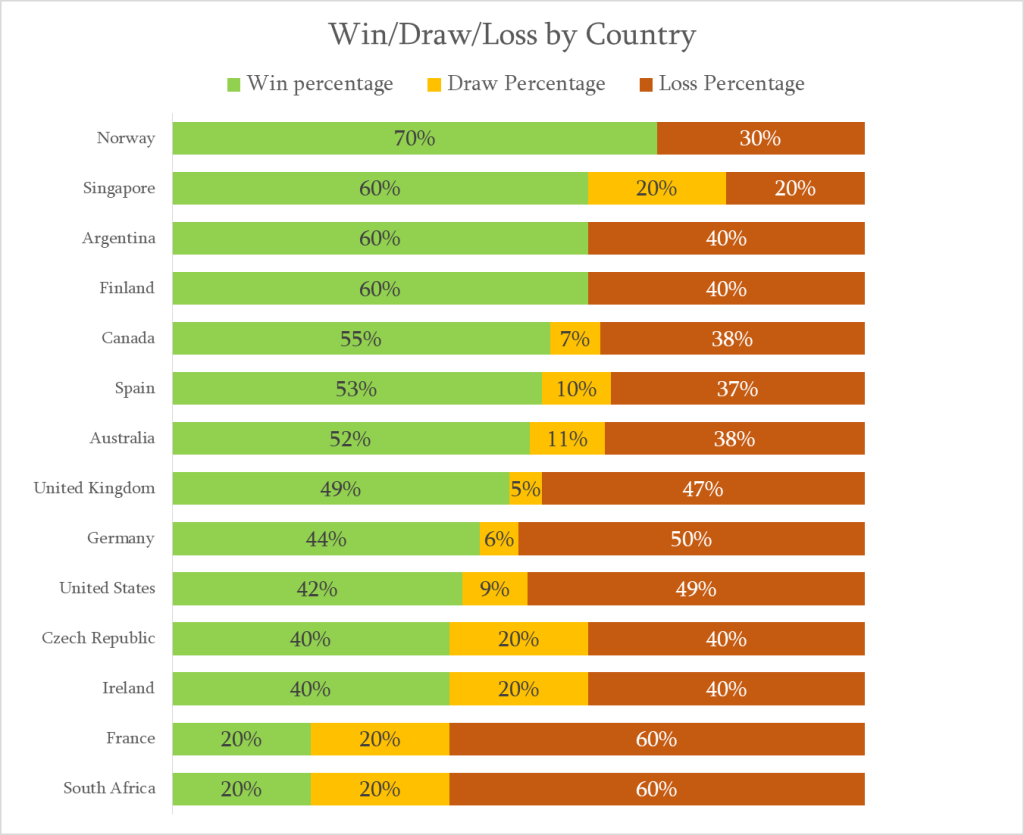
Country Stats
Canada have retained their top spot but Spain have closed the gap. There was seven percentage points between them at the end of Round 4, this has now closed to just two – with Australia just one percentage point behind Spain!
Its going to be an incredibly close finale going into Round 6 and either Canada, Spain or Australia could still emerge as the victorious country.
The UK and the US… probably won’t.
Seeing as we apparently can’t beat the rest of the world, I’m now choosing the focus on the UK vs US grudge match! The UK has managed to slightly extend their lead over the US and now has a five game advantage. Can we hold on to it during Round 6 or will the dastardly ungrateful colonials scoop victory at the last moment?!
UK 39 – 34 USA
Elliot’s Beer Fund
If you've enjoyed the blog and you're feeling generous, you can buy me a pint. Please dont feel any obligation to do so, I've started this blog because it's fun, not to make any money. Any money received will go towards hosting costs. Or my beer fund... ok mainly my beer fund.
As yet another round of A Call to Arms draws to a close, its time for the Round 4 stats breakdown. You can find the breakdowns for the previous rounds below.
We’re now up to a mighty 287 games of Kings of War – across all those games 767,800 points worth of units have been killed.
If an average game on Universal Battle takes 3 hours, Call to Arms has been responsible for 861 hours of Kings of War gameplay, that’s almost 39 days!
Tournament Stats
The scenario this round was Push, using a fixed number of tokens per player (2) and one in the middle of the board as usual.
69/72 games took place this round, with 3 games being decided by the TO due to hitting the round deadline.
Yet again all 26 races were played at least once. Undead have reclaimed their spot as the most popular faction this round – it seems that the mid-round Mhorgoth nerf didn’t do too much to dampen the spirits of all those Undead players.
Order of the Brothermark remain the stalwart bottom of the list. This is particularly surprising when you look at how popular their fellow Brotherhood, the Order of the Green Lady are. I don’t think this low rate of play says much about the strength of the army but for whatever reason they don’t seem to appeal to many players at the moment.
The number of players scoring the maximum 25 points was significantly higher this round. This suggests to me that it was easier to score more bonus points on this scenario – my fellow Northern Kings and I will be looking into the data on this round very carefully to decide if we need to modify how bonus points are scored for Push in future events.
2300 remained the predominant points level with 71% of players choosing to play at that level.
One game was played at 2170 (I checked it wasn’t a typo) – purely so that they could make it on to my chart!
Well there you are!
The number of games that ended in a Draw fell back down to similar levels as Rounds 1 and 2, suggesting that the high number of Draws last round was due to the Kill scenario and not a balancing out of player skill due to the Swiss matching system.
Round 1 – Dominate – Draw percentage – 3%
Round 2 – Pillage – Draw percentage – 8%
Round 3 – Kill – Draw percentage – 21%
Round 4 – Push – Draw percentage – 3%
Army Stats
Look at Free Dwarfs go – not one, but two whole wins!! They still only have a 14% win rate, but its better than 0%!
Trident Realms are threating to take the crown from Undead for the army that most consistently score bonus points – Trident Realms are currently 11th in terms of games played but have taken the lead in terms of overall win percentage (see below!).
Both variety of Dwarfs are very much languishing in last place, despite the Free Dwarf’s two glorious wins (I’m not bias, honest). The Dwarfs average points for kills isn’t much lower than the rest of the field, but its their scenario points that are really letting them down. I wonder if their lack of manoeuvrability is preventing them from being able to grab objectives late game and score those few extra bonus points (even in defeat) like other armies can.
Undead have regained the title of ‘most killy’ from Varangur. For the third round running, Goblins remain the most pacifist army out there managing to kill only 51% of the opponents army on average – this is 20% less than the average Undead game.
I’ve pulled out some more detailed stats for the top 10* most played armies. These are the armies with enough results to prevent the averages being skewed too much by a single player.
*I’m actually comparing the top 11, because two armies were tied for 10th place
Trident Realms have toppled Undead for the first time in the tournament, taking the place as the faction with the highest win percentage – can they hold on to it during the last two rounds?
Country Stats
Look at Canada go! Spain has struggled a little this round, winning just one of their games – this opened the door for Canada to jump into the top spot.
In the UK vs US grudge match, the UK has managed to eek out a marginal lead taking it to:
If you've enjoyed the blog and you're feeling generous, you can buy me a pint. Please dont feel any obligation to do so, I've started this blog because it's fun, not to make any money. Any money received will go towards hosting costs. Or my beer fund... ok mainly my beer fund.
I’m back with another Kings of War battle report. This time its my round 1 game of the Kings of Herts online Universal Battle tournament. This is a four round tournament at 1995 points.
I decided to bring Twilight Kin as I’ve been having a lot of fun using them lately and I’ve just taken the plunge and ordered a load of models for them. They’re going to be my first 100% Mantic army!
My opponent was Minor Internet Celebrity and Benevolent Overlord of the Kings of War Fanatics, Jonathan Faulkes. For those of you that don’t know Jon (shame on you!) he’s been around in Kings of War since the very beginning.
Jon brought his Varangur with a couple of allied Nightstalker Butcher regiments for ‘thicc chaff’ – he’s clearly been taking notes whilst doing the commentary on Dash28.
The scenario for this round was a slightly modified version of Raze, where the tokens on either board side were woth 2VPs and the one in the centre is still only worth 1VP.
Jon livestreamed the game on the Four Foot Snake YouTube channel. I’ve linked the video below and if you have the time I really recommend you give it a watch. Seeing as there is a video record of the game, I’ve gone into less detail in this battle report than I normally would – instead I’ve focused more on why I made the moves I did.
The Twilight Kin
The Varangur
The Battlefield
For this tournament, every game in the round uses the same battlefield map that has been designed specially by the TO. I really like this idea as it lets the TO be a little more inventive with terrain whilst making sure that it is balanced for the scenario.
Its a concept that we’ve discussed introducing at a Northern Kings event, but Universal Battle lends itself to the idea very well.
Because of how objective markers are deployed in Raze, you’re always going to have at least one objective on both halves of the board (left to right). What I really liked about this map was the double forest in the middle of the board as it pretty effectively splits the table into two corridors of play – I’ve labelled them Zone A and Zone B. I knew that there was going to be two tokens in one zone and one in the other. I needed to make sure that my two tokens weren’t in the same Zone as Jon’s two tokens.
Jon has a fairly small elite army, so my hope was to engage the majority of it in one Zone and use my numerical advantage to capture the objectives in the other Zone relatively unopposed. The hope was that the double forests would keep units from being easily able to cross between Zones.
Deployment
I placed my two objectives in the opposite Zone to where Jon placed his. This allowed me to take advance of the higher number of units I had over Jon.
I was nervous going in to this game, Jon had four hammer units each of which could one-shot every single unit in my army. I knew that the game wouldn’t be decided in a grind (which is where my Butchers, Horseman and Drain Life usually excel), it was going to be decided in head on charges and exchanging units in one round of combat.
As Jon started to deploy his army, I came up with a plan. It became clear early on that he was planning on dedicating the majority of his forces on the right of the board (Zone B) opposite two of his objectives. I therefore did the same, deploying most of my army in Zone B facing off against him- however I made sure to hold back enough units to guarantee that I could quickly grab the two tokens on the left in Zone A.
The plan was fairly simple;
Zone A, capture my two tokens on the left as fast as possible. Even if he moved his units up to contest, the Impalers had more unit strength (US) than the Draugr and the Fiends and Gargoyles together had more US than the Fallen.
Zone B, I planned to throw my entire army at him one unit at a time to delay him as long as possible to make sure that he wouldn’t have enough time to cross into Zone A and grab the 3rd token in the top left corner. I also planned to hold the Gargoyles back in reserve and if he ever left his bottom right token undefended, they were going to swoop in and take it.
Don’t forget that in this modified version of Raze, the tokens on the 6″ line are worth 2 points and the one n the middle is worth 1. So if I could capture all of the tokens on Jon’s side and defend just one of mine, I could still win the game without worrying about taking the middle token.
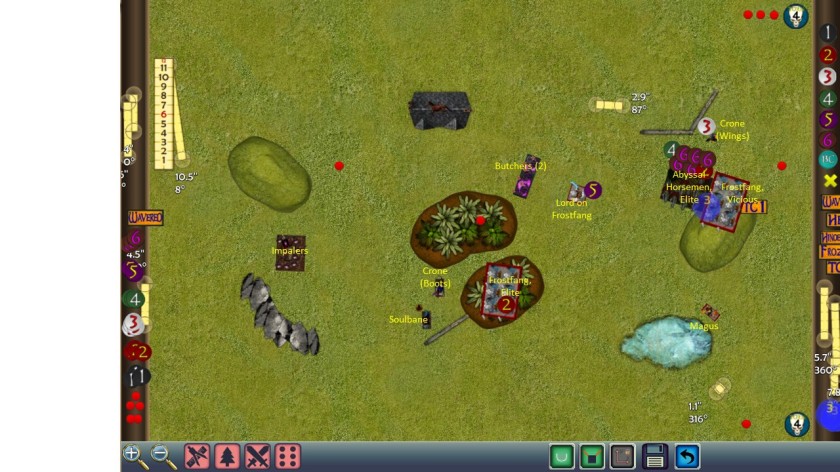
Top of Turn 1
Jon won the roll for first turn and opted to pass it to me.
On the left I moved up as far as possible whilst staying out of 16″ range of the Fallen.
On the right I was more cautious, moving up slowly. I placed the Abyssal Horsemen in 20″ range of Magnilde.
This was a risk because if she charged, she would pin the Horsemen in place and allow them to be charged (and most likely killed) by the Mounted Sons next turn. But I was nervous about how I was going to deal with Mags – I had no plan for taking her out and left unattended she could be a real issue for my plan to hold the Gargoyles in reserve to grab the objective late game.
So I left the Horsemen there as bait – 265 point Horsemen bait to protect Gargoyles! I was fairly confident that between the Horsemen and Drain Life I could kill Mags in one turn on the counter charge, so at least they’ll get some of their points back.
Bottom of Turn 1
Mags took the charge on the Horsemen, doing a couple of points of damage but more importantly blocking them in place for the Mounted Sons to come finish off next turn.
The Magus’ Lightning Bolt did a couple of points of damage to Butcher horde (2).
Top of Turn 2
Jon had left his bottom right token unprotected – the Gargoyles we’re going to have that! On the left, the Impalers moved forward to capture the far left objective.
I charged both Butcher hordes into once of his thicc chaff regiments, which in hindsight was a mistake. I made this charge so that I could hold him up in the corner as long as possible – I would have been better to charge one horde in and held the second back for a further turn of delaying.
The Abyssal Horsemen killed Magnilde on the counter charge (woo!) but the Horsemen’s sacrifice was no longer needed because the Gargoyles had been able to grab the token much sooner than expected.
The Gargoyles on the left charged the Fallen and the Fiends moved up behind them. I put the Fiends in a position so that the Fallen couldn’t corkscrew charge the Fiends without being hindered over the wall.
Abyssal Horsemen w. Elite damage count: 1
End of turn score: Elliot 4 – 0 Jon
Bottom of Turn 2
The turn of pain!
Boom, boom and boom! Both Butcher hordes, both Gargoyles and the Abyssal Horsemen with Brew of Sharpness were routed – just a mere 825 points gone!
This highlighted my mistake with the Butcher hordes, I needn’t have lost both hordes and could have had a spare horde ready to keep the Frostfangs stuck in the corner.
The Draugr charged the Impalers and did a couple of points of damage, but they held.
Abyssal Horsemen w. Elite damage count: 1
End of turn score: Elliot 4 – 0 Jon
Top of Turn 3
The Abyssal Horsemen with Elite had their choice of charge targets and seeing as everything in front of them was ‘only’ 15/17 they had a fairly good shout of killing any of them in one go.
I decided to stick with the plan – I charged the Mounted Sons so that anything that came after them would be drawn as far away as possible from the top left objective. Thanks to Drain Life the Horsemen killed the Mounted Sons in one and turned to face their inevitable doom.
The Fiends charged the Fallen and between Dread and Drain Life they almost managed to waver them but fell one short.
The Impalers killed the Draugr and turned to face the last objective.
End of turn score: Elliot 4 – 0 Jon
Bottom of Turn 3
The Fallen killed the Fiends in one- it wasn’t unexpected but still a shame. I knew from the very beginning that I couldn’t expect to survive a single round of combat against any of Jon’s units, but in practice it was really hurting.
The Magus wavered the flying Crone with a Lighting Bolt, taking her Drain Life out of the game for a turn.
Other than that nothing much of note happened this turn…
Other than the Horseman taking 18 damage from the Frostfangs and rolling double 1s! While this was a pain for Jon, it wasn’t the end of the world. He’d blow through them next turn and be in a position to capture the top right token after the reform, so it shouldn’t impact him too much.
Abyssal Horsemen w. Elite damage count: 19
End of turn score: Elliot 4 – 0 Jon
Top of Turn 4
The Soulbane charged the Fallen and in combination with Drain Life finished them off. The Impalers moved forward and captured my remaining objective.
The Abyssal Horsemen regiment, flush from their miraculous survival counter charged the Lord on Frostfang. I picked the Lord simply because it was the choice that put me the most in the way to block both units from easily walking on to the top right objective.
End of turn score: Elliot 6 – 0 Jon
Bottom of Turn 4
Jon finally started to move the Butcher (2) and the Lord on Frostfang towards the centre of the board, ready to cross into Zone A and the top left objective that the entire game would swing on – en route they captured the middle objective.
The Frostfang horde with Elite moved into the trees. They were going to make my life much more difficult as it meant Jon has three units that could threaten the top left objective and I only had two units left that could easily block them – the Impalers and the Soulbane (who is Mighty).
Out on the right the Frostfang horde flanked the Horsemen, doing another 22 damage to them! Now all he had to do was not roll another double 1….
You can guess what happened next – poor Jon.
This double 1 was a much bigger deal. It not only opened up a rear charge on his other units, it meant that the Frostfang horde with Vicious would need another turn to grab the top right objective, effectively taking them out of the game.
Abyssal Horsemen w. Elite damage count: 41
End of turn score: Elliot 6 – 2 Jon
Top of Turn 5
The Abyssal Horsemen (who had absolutely no business being alive at this point) rear charged the Frontfang horde in the woods, along with the Soulbane in the front. Despite being hindered and devastated they managed to break them in one.
The flying Crone put a couple more damage on the Lord on Frostfang – I was in a decent place to finish him off in Turn 6 if both Crones focused their Drain Life on him.
The Impalers moved up to defend the top left token.
End of turn score: Elliot 6 – 2 Jon
Bottom of Turn 5
Jon pushed the Lord on Frostfang forward as far as possible making a last push for the top left token. The Frostfang horde with Vicious side stepped into range of the top right objective.
The Magus fired his Lightning Bolt 7 at the HEAVILY damaged Abyssal Horsemen unit… and did zero damage to them!
End of turn score: Elliot 6 – 4 Jon
Top of Turn 6
This turned added a bit of insult to injury. The Soulbane moved up to put himself in range of the Lord on Frostfang with his Dread – thanks to Dread the Drain Life managed to break the Lord.
The flying Crone put four damage on the Magus and wavered him as well – it looked like the Horsemen were going to live!
To really cement just how invulnerable the Horseman were, between two turns of regeneration and Drain Life heal they ended the turn on 9 damage – that’s 32 damaged recovered!
All I had to do now was survive a Butcher regiment charge and the game was mine.
End of turn score: Elliot 6 – 4 Jon
Bottom of Turn 6
The Butcher regiment charged the Impalers but for the first time in their history, the Impalers held.
And that was the game!
End of game score: Elliot 7 – 4 Jon
After Game Thoughts
So I think this game can be quite nicely summed up in one convenient meme that I made just for this occasion…
I’m not going to be self deprecating and say that I would have definitely lost if it wasn’t for the double 1’s, but they really REALLY helped.
Looking back through the game whilst writing this battle report, I think that if Jon hadn’t rolled two double 1’s I might have had a chance of winning on turn 6, but I would definitely have lost if the game went to turn 7. It would have entirely depended on how well I could block his units getting into Zone A with the few units I had left – either way it would have been much closer than it ended up being.
For the most part I stuck to the plan – I took all the objectives in Zone A and managed to delay Jon’s army in Zone B. I made a big mistake by sending both Butcher hordes in early and that should have cost me much more than it did – as it was, the double 1s gave me back the turns of delay I’d lost through my mistake with the Butchers.
All in all it was an excellent game and if you watch the live stream you’ll see that we’re both laughing all the way through it, exactly how a good game should go. Jon is a brilliant opponent and was a pleasure to play against – if you haven’t already I strongly recommend you watch the FFS live stream of the game and check out Jon’s other live streams.
Keep an eye out for more Twilight Kin battle reports coming soon as I play the next round of the Kings of Herts tournament. Or check out my other Twilight Kin articles below-
If you've enjoyed the blog and you're feeling generous, you can buy me a pint. Please dont feel any obligation to do so, I've started this blog because it's fun, not to make any money. Any money received will go towards hosting costs. Or my beer fund... ok mainly my beer fund.
The stats below now represents 218 games played which is more than most two day tournaments manage over 6 rounds, and we’re only on round 3!
Tournament Stats
The scenario this round was Kill – this turned out to be a slightly controversial choice of scenario!
A big thank you for being my ‘willing’ guinea pigs for an experiment to see how a modified version of Kill worked in practice. I’m currently writing up my thoughts based on the results and player feedback and will be sharing that in the next few days.
72/73 games took place this round, with two players deciding not to carry on with the tournament and dropped out taking us to a mere 144 players.
For the third round in a row, all 26 races were played at least once.
Its a shame to see the Forces of Nature falling so much in popularity, but I can’t say that I’m too surprised. Forces of Nature where my first love in Kings of War, but they’re definitely an army that can be hard to win games with – especially in Kill.
While Undead are still storming ahead as the most popular faction overall they were not most popular faction this round. That accolade went to the Salamanders.
I’m not surprised that Salamanders have gone up in popularity as I think they’re probably the army that gained the most out of 3rd edition, but I am surprised to see them being so popular in Kill as I have never really thought of them as a ‘killy’ army.
There was a big increase in the number of games that ended in a draw this round.
15/72 games (21%) ended in a draw – compared to 3% in round 1 and 8% in round 3. It’ll be really interesting to see if this pattern continues into the next round. This will tell us if the high number of draws is down to the scenario or due to player skill becoming more evenly balanced due to the swiss rankings system.
Games played at 2300 points have definitely become the norm this round with 72% of games taking place at that point level.
Far less people scored the top points this round.
This could be due to the higher number of draws, but Tom Annis made an interesting observation on the Universal Battle Facebook page. He noticed that a lot of people have been saying that they played Kill first and ignored the secondary objectives until the end; where as he had made sure to factor them in from the start. It possible that players might have approached the scenario in the wrong way and have given up the top points as a result.
Army Stats
Due to their large showing this round, Salamanders have jumped up to the second most played army.
There definitely seems to be some stronger armies appearing, as well as armies that are struggling to keep up. I said it last time and I’ll say it again – poor Free Dwarfs.
I’ve always been a believer that player skill is the single most important factor to winning a game. As a very rough rule of thumb I would say winning is 80% player skill, 10% luck and 10% down to the army and the list you use.
Even with that in mind, there are a few armies languishing on a 20% win rate or less (Free Dwarfs are on 0/10 games!) – I feel that this has to be down to the army and not just the player.
Undead continue to top the charts in bonus points scored – with Varangur hot on their heels behind them.
There is a fairly uniform spread across all of the armies until you get to the Dwarfs and it falls off a cliff!
It seems that the few wins that Dwarfs have managed to get, have been by the skin of their teeth.
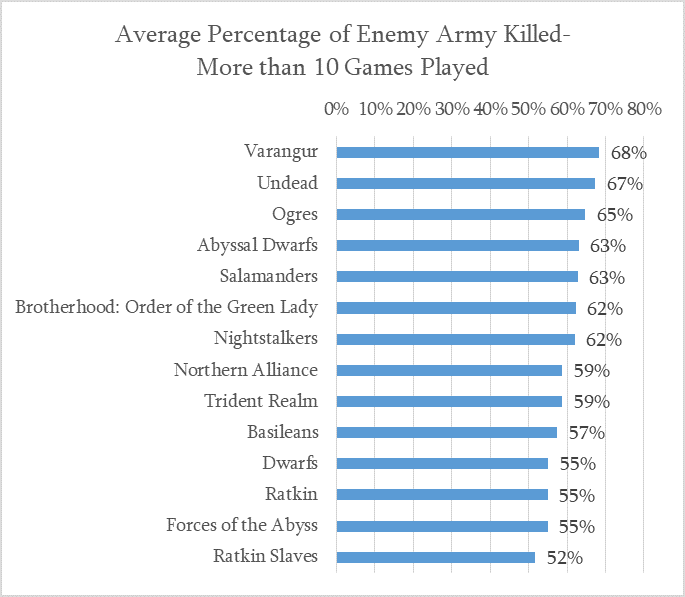
Once again Varangur are on the top spot for percentage of the enemy killed.
The most pacifist army at this point is the Goblins, they really don’t want to seem to kill anything!
To have 23 percentage points of difference between the top and bottom armies after 218 games is pretty striking.
I have always thought of Kings of War as a very balanced game (and it is) – but it seems that although all the armies are equal, some armies are more equal than others.
Like the last round, I’ve pulled out the win rates for the top 10 most played armies.
These armies have played 125 games between them, so I would consider this to be a pretty reliable indicator.
Country Stats
Ok, I know this is what you all really came here for!
As before, some of the results above represent just one or two people and while I don’t want to take away their achievements (of failures!) I’ve pulled out the five countries with the most players – the ‘Big Five’.
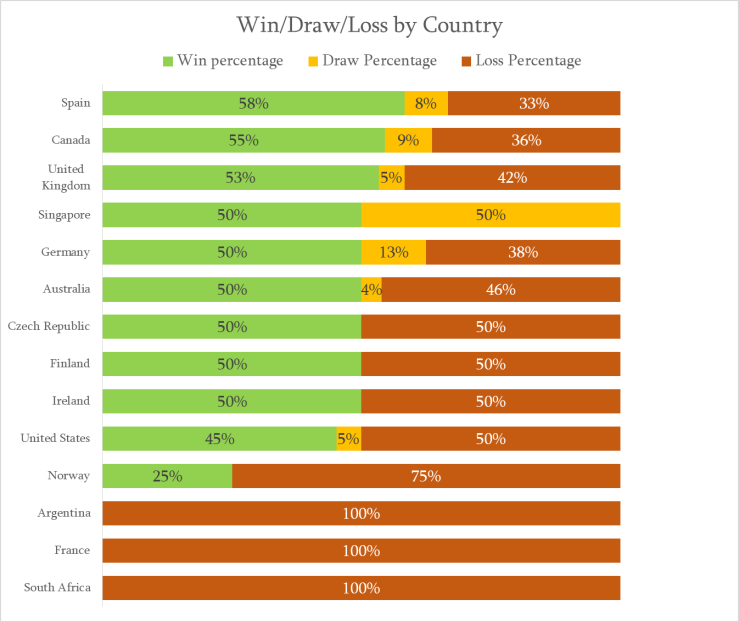
I’m not at all surprised to see Spain out on top as every time I’ve had the pleasure of playing one of the guys from Spain, its been a bloody tough game.
In the greatest conflict the United Kingdom and the United States have fought (my history isn’t good!) it is incredibly close. As we go into round 4 there is just one game in it!
United Kingdom 22 – 21 United States
And that’s all for now. Now that I’ve got a good amount of data I’m going to start pulling out some more detailed information that I’ll be sharing over the next few weeks – I’ve already had a few requests for additional information.
The scenario this round was Pillage with a set 6 objectives. Pillage is a simple scenario but one of the best in my opinion.
71/73 games took place. The results for the other two were decided by the TO Adam – he wasn’t joking when he said get your results in or he’d decide them for you!
Once again, all 26 races were represented at least once. Its becoming obvious that some factions are much more popular than others – its almost like Undead are really really good!
I’m surprised to see Goblins so far down the list, I thought people might use the opportunity to take the crazy hordes lists that you wouldn’t ever want to build in real life.
The most popular points value was again 2300 points with 56% choosing to play at that level.
We saw a big reduction in the number of people scoring the maximum points this round. I’m not sure if this is because Pillage is a harder scenario to score full points on, or if the players were more evenly matched because of the swiss ranking up system. My guess would be that its a little early in the tournament for swiss ranking to be having much effect, so the scenario is definitely having some impact.
On average, people also killed a lower percentage of their opponent’s army. I’d guess that this is because Dominate (the scenario in round 1) encourages a big brawl in the centre of the board, whereas Pillage is more spread out.
It’ll be really interesting to see if we get see less big results scored as players become more evenly matched – or if there is a clear pattern between results and the scenario played.
Army Stats
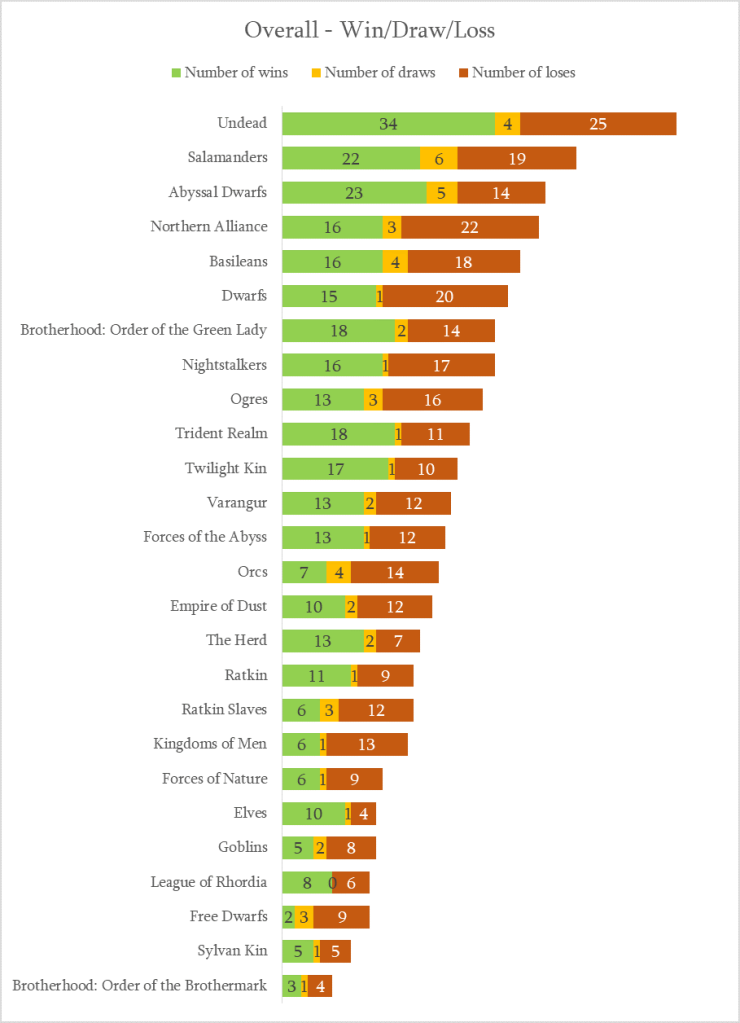
Its not a good day to be a Dwarf! Or at least, not a well behaved Dwarf. Dwarfs and Free Dwarfs have a combined total of 19 games played, but a win rate of only 21%.
At the moment, Elves are the only army with a 100% win rate – although to be fair that is only out of 5 games.
I think that the amount of armies that are on or around a 50% win rate is a really good indication of the balance within Kings of War – it does also highlights that there are a few armies that seem to need a boost.
The Elves and Brothermark lead the way with the average amount of bonus points scored, but again these results should be taken with a pinch of salt because they are based on relatively low number (only 2 in the Brothermark’s case).
The highest scoring army with a decent number of results is Undead.
I’m not surprised by this at all as I personally think Undead are the strongest Kings of War faction. It shows that their popularity is at least partially because they’re a powerful army and not just because people like the fluff or playstyle etc.
Poor Dwarfs…
While I’m very impressed with the amount of kills the handful of Elf generals have managed to achieve, once again I’d be cautious about putting too much weight on their place in the rankings – their average is out of only 5 games compared to Undead’s 25.
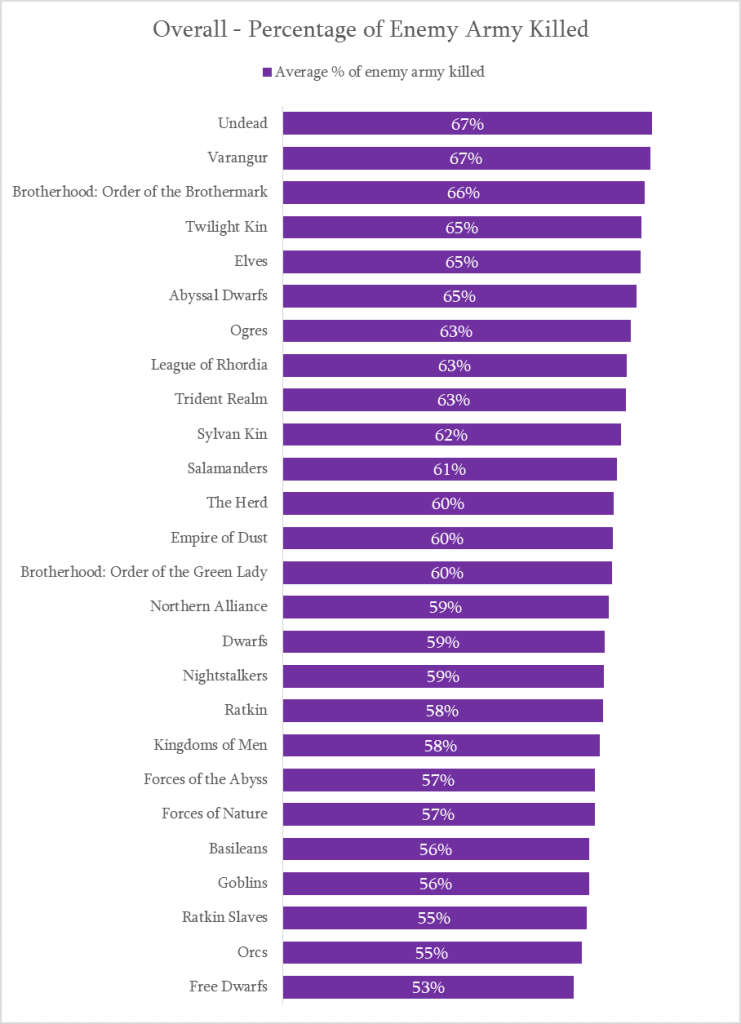
Varangur take the top spot in the ‘decent number of games played’ category. Its fitting that Varangur should have such a high average percentage of kills as they’re such an aggressive in your face army.
As a baseline to compare against, the overall average percentage of enemy’s army killed is currently 60%.
The two charts above show the win percentage and average percentage of enemy army killed for the armies that have more than 10 result. I’d consider these a more reliable measure of how the army is performing.
There’s currently a significant difference between the highest and lowest win rates and it’ll be really interesting to see if this carries on as the tournament progresses. As players are matched up more in line with their skill level, we’d expect to see all the armies evening out at around 50%, so any outliers might suggest that an army is too powerful, or could do with a boost.
Country Stats
Call to Arms 4 truly is an international tournament, with 14 different countries represented.
The United States make up just under 50% of the field with the UK second (21%) followed by Australia (9%) and Canada (8%).
Spain is currently out in front in terms of win percentage – the Spaniards have won an impressive 58% of their games so far.
Quite a few countries are represented by just one of two people, so for the sake of more even comparison I’ve split off the ‘big five’ into a separate chart – these are the countries that have more than 10 players representing them.
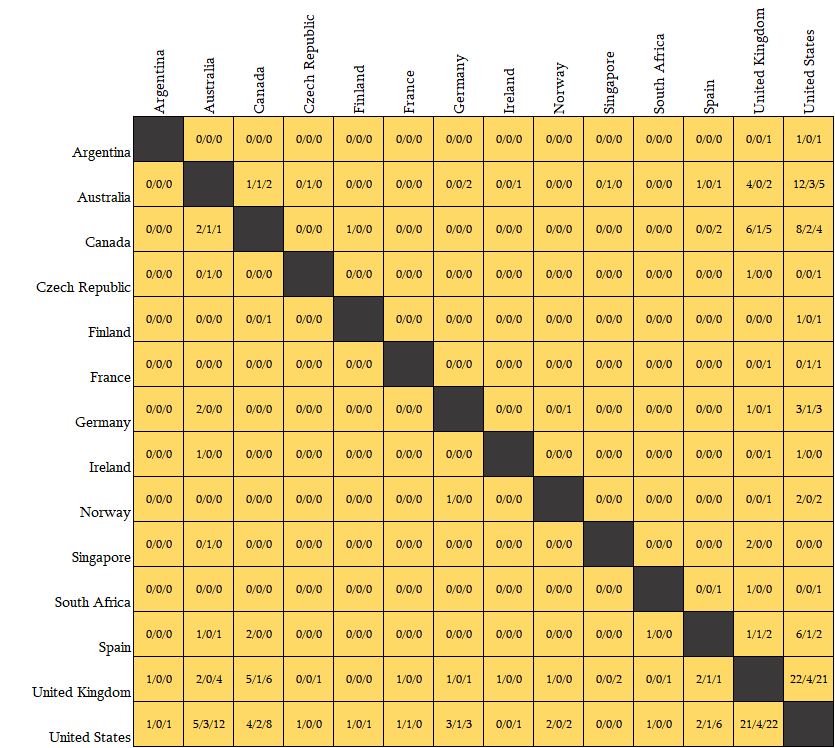
Starting in round 3, I’ll be sharing a table showing each country’s win rate is vs each other country, so in your round 3 games don’t forget that you’re representing your country!
Round 3 is going to be Kill, using the modified Northern Kings version, so it’ll be really interesting what impact that has on the stats and if the different style of scenario mixes things up a bit.
Round 1 has drawn to a close just under a week early – its almost like we all have lots of free time on our hands for some reason. 73 games took place, making A Call to Arms 4 officially the largest Kings of War event ever.
We’re seeing a fantastic variety in armies used, with all 26/26 races being represented in round 1. It’ll be really interesting to see if that variety continues into the later rounds, or if people start to gravitate towards the races that are doing better.
We’ve seen some really big wins this round, with 17 people scoring the maximum 25 points – looks like round 2 is going to be a tough fight on the top tables.
While its definitely still early days, there already seems to be some races struggling to keep up. Dwarfs (of both colours), Kingdoms of Men, Orcs and Empire of Dust need some worthy champions to step up and score some wins with them!
As the tournament progresses and I get access to more data, I’ll be expanding the analysis.