I’m back with another Kings of War battle report. This time its my round 1 game of the Kings of Herts online Universal Battle tournament. This is a four round tournament at 1995 points.
I decided to bring Twilight Kin as I’ve been having a lot of fun using them lately and I’ve just taken the plunge and ordered a load of models for them. They’re going to be my first 100% Mantic army!
My opponent was Minor Internet Celebrity and Benevolent Overlord of the Kings of War Fanatics, Jonathan Faulkes. For those of you that don’t know Jon (shame on you!) he’s been around in Kings of War since the very beginning.
Jon brought his Varangur with a couple of allied Nightstalker Butcher regiments for ‘thicc chaff’ – he’s clearly been taking notes whilst doing the commentary on Dash28.
The scenario for this round was a slightly modified version of Raze, where the tokens on either board side were woth 2VPs and the one in the centre is still only worth 1VP.
Jon livestreamed the game on the Four Foot Snake YouTube channel. I’ve linked the video below and if you have the time I really recommend you give it a watch. Seeing as there is a video record of the game, I’ve gone into less detail in this battle report than I normally would – instead I’ve focused more on why I made the moves I did.
The Twilight Kin


The Varangur


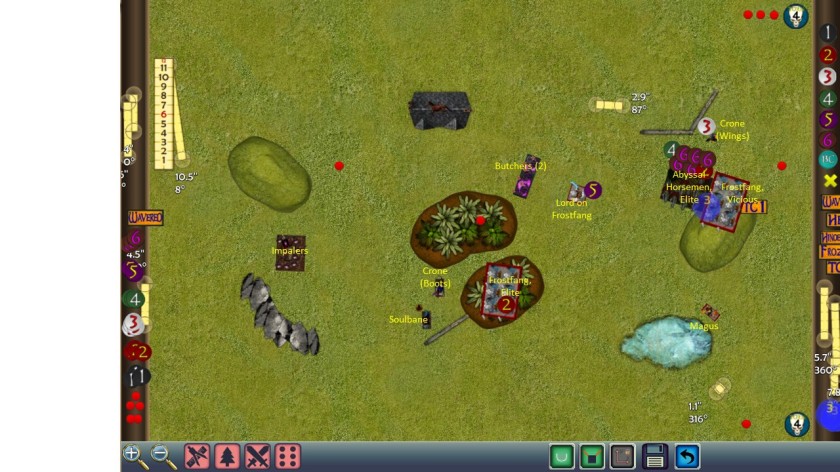
The Battlefield
For this tournament, every game in the round uses the same battlefield map that has been designed specially by the TO. I really like this idea as it lets the TO be a little more inventive with terrain whilst making sure that it is balanced for the scenario.
Its a concept that we’ve discussed introducing at a Northern Kings event, but Universal Battle lends itself to the idea very well.

Because of how objective markers are deployed in Raze, you’re always going to have at least one objective on both halves of the board (left to right). What I really liked about this map was the double forest in the middle of the board as it pretty effectively splits the table into two corridors of play – I’ve labelled them Zone A and Zone B. I knew that there was going to be two tokens in one zone and one in the other. I needed to make sure that my two tokens weren’t in the same Zone as Jon’s two tokens.
Jon has a fairly small elite army, so my hope was to engage the majority of it in one Zone and use my numerical advantage to capture the objectives in the other Zone relatively unopposed. The hope was that the double forests would keep units from being easily able to cross between Zones.
Deployment

I placed my two objectives in the opposite Zone to where Jon placed his. This allowed me to take advance of the higher number of units I had over Jon.
I was nervous going in to this game, Jon had four hammer units each of which could one-shot every single unit in my army. I knew that the game wouldn’t be decided in a grind (which is where my Butchers, Horseman and Drain Life usually excel), it was going to be decided in head on charges and exchanging units in one round of combat.
As Jon started to deploy his army, I came up with a plan. It became clear early on that he was planning on dedicating the majority of his forces on the right of the board (Zone B) opposite two of his objectives. I therefore did the same, deploying most of my army in Zone B facing off against him- however I made sure to hold back enough units to guarantee that I could quickly grab the two tokens on the left in Zone A.
The plan was fairly simple;
Zone A, capture my two tokens on the left as fast as possible. Even if he moved his units up to contest, the Impalers had more unit strength (US) than the Draugr and the Fiends and Gargoyles together had more US than the Fallen.
Zone B, I planned to throw my entire army at him one unit at a time to delay him as long as possible to make sure that he wouldn’t have enough time to cross into Zone A and grab the 3rd token in the top left corner. I also planned to hold the Gargoyles back in reserve and if he ever left his bottom right token undefended, they were going to swoop in and take it.
Don’t forget that in this modified version of Raze, the tokens on the 6″ line are worth 2 points and the one n the middle is worth 1. So if I could capture all of the tokens on Jon’s side and defend just one of mine, I could still win the game without worrying about taking the middle token.
Top of Turn 1

Jon won the roll for first turn and opted to pass it to me.
On the left I moved up as far as possible whilst staying out of 16″ range of the Fallen.
On the right I was more cautious, moving up slowly. I placed the Abyssal Horsemen in 20″ range of Magnilde.
This was a risk because if she charged, she would pin the Horsemen in place and allow them to be charged (and most likely killed) by the Mounted Sons next turn. But I was nervous about how I was going to deal with Mags – I had no plan for taking her out and left unattended she could be a real issue for my plan to hold the Gargoyles in reserve to grab the objective late game.
So I left the Horsemen there as bait – 265 point Horsemen bait to protect Gargoyles! I was fairly confident that between the Horsemen and Drain Life I could kill Mags in one turn on the counter charge, so at least they’ll get some of their points back.
Bottom of Turn 1

Mags took the charge on the Horsemen, doing a couple of points of damage but more importantly blocking them in place for the Mounted Sons to come finish off next turn.
The Magus’ Lightning Bolt did a couple of points of damage to Butcher horde (2).
Top of Turn 2

Jon had left his bottom right token unprotected – the Gargoyles we’re going to have that! On the left, the Impalers moved forward to capture the far left objective.
I charged both Butcher hordes into once of his thicc chaff regiments, which in hindsight was a mistake. I made this charge so that I could hold him up in the corner as long as possible – I would have been better to charge one horde in and held the second back for a further turn of delaying.
The Abyssal Horsemen killed Magnilde on the counter charge (woo!) but the Horsemen’s sacrifice was no longer needed because the Gargoyles had been able to grab the token much sooner than expected.
The Gargoyles on the left charged the Fallen and the Fiends moved up behind them. I put the Fiends in a position so that the Fallen couldn’t corkscrew charge the Fiends without being hindered over the wall.
Abyssal Horsemen w. Elite damage count: 1
End of turn score: Elliot 4 – 0 Jon
Bottom of Turn 2

The turn of pain!
Boom, boom and boom! Both Butcher hordes, both Gargoyles and the Abyssal Horsemen with Brew of Sharpness were routed – just a mere 825 points gone!
This highlighted my mistake with the Butcher hordes, I needn’t have lost both hordes and could have had a spare horde ready to keep the Frostfangs stuck in the corner.
The Draugr charged the Impalers and did a couple of points of damage, but they held.
Abyssal Horsemen w. Elite damage count: 1
End of turn score: Elliot 4 – 0 Jon
Top of Turn 3

The Abyssal Horsemen with Elite had their choice of charge targets and seeing as everything in front of them was ‘only’ 15/17 they had a fairly good shout of killing any of them in one go.
I decided to stick with the plan – I charged the Mounted Sons so that anything that came after them would be drawn as far away as possible from the top left objective. Thanks to Drain Life the Horsemen killed the Mounted Sons in one and turned to face their inevitable doom.
The Fiends charged the Fallen and between Dread and Drain Life they almost managed to waver them but fell one short.
The Impalers killed the Draugr and turned to face the last objective.
End of turn score: Elliot 4 – 0 Jon
Bottom of Turn 3

The Fallen killed the Fiends in one- it wasn’t unexpected but still a shame. I knew from the very beginning that I couldn’t expect to survive a single round of combat against any of Jon’s units, but in practice it was really hurting.
The Magus wavered the flying Crone with a Lighting Bolt, taking her Drain Life out of the game for a turn.
Other than that nothing much of note happened this turn…
Other than the Horseman taking 18 damage from the Frostfangs and rolling double 1s! While this was a pain for Jon, it wasn’t the end of the world. He’d blow through them next turn and be in a position to capture the top right token after the reform, so it shouldn’t impact him too much.
Abyssal Horsemen w. Elite damage count: 19
End of turn score: Elliot 4 – 0 Jon
Top of Turn 4

The Soulbane charged the Fallen and in combination with Drain Life finished them off. The Impalers moved forward and captured my remaining objective.
The Abyssal Horsemen regiment, flush from their miraculous survival counter charged the Lord on Frostfang. I picked the Lord simply because it was the choice that put me the most in the way to block both units from easily walking on to the top right objective.
End of turn score: Elliot 6 – 0 Jon
Bottom of Turn 4
Jon finally started to move the Butcher (2) and the Lord on Frostfang towards the centre of the board, ready to cross into Zone A and the top left objective that the entire game would swing on – en route they captured the middle objective.
The Frostfang horde with Elite moved into the trees. They were going to make my life much more difficult as it meant Jon has three units that could threaten the top left objective and I only had two units left that could easily block them – the Impalers and the Soulbane (who is Mighty).
Out on the right the Frostfang horde flanked the Horsemen, doing another 22 damage to them! Now all he had to do was not roll another double 1….
You can guess what happened next – poor Jon.
This double 1 was a much bigger deal. It not only opened up a rear charge on his other units, it meant that the Frostfang horde with Vicious would need another turn to grab the top right objective, effectively taking them out of the game.
Abyssal Horsemen w. Elite damage count: 41
End of turn score: Elliot 6 – 2 Jon
Top of Turn 5

The Abyssal Horsemen (who had absolutely no business being alive at this point) rear charged the Frontfang horde in the woods, along with the Soulbane in the front. Despite being hindered and devastated they managed to break them in one.
The flying Crone put a couple more damage on the Lord on Frostfang – I was in a decent place to finish him off in Turn 6 if both Crones focused their Drain Life on him.
The Impalers moved up to defend the top left token.
End of turn score: Elliot 6 – 2 Jon
Bottom of Turn 5

Jon pushed the Lord on Frostfang forward as far as possible making a last push for the top left token. The Frostfang horde with Vicious side stepped into range of the top right objective.
The Magus fired his Lightning Bolt 7 at the HEAVILY damaged Abyssal Horsemen unit… and did zero damage to them!
End of turn score: Elliot 6 – 4 Jon
Top of Turn 6

This turned added a bit of insult to injury. The Soulbane moved up to put himself in range of the Lord on Frostfang with his Dread – thanks to Dread the Drain Life managed to break the Lord.
The flying Crone put four damage on the Magus and wavered him as well – it looked like the Horsemen were going to live!
To really cement just how invulnerable the Horseman were, between two turns of regeneration and Drain Life heal they ended the turn on 9 damage – that’s 32 damaged recovered!
All I had to do now was survive a Butcher regiment charge and the game was mine.
End of turn score: Elliot 6 – 4 Jon
Bottom of Turn 6

The Butcher regiment charged the Impalers but for the first time in their history, the Impalers held.
And that was the game!
End of game score: Elliot 7 – 4 Jon
After Game Thoughts
So I think this game can be quite nicely summed up in one convenient meme that I made just for this occasion…

I’m not going to be self deprecating and say that I would have definitely lost if it wasn’t for the double 1’s, but they really REALLY helped.
Looking back through the game whilst writing this battle report, I think that if Jon hadn’t rolled two double 1’s I might have had a chance of winning on turn 6, but I would definitely have lost if the game went to turn 7. It would have entirely depended on how well I could block his units getting into Zone A with the few units I had left – either way it would have been much closer than it ended up being.
For the most part I stuck to the plan – I took all the objectives in Zone A and managed to delay Jon’s army in Zone B. I made a big mistake by sending both Butcher hordes in early and that should have cost me much more than it did – as it was, the double 1s gave me back the turns of delay I’d lost through my mistake with the Butchers.
All in all it was an excellent game and if you watch the live stream you’ll see that we’re both laughing all the way through it, exactly how a good game should go. Jon is a brilliant opponent and was a pleasure to play against – if you haven’t already I strongly recommend you watch the FFS live stream of the game and check out Jon’s other live streams.
Keep an eye out for more Twilight Kin battle reports coming soon as I play the next round of the Kings of Herts tournament. Or check out my other Twilight Kin articles below-

Elliot’s Beer Fund
If you've enjoyed the blog and you're feeling generous, you can buy me a pint. Please dont feel any obligation to do so, I've started this blog because it's fun, not to make any money. Any money received will go towards hosting costs. Or my beer fund... ok mainly my beer fund.
£3.00