Battle Report – Kings of Herts UB tournament – Round 1 – Twilight Kin vs Varangur

I’m back with another Kings of War battle report. This time its my round 1 game of the Kings of Herts online Universal Battle tournament. This is a four round tournament at 1995 points.

I decided to bring Twilight Kin as I’ve been having a lot of fun using them lately and I’ve just taken the plunge and ordered a load of models for them. They’re going to be my first 100% Mantic army!

My opponent was Minor Internet Celebrity and Benevolent Overlord of the Kings of War Fanatics, Jonathan Faulkes. For those of you that don’t know Jon (shame on you!) he’s been around in Kings of War since the very beginning.

Jon brought his Varangur with a couple of allied Nightstalker Butcher regiments for ‘thicc chaff’ – he’s clearly been taking notes whilst doing the commentary on Dash28.

The scenario for this round was a slightly modified version of Raze, where the tokens on either board side were woth 2VPs and the one in the centre is still only worth 1VP.

Jon livestreamed the game on the Four Foot Snake YouTube channel. I’ve linked the video below and if you have the time I really recommend you give it a watch. Seeing as there is a video record of the game, I’ve gone into less detail in this battle report than I normally would – instead I’ve focused more on why I made the moves I did.


The Twilight Kin


The Varangur


The Battlefield

For this tournament, every game in the round uses the same battlefield map that has been designed specially by the TO. I really like this idea as it lets the TO be a little more inventive with terrain whilst making sure that it is balanced for the scenario.

Its a concept that we’ve discussed introducing at a Northern Kings event, but Universal Battle lends itself to the idea very well.

Because of how objective markers are deployed in Raze, you’re always going to have at least one objective on both halves of the board (left to right). What I really liked about this map was the double forest in the middle of the board as it pretty effectively splits the table into two corridors of play – I’ve labelled them Zone A and Zone B. I knew that there was going to be two tokens in one zone and one in the other. I needed to make sure that my two tokens weren’t in the same Zone as Jon’s two tokens.

Jon has a fairly small elite army, so my hope was to engage the majority of it in one Zone and use my numerical advantage to capture the objectives in the other Zone relatively unopposed. The hope was that the double forests would keep units from being easily able to cross between Zones.


Deployment

I placed my two objectives in the opposite Zone to where Jon placed his. This allowed me to take advance of the higher number of units I had over Jon.

I was nervous going in to this game, Jon had four hammer units each of which could one-shot every single unit in my army. I knew that the game wouldn’t be decided in a grind (which is where my Butchers, Horseman and Drain Life usually excel), it was going to be decided in head on charges and exchanging units in one round of combat.

As Jon started to deploy his army, I came up with a plan. It became clear early on that he was planning on dedicating the majority of his forces on the right of the board (Zone B) opposite two of his objectives. I therefore did the same, deploying most of my army in Zone B facing off against him- however I made sure to hold back enough units to guarantee that I could quickly grab the two tokens on the left in Zone A.

The plan was fairly simple;

Zone A, capture my two tokens on the left as fast as possible. Even if he moved his units up to contest, the Impalers had more unit strength (US) than the Draugr and the Fiends and Gargoyles together had more US than the Fallen.

Zone B, I planned to throw my entire army at him one unit at a time to delay him as long as possible to make sure that he wouldn’t have enough time to cross into Zone A and grab the 3rd token in the top left corner. I also planned to hold the Gargoyles back in reserve and if he ever left his bottom right token undefended, they were going to swoop in and take it.

Don’t forget that in this modified version of Raze, the tokens on the 6″ line are worth 2 points and the one n the middle is worth 1. So if I could capture all of the tokens on Jon’s side and defend just one of mine, I could still win the game without worrying about taking the middle token.


Top of Turn 1

Jon won the roll for first turn and opted to pass it to me.

On the left I moved up as far as possible whilst staying out of 16″ range of the Fallen.

On the right I was more cautious, moving up slowly. I placed the Abyssal Horsemen in 20″ range of Magnilde.

This was a risk because if she charged, she would pin the Horsemen in place and allow them to be charged (and most likely killed) by the Mounted Sons next turn. But I was nervous about how I was going to deal with Mags – I had no plan for taking her out and left unattended she could be a real issue for my plan to hold the Gargoyles in reserve to grab the objective late game.

So I left the Horsemen there as bait – 265 point Horsemen bait to protect Gargoyles! I was fairly confident that between the Horsemen and Drain Life I could kill Mags in one turn on the counter charge, so at least they’ll get some of their points back.


Bottom of Turn 1

Mags took the charge on the Horsemen, doing a couple of points of damage but more importantly blocking them in place for the Mounted Sons to come finish off next turn.

The Magus’ Lightning Bolt did a couple of points of damage to Butcher horde (2).


Top of Turn 2

Jon had left his bottom right token unprotected – the Gargoyles we’re going to have that! On the left, the Impalers moved forward to capture the far left objective.

I charged both Butcher hordes into once of his thicc chaff regiments, which in hindsight was a mistake. I made this charge so that I could hold him up in the corner as long as possible – I would have been better to charge one horde in and held the second back for a further turn of delaying.

The Abyssal Horsemen killed Magnilde on the counter charge (woo!) but the Horsemen’s sacrifice was no longer needed because the Gargoyles had been able to grab the token much sooner than expected.

The Gargoyles on the left charged the Fallen and the Fiends moved up behind them. I put the Fiends in a position so that the Fallen couldn’t corkscrew charge the Fiends without being hindered over the wall.

Abyssal Horsemen w. Elite damage count: 1

End of turn score: Elliot 4 – 0 Jon


Bottom of Turn 2

The turn of pain!

Boom, boom and boom! Both Butcher hordes, both Gargoyles and the Abyssal Horsemen with Brew of Sharpness were routed – just a mere 825 points gone!

This highlighted my mistake with the Butcher hordes, I needn’t have lost both hordes and could have had a spare horde ready to keep the Frostfangs stuck in the corner.

The Draugr charged the Impalers and did a couple of points of damage, but they held.

Abyssal Horsemen w. Elite damage count: 1

End of turn score: Elliot 4 – 0 Jon


Top of Turn 3

The Abyssal Horsemen with Elite had their choice of charge targets and seeing as everything in front of them was ‘only’ 15/17 they had a fairly good shout of killing any of them in one go.

I decided to stick with the plan – I charged the Mounted Sons so that anything that came after them would be drawn as far away as possible from the top left objective. Thanks to Drain Life the Horsemen killed the Mounted Sons in one and turned to face their inevitable doom.

The Fiends charged the Fallen and between Dread and Drain Life they almost managed to waver them but fell one short.

The Impalers killed the Draugr and turned to face the last objective.

End of turn score: Elliot 4 – 0 Jon


Bottom of Turn 3

The Fallen killed the Fiends in one- it wasn’t unexpected but still a shame. I knew from the very beginning that I couldn’t expect to survive a single round of combat against any of Jon’s units, but in practice it was really hurting.

The Magus wavered the flying Crone with a Lighting Bolt, taking her Drain Life out of the game for a turn.

Other than that nothing much of note happened this turn…

Other than the Horseman taking 18 damage from the Frostfangs and rolling double 1s! While this was a pain for Jon, it wasn’t the end of the world. He’d blow through them next turn and be in a position to capture the top right token after the reform, so it shouldn’t impact him too much.

Abyssal Horsemen w. Elite damage count: 19

End of turn score: Elliot 4 – 0 Jon


Top of Turn 4

The Soulbane charged the Fallen and in combination with Drain Life finished them off. The Impalers moved forward and captured my remaining objective.

The Abyssal Horsemen regiment, flush from their miraculous survival counter charged the Lord on Frostfang. I picked the Lord simply because it was the choice that put me the most in the way to block both units from easily walking on to the top right objective.

End of turn score: Elliot 6 – 0 Jon


Bottom of Turn 4
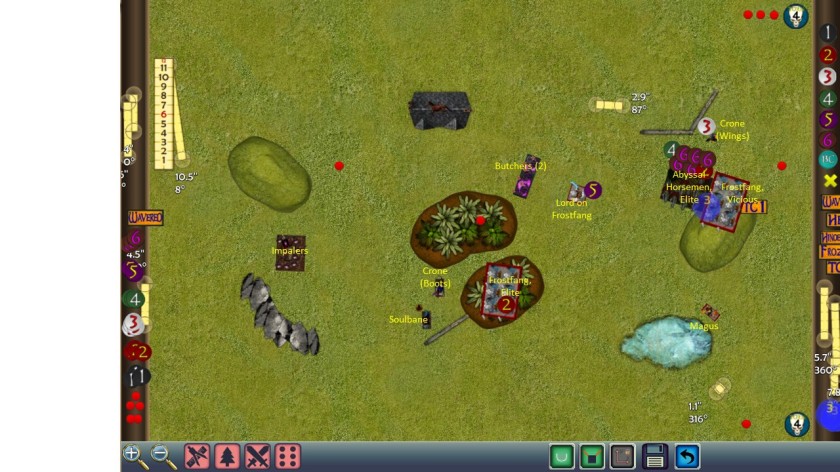
Jon finally started to move the Butcher (2) and the Lord on Frostfang towards the centre of the board, ready to cross into Zone A and the top left objective that the entire game would swing on – en route they captured the middle objective.

The Frostfang horde with Elite moved into the trees. They were going to make my life much more difficult as it meant Jon has three units that could threaten the top left objective and I only had two units left that could easily block them – the Impalers and the Soulbane (who is Mighty).

Out on the right the Frostfang horde flanked the Horsemen, doing another 22 damage to them! Now all he had to do was not roll another double 1….

You can guess what happened next – poor Jon.

This double 1 was a much bigger deal. It not only opened up a rear charge on his other units, it meant that the Frostfang horde with Vicious would need another turn to grab the top right objective, effectively taking them out of the game.

Abyssal Horsemen w. Elite damage count: 41

End of turn score: Elliot 6 – 2 Jon


Top of Turn 5

The Abyssal Horsemen (who had absolutely no business being alive at this point) rear charged the Frontfang horde in the woods, along with the Soulbane in the front. Despite being hindered and devastated they managed to break them in one.

The flying Crone put a couple more damage on the Lord on Frostfang – I was in a decent place to finish him off in Turn 6 if both Crones focused their Drain Life on him.

The Impalers moved up to defend the top left token.

End of turn score: Elliot 6 – 2 Jon


Bottom of Turn 5

Jon pushed the Lord on Frostfang forward as far as possible making a last push for the top left token. The Frostfang horde with Vicious side stepped into range of the top right objective.

The Magus fired his Lightning Bolt 7 at the HEAVILY damaged Abyssal Horsemen unit… and did zero damage to them!

End of turn score: Elliot 6 – 4 Jon


Top of Turn 6

This turned added a bit of insult to injury. The Soulbane moved up to put himself in range of the Lord on Frostfang with his Dread – thanks to Dread the Drain Life managed to break the Lord.

The flying Crone put four damage on the Magus and wavered him as well – it looked like the Horsemen were going to live!

To really cement just how invulnerable the Horseman were, between two turns of regeneration and Drain Life heal they ended the turn on 9 damage – that’s 32 damaged recovered!

All I had to do now was survive a Butcher regiment charge and the game was mine.

End of turn score: Elliot 6 – 4 Jon


Bottom of Turn 6

The Butcher regiment charged the Impalers but for the first time in their history, the Impalers held.

And that was the game!

End of game score: Elliot 7 – 4 Jon


After Game Thoughts

So I think this game can be quite nicely summed up in one convenient meme that I made just for this occasion…

I’m not going to be self deprecating and say that I would have definitely lost if it wasn’t for the double 1’s, but they really REALLY helped.

Looking back through the game whilst writing this battle report, I think that if Jon hadn’t rolled two double 1’s I might have had a chance of winning on turn 6, but I would definitely have lost if the game went to turn 7. It would have entirely depended on how well I could block his units getting into Zone A with the few units I had left – either way it would have been much closer than it ended up being.

For the most part I stuck to the plan – I took all the objectives in Zone A and managed to delay Jon’s army in Zone B. I made a big mistake by sending both Butcher hordes in early and that should have cost me much more than it did – as it was, the double 1s gave me back the turns of delay I’d lost through my mistake with the Butchers.

All in all it was an excellent game and if you watch the live stream you’ll see that we’re both laughing all the way through it, exactly how a good game should go. Jon is a brilliant opponent and was a pleasure to play against – if you haven’t already I strongly recommend you watch the FFS live stream of the game and check out Jon’s other live streams.


Keep an eye out for more Twilight Kin battle reports coming soon as I play the next round of the Kings of Herts tournament. Or check out my other Twilight Kin articles below-


Elliot’s Beer Fund

If you've enjoyed the blog and you're feeling generous, you can buy me a pint. Please dont feel any obligation to do so, I've started this blog because it's fun, not to make any money. Any money received will go towards hosting costs. Or my beer fund... ok mainly my beer fund.

£3.00

Call to Arms – Round 2 Stats

Round 2 of a Call to Arms has drawn to a close and that means one thing – juicy juicy stats!

The stats for round 1 can be found here.

Tournament Stats

The scenario this round was Pillage with a set 6 objectives. Pillage is a simple scenario but one of the best in my opinion.

71/73 games took place. The results for the other two were decided by the TO Adam – he wasn’t joking when he said get your results in or he’d decide them for you!

Once again, all 26 races were represented at least once. Its becoming obvious that some factions are much more popular than others – its almost like Undead are really really good!

I’m surprised to see Goblins so far down the list, I thought people might use the opportunity to take the crazy hordes lists that you wouldn’t ever want to build in real life.

The most popular points value was again 2300 points with 56% choosing to play at that level.

We saw a big reduction in the number of people scoring the maximum points this round. I’m not sure if this is because Pillage is a harder scenario to score full points on, or if the players were more evenly matched because of the swiss ranking up system. My guess would be that its a little early in the tournament for swiss ranking to be having much effect, so the scenario is definitely having some impact.

On average, people also killed a lower percentage of their opponent’s army. I’d guess that this is because Dominate (the scenario in round 1) encourages a big brawl in the centre of the board, whereas Pillage is more spread out.

It’ll be really interesting to see if we get see less big results scored as players become more evenly matched – or if there is a clear pattern between results and the scenario played.

Army Stats

Its not a good day to be a Dwarf! Or at least, not a well behaved Dwarf. Dwarfs and Free Dwarfs have a combined total of 19 games played, but a win rate of only 21%.

At the moment, Elves are the only army with a 100% win rate – although to be fair that is only out of 5 games.

I think that the amount of armies that are on or around a 50% win rate is a really good indication of the balance within Kings of War – it does also highlights that there are a few armies that seem to need a boost.

The Elves and Brothermark lead the way with the average amount of bonus points scored, but again these results should be taken with a pinch of salt because they are based on relatively low number (only 2 in the Brothermark’s case).

The highest scoring army with a decent number of results is Undead.

I’m not surprised by this at all as I personally think Undead are the strongest Kings of War faction. It shows that their popularity is at least partially because they’re a powerful army and not just because people like the fluff or playstyle etc.

Poor Dwarfs…

While I’m very impressed with the amount of kills the handful of Elf generals have managed to achieve, once again I’d be cautious about putting too much weight on their place in the rankings – their average is out of only 5 games compared to Undead’s 25.

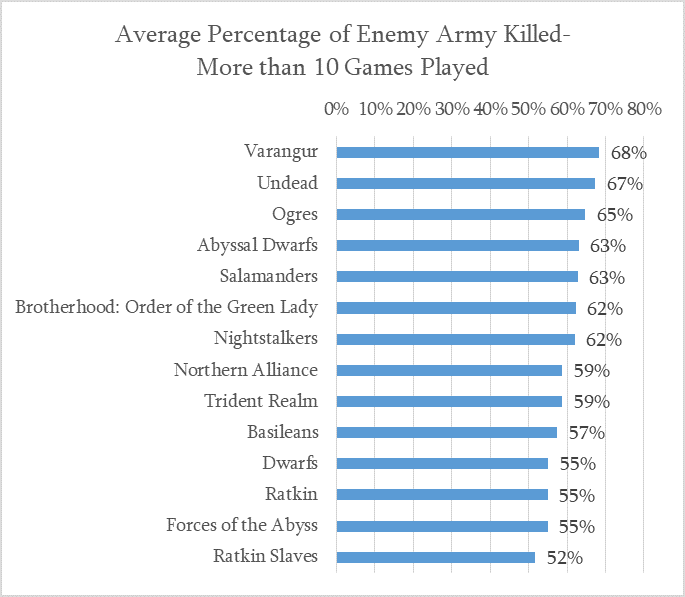
Varangur take the top spot in the ‘decent number of games played’ category. Its fitting that Varangur should have such a high average percentage of kills as they’re such an aggressive in your face army.

As a baseline to compare against, the overall average percentage of enemy’s army killed is currently 60%.

The two charts above show the win percentage and average percentage of enemy army killed for the armies that have more than 10 result. I’d consider these a more reliable measure of how the army is performing.

There’s currently a significant difference between the highest and lowest win rates and it’ll be really interesting to see if this carries on as the tournament progresses. As players are matched up more in line with their skill level, we’d expect to see all the armies evening out at around 50%, so any outliers might suggest that an army is too powerful, or could do with a boost.

Country Stats

Call to Arms 4 truly is an international tournament, with 14 different countries represented.

The United States make up just under 50% of the field with the UK second (21%) followed by Australia (9%) and Canada (8%).

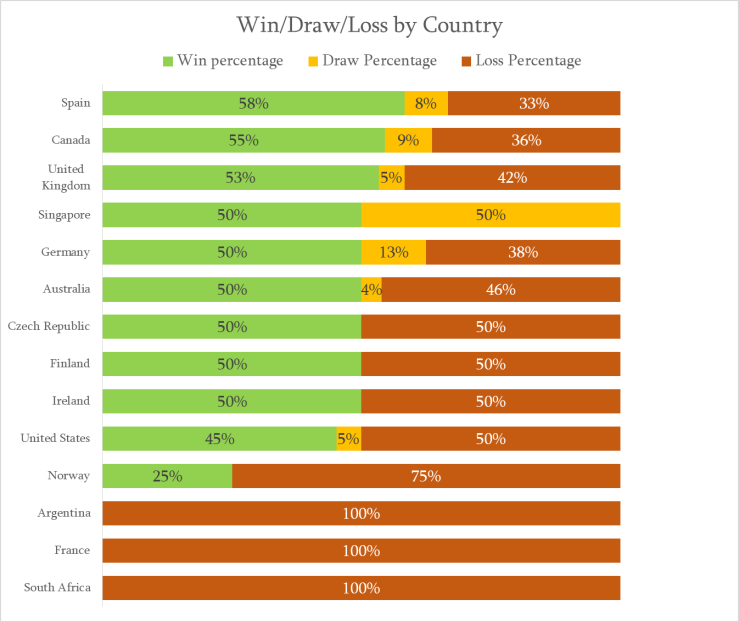
Spain is currently out in front in terms of win percentage – the Spaniards have won an impressive 58% of their games so far.

Quite a few countries are represented by just one of two people, so for the sake of more even comparison I’ve split off the ‘big five’ into a separate chart – these are the countries that have more than 10 players representing them.

Starting in round 3, I’ll be sharing a table showing each country’s win rate is vs each other country, so in your round 3 games don’t forget that you’re representing your country!

Round 3 is going to be Kill, using the modified Northern Kings version, so it’ll be really interesting what impact that has on the stats and if the different style of scenario mixes things up a bit.

As usual you can find the game rounds here:
https://tabletop.to/call-to-arms-worldwide-40-univer…/rounds

You can find the current rankings here:
https://tabletop.to/call-to-arms-worldwide-40-univer…/ladder

Results get entered here:
https://forms.gle/F2BETtSuNPUDb26k6

Mark Cunningham has created a website for the event that’s pretty handy you can find it here:
https://sites.google.com/view/call-to-arms/home?authuser=0


Good luck and happy gaming!

Battle Report – Twilight Kin vs Goblins – 25/04/2020

I’m back with another Kings of War battle report – two in two days you lucky things!

I’m using the Twilight Kin again vs Steve Forester’s Goblins. This is my fourth game using Twilight Kin – you can read about my first game here.

The scenario was Control which can be a hard one to play vs Goblins as they have access to lots of cheap sources of unit strength that they can leave sat in a corner all game.

My list

The core of my list is still very similar to my first game. I still have the same four unlocking units, two regiments of Abyssal Horsemen and two regiments of Kindred Archers.

I’ve swapped the Brew of Strength out for Elite on one of the Horsemen units. I needed the 10 points to spend elsewhere and on an 18 attack unit, the difference in results against Def4 and Def5 opponents is actually pretty small.

In the three games before this one, the Kindred Archers have been difficult to quantify. They’ve been very good at holding objectives and carrying loot tokens, but absolutely shite at shooting anything! This is slightly frustrating because they’re effectively doing the same job that a unit 20-30 points cheaper than them. I still plan to keep them in the list because Twilight Kin have no better options, but I definitely agree with the cries of all the other Elf players that knocking them down to Ra5 was unnecessary, especially with all the other nerfs to shooting in 3rd edition.

The biggest thing I’ve changed is how many points I have invested into Drain Life. In each of my games I’ve turned up the dial slightly until reaching the point I’m at now. Each time I’ve spent more points on Drain Life it’s proven to be points well spent so I’m going to keep going until I feel its an overinvestment.

In order to afford all this extra investment in Drain Life, I have had to reduce down to two Butcher hordes. This saved more points then I needed so I had points left over to add in a troop of Silverbreeze which do look excellent on paper.

Steve’s list

I really like Steve’s list, its a great example of how Goblins can do combined arms really well – this list has real combat punch and a good amount of shooting.

The Mincer troops are excellent, the 100x100mm footprints are really good at navigating around the Trolls and Rabble regiments and they pack enough punch that they cannot be ignored.

I didn’t appreciate just how many Lightning Bolts this list can throw out and it comes back to bite me in this game.

Deployment

I started off by deploying both Archer regiments on either flank – the plan was that they would sit at the back of the board all game and do their best to shoot off any soft targets that presented themselves.

Once we were fully deployed I decided on my plan for the game.

I knew that the Trolls and Mawbeasts would be limited in how quickly they could push up the board because of the woods in the middle of his line. I therefore decided that I would try and pin his forces in the bottom left two scoring zones.

I planned to use the Fiends, Silverbreeze and Butchers (2) to take the right bottom zone and then turn inwards to continue to pincer the Trolls and Mawbeasts. This was slightly scuppered when Steve deployed his final troop of Mincers (2) on the right flank, making it much stronger.

It was an ambitious plan but it at least gave me a general direction of travel to work with – I could then adapt on the fly as the game progressed.

I won the roll for first turn and opted to go first so that I could apply pressure early on and work on my plan to pin Steve in place.

Top of Turn 1

All of my units on the left hand side moved forward, keeping just out of charge range of the Trolls.

I pushed up the Gargoyles (2) quite aggressively, putting them in charge range of the Lobba’s next turn. They would have to endure a turn of lighting bolt from Magwa, but if they survived they would be in a good position next turn.

Both Archer regiments shot at units on either flank – they both did a point of damage and managed to waver the Mawbeasts (4).

Bottom of Turn 1

In response to my Horsemen and Butchers moving up, Steve brought his Mawbeasts forward to screen his Trolls – otherwise he held steady in the centre.

On his right flank he chose not to move at all. Magwa fired his Lighting Bolt at the Gargoyles (2) and managed to put 4 damage on them but thankfully didn’t waver or rout them.

All three Lobbas fired at Butchers (1) but they only took 1 damage – stealthy really helped out here as Steve rolled four 5’s to hit out of six shots. One Wiz cast Hex on the Crone and another put a point of damage on the Silverbreeze.

Overall it had been a pretty lacklustre shooting phase for the Goblins.

Top of Turn 2

Despite being in range to charge with the majority of my army, I decided to hold off and let him come to me. At the moment, my plan to keep Steve contained in the bottom two left scoring zones was working and I’d taken very little damage from his first turn of shooting – basically, I didn’t need to rush into combat.

On the left flank, the Soulbane moved him full 18″ to run behind Steve’s lines. If the Soulbane could take out the Mincer troop (1), a lot of Steve’s combat punch would be taken out. One thing that I didn’t account for when leaving the Soulbane out in the open was the amount of Lighting Bolts Steve’s list could throw out. I think after getting off so lightly in the first shooting phase, I’d become a little complacent.

The Gargoyles (2) charge the Lobba (3) and routed it. They pivoted to face the other Lobbas but made sure to keep Magwa in their flank. While this didn’t effect the number of attacks Magwa would have (he’s an individual so doesn’t double attacks in the flank), it did mean that if he chose to charge the Gargoyles (2), he would have to remain in range of the Fiends the following turn.

Both Archer regiments shot at their targets again, both doing another point of damage.

Overall I was fairly happy with this turn, I thought I was in a good position for the next turn and was starting to envelop Steve’s line.

Bottom of Turn 2

Steve began the push up with his Rabble, Trolls and Mawbeasts in the centre of the board. This meant that I would have to start engaging him next turn or risk him being able to cross into my half of the board.

Mawbeast troop (3) charge Butcher (2) and did a very respectable 4 damage to them, but at -/18 they weren’t very concerned about it.

Magwa charged and easily killed the Gargoyles (2), but couldn’t manage to get himself out of range of the Fiends charge the next turn.

Not happy with the sneaky Soulbane trying to infiltrate their back lines, all three Wiz moved backwards and opened up on the Soulbane with their lightning bolts, doing 5 damage and narrowly avoiding wavering him – so much for my plan of the Soulbane running around the back lines unopposed.

Both remaining Lobbas again fired at the Butchers, but both missed (two more 5’s rolled – stealthy was doing well for me this game!).

Top of Turn 3

Enough waiting around… charge!

I decided it was the time to commit across the board. If I waited any longer I would be taking charges on Steve’s terms not mine, so better to engage first and at least wipe out his Mawbeast screen before having to engage the Trolls.

The Butchers (2) killed the Mawbeasts that had charged them in the previous turn. The Crone’s Drain Life helped heal the Butchers (2) back up to full health, undoing all the Mawbeast’s good work.

On the right flank the Fiends charged Magwa, the Crone made use of her Boots of Levitation to move 18″ down the board and cast Drain Life on Magwa. Between the two of them, they managed to kill Magwa in one.

I had hoped that after killing Magwa I would be able to reform in a way that took me out of arc of the Mincer troop (2). This would have effectively let me pick off the remaining units on Steve’s right flank one at a time, supported by the Crone’s Drain Life and the Archer (2) and Silverbreeze shooting.

Sadly it was not to be – no matter how I rotated them there was no way to stop the Mincers getting a charge next turn.

The Silverbreeze and Archer regiment (2) both shot at the Mawbeast troop (4), routing them.

In the middle of the board, everything charged. The Abyssal Horsemen with Elite (and backed up by Drain Life 9) managed to break the Rabble horde in one go and turned to face the incoming Mincer troop.

The slightly smouldering Soulbane shrugged off his lighting bolt barrage and charged the Mincer troop (1), but only managed to do 3 damage.

Butcher (1) charged the Troll on the right, but as they were hindered they did very little only managing 1 damage. Not to worry, the Gargoyles (1) would block in the Mawbeast (2), protecting the Butchers (1) from getting flanked next turn. I’d be fine so long as the hindered Gargoyles (1) didn’t accidentally kill the Mawbeasts (2)…

Oh bugger they killed them! Oh well so long as my over run is more than 1″ I’ll still block the Trolls with the Strider Boots from being able to flank the Butchers (1)… I rolled 1″. Oh dear, that was going to hurt next turn.

The Horsemen with the Brew of Sharpness killed Mawbeast troop (1) and prepared themselves to receive the counter attack from the pathfinder Trolls.

It was not a good turn to be a Mawbeast!

While it seemed like Steve lost a lot of stuff this turn I was actually quite nervous about his next turn. I’d managed to kill his screening units, but I really needed to survive with as much as possible next turn to give me chance to start Drain Life’ing his squishier units (like his Wiz) to heal some damage back on the combat blocks.

Bottom on Turn 3

It was Steve’s turn to charge everything!

On the right flank, the Rabble (2) and the Mincer troop (2) charged the Fiends. Unfortunately the Mincer troops (2) leader point was further to the left than the Rabble’s (2) so they ended up on the left hand side, meaning they weren’t hindered. Together they did 8 damage to the Fiends and wavered them.

Both Lobbas and the Wiz with the Boomstick yet again fired at the Butcher (2). Both Lobbas missed (two more 5s!! – yes I was keeping track) but the lightning bolt got 2 damage through.

The other two Wiz continued their lighting barrage on the Soulbane. They only managed to do 1 more damage but it was enough to waver him. Clearly he’s had enough of being fried.

As expected, the Trolls with Jesse’s Boots flanked the Butchers (1) and easily routed them. They spun around 180 degrees to face the two Horsemen regiments.

The Mincer troop (1) and the Trolls with Pathfinder both charged a unit of Horsemen each. They both managed to do damage but not enough to really threaten them.

Top of Turn 4

In Turn 4, I started to think about what my strategy should be to try and win the game. My initial plan hard half worked – sort of.

For now at least I was manging to hold the Trolls in Steve’s half of the board – the issues was going to be the right flank. The Fiends would most likely die next turn, and that would give Steve at least two more turns to move his remaining units into better scoring positions. Between the two Rabble regiments and the Mincer troop (2) he had enough unit strength to hold both right scoring zones.

I would need to do something about the Rabble!

On the left hand side, Archer regiment (1) fired at the Rabble regiment (1), doing 2 more point of damage and killing them – one down!

On the right flank, I fired both the Archers and the Silverbreeze at the Rabble regiment (2), doing a decent 4 points of damage.

In the centre of the board, Butcher horde (2) charged the Trolls and in combination with Drain Life routed them in one. The Abyssal Horsemen with the Brew of Sharpness did an impressive 8 damage to the pathfinder Troll and wavered them. Sadly David Bowie was hanging around just behind them so they were headstrong.

The other Abyssal Horsemen regiment (backed up by Drain Life 9) managed to finish what the Soulbane started and killed the Mincer troop (1).

Bottom of Turn 4

Steve didn’t have many tactical options open to him this turn, instead he just needed to brawl his way into better position next turn.

The Wiz cast Hex on the Crone – its almost as if he was fed up being Drain Life’d every turn!

Both Lobbas fired at the Butchers (2) again and missed again! Sadly no 5’s rolled this time to add to my smug stealthy counter. The Inspiring Wiz managed to put 1 more damage on the Soulbane, wavering him again.

As expected the Mincer troop (2) blew through the heavily damaged Fiends and over ran towards the centre of the board.

Inspired by the mere presence of David Bowie within their midst, the pathfinder Trolls passed their Headstrong roll and then for good measure proceeded to do 11 damage to the Abyssal Horsemen regiment – routing them in one!

Despite heavy losses on both sides, Steve was in a good position. His right flank was now free to move with at least two turns left, and it was down to a straight 2v2 fight in the centre of the board. I thought I should be able to win the fight for the centre, but I wasn’t confident that I would have enough left when the dust settled to win the scenario.

Top of Turn 5

Continuing my plan of doing everything I could to even up the unit strength balance on the right flank, I shot the Silverbreeze, Archers (2) and the Crone into the Rabble regiments. Sadly due to a combination of mighty goblin shields and Kindred Archers being terrible at their job, I only managed to do 2 more damage.

The Abyssal Horseman with Elite charged the pathfinder Trolls. I felt that I needed to kill these last two units quickly before the Mincer troop (2) reinforcements arrived – so I decided to ignore the Hex on my Crone and cast Drain Life on the Trolls. Naturally, this meant that she rolled the most hits she had all game and did 8 damage to herself!

The Butcher’s (2) charged the Trolls, but as they were hindered didn’t manage to do much damage to them. Luckily for the Butchers, the Crone’s Drain Life had healed them back up to full health, so nothing short of a dairy based divine intervention would put them at risk of breaking next turn.

Bottom of Turn 5 – Dairy based divine intervention

You may have noticed that the Butchers (2) are dead…

Pizza Jesus proving yet again that he truly is the most powerful of all the dairy based deities – even more powerful than the mighty Fondue Ganesh.

Elsewhere the two Lobbas fired at the Silverbreeze – one hit and did 3 damage but didn’t waver/rout them meaning they still had a chance to help kill Rabble on Turn 6.

Proving that lightning can strike the same place twice but three times is pushing it, the Soulbane managed to avoid taking any damage this turn and was finally ready to rejoin the fight.

The Wiz cast Hex on the Drain Life 9 Crone this time, daring me to have another go at killing myself. The other Wiz wavered the Crone who had been Hexxed the previous turn.

Top of Turn 6

This was a key turn for me, as it was potentially my last chance to take off some of Steve’s unit strength.

The Abyssal Horsemen charged the pizza blessed Trolls. The flying Crone decided to ignore the Hex and hit the Trolls with Drain Life 9 – she did a very impressive 12 damage to herself but managed to push enough damage onto the Trolls to allow the Horsemen to break them.

The Soulbane killed one of the Wiz that had been harassing him all game.

On the right flank, the Kindred Archers once again did nothing (because apparently shooting bows is hard for 100+ year old Archers who’s been training to do it all their life?!), but the Silverbreeze showed that its easier to fire a bow while riding a horse at the same time – they did 1 more point of damage to the Rabble regiment (2) and routed them.

At the end of my Turn 6 I held four scoring zones and had reduced Steve to two scoring units. All I had to do now was cross my fingers that Steve’s shooting didn’t suddenly wake up on Turn 6 and take off my Abyssal Horsemen.

Bottom of Turn 6

Mercifully, the Abyssal Horsemen were only in the arc of one of the Lobbas… and it missed! Phew! The other Lobba fired at the Silver Breeze but also missed.

David Bowie charged the flying Crone and the Boomstick Wiz shot the Soulbane – both died happy in the knowledge that if the game ended now their sacrifice would not be in vain.

We rolled for turn 7 – and got it! I was going to have to endure another squeaky bum time shooting phase to see if my Horsemen could survive!

Top of Turn 7

The Abyssal Horsemen charged and killed David Bowie, making sure to stay out of the arc of Lobba (2) with their reform.

The Silverbreeze turned and managed to just squeeze themselves into the top middle scoring zone. This meant that if the two Crones could kill the Mincer troop (2) with Drain Life, I would still win the game even if the Lobbas managed to kill another one of my units.

Sadly the Crones couldn’t quite mange it.

Bottom of Turn 7

I had to endure two squeaky bum time artillery shots against the Archer regiment (2) and the Abyssal Horsemen – but luck was on my side this time and all of the shots missed.

The Mincer troop (2) moved into top centre scoring zone bagging Steve a very well deserved two points.

The Final Result

At the end of Turn 7 I had manged to hold out to win by 4-3.

Steve played really well and it was a brilliant game – if his shooting had gone differently for him in the last few turn, it would have been a very different outcome.

For the most part I was happy with how I played the game. My plan to contain the Trolls had worked pretty well. I took a few unexpected casualties and I think on more average rolls I would have had more units left alive in the centre of the board

The right flank didn’t work anywhere near as well and I was definitely over optimistic there. I’m not sure I could have done much differently and it worked out for the best in the end – but that was more down to luck than skill.

Thoughts on My List

Seeing as this is already a very long blog post, I’ve decided to put my thoughts on my list and Twilight Kin in general into a separate post. So watch out for that in the next few days.

The Pie. The Bite. The Slice. Amen.

Battle Report – Twilight Kin vs Ratkin Slaves – 20/04/2020

I’m back with another battle report, this time I’m trying out a brand new army for me, Twilight Kin vs the Ratkin of Mark Cunningham. Mark is currently working on a Ratkin army that may be a little unsuitable for a family friendly blog, so lets just say that the Twilight Kin were going to be playing against some Rats of…. ill repute.

This battle report will be the first of the four games I’ve played so far with Twilight Kin. I have another report coming in a few days time that was the fourth game I played with them. At the end of that report I’ll spend a bit of time going through the changes I’ve made to my list and share some of my experiences with Twilight Kin so far.

My list

The more eagle eyed amongst you will realise that my list is actually illegal. The Summoner Crone cannot upgrade to Drain Life 9 alongside a mount. Seeing as I only realised this in turn 1, we decided just to play the Crone as Drain Life 6 for the game and have the 30 points I spent on the upgrade be my punishment for not reading the book properly!

This is my first go writing a list for Twilight Kin so I went for units that looked strong on paper and worked from there. The first thing I found was the lack of unlocks available in the list, especially the lack of horde unlocks. I’ve heard this said about Twilight Kin before but when I started to properly build a list I realised just how much of an issue it was; and how much it would force me down a very set list building path.

Cronebound Butchers seemed to be incredibly good value at only 200 points, so I decided to triple down and take three hordes to form a solid anchor point to centre my lines.

The Horsemen seemed like a ‘must take’ unit – one of the few competitive unlocks available and a very good all round hammer unit. Fiends seemed to be a good pairing with the Horsemen.

Two regiments of Kindred Archers round out the unlocks, their purpose in the list is to sit on objectives and try and shoot off soft targets where they can.

Mark’s list

Deployment

I won the roll for sides and chose to deploy at the top of the board. This instantly gave me control of two of the five objectives, with two more easily within range to move on to.

I decided that my plan for the game would be to ignore the bottom objective and instead focus on the other four.

This would hopefully mean that his Decimators horde (which I was terrified of) would be kept out of the game for quite a while, as it couldn’t stray far from the bottom objective if it wanted to score it late game (Dwarfs only have little legs).

I deployed my three Butcher hordes in the midst of all of the objective. These Def5 -/18 blocks were my best bet for holding out until the end of the game and winning the scenario. Mark had quite a lot of shooting between the Katsuchan’s and the Nightmares, but I wasn’t too worried about that because A) the majority of my army was stealthy and B) he’d deployed his Nightmares behind his Slave Wretches, meaning I would have stealthy and cover against his shooting.

I put my three heaviest hitting units out on the right flank in order to make Mark choose between committing hard for the objectives, but exposing his flanks, or guarding his flanks but slowing down his advance on the objectives.

One thing I was nervous about was the Slave Wretch horde with the Crystal Pendant. He’d deployed it front and centre (on Slave Wretch (2)) so I would be forced to deal with it. I had a plan for that however…

Top of Turn 1

I won the roll off for turn 1 and opted to go first.

All three Butcher hordes pushed up, but made sure to stay out of range of the Decimators and Nightmares, even if they moved in their turn. I moved the Fiends into and Horsemen with Brew of Strength up on the right to immediately start putting pressure on his Slave Wretch hordes (3). While the Slave hordes aren’t great at killing things, they do have a lot of nerve so I was keen to get into them early on to start wearing them down.

Archer regiment (1) put a point of damage on the Slave Warrior regiment. The hope was that they would be able to waver and then kill them before it got in range to threaten the Archers (1).

Archer regiment (2) put a point of damage Slave Wretch horde (2), the one with the Crystal Pendant… its a start!

The Soulbane pushed up fast on the right flank, using the Height 6 rocks to keep out of line of sight of the Overmaster. From where he was, he had a charge next turn on both Katsuchans and the right most Slave Wretches (3).

Gargoyles (3) moved forward 20″ and pivoted 90 degrees. This meant that they were just out of the front arc of the Overmaster, but sadly they were also just out of 20″ range of Katsuchan (3).

The Abyssal Horsemen with Brew of Sharpness moved up more slowly, making sure that the Overmaster didn’t have any room to land safely where he could start to threaten my flank.

Bottom of Turn 1

For the most part, Mark chose to be very conservative with his turn 1 movements, hoping to thin me down a little with his shooting before moving himself into charge range.

The Slave Warrior regiment moved their full 12″ forward, instantly putting the Archers (1) under pressure. Slave Nightmare horde (3) turned 90 degrees to look towards the right flank. This was a nice move on Mark’s part, because it prevented my Gargoyles (2) from moving 20″ behind his line next turn and threatening his rear.

Other than that he stayed put, including with his Overmaster. I have to admit I though this was a mistake. I’m not sure if he was nervous about being flanked/ reared by the Gargoyles, but where he is there, he isn’t doing much good and isn’t putting out much of a threat for next turn.

After the game, Mark told me that he had eyeballed the range of the Overmaster and thought that he’d be able to flank my Fiends if they charged the Wretches (3) next turn. Unfortunately for him, he was out by just under 1″…

Katsuchan (1) fired at the Butchers on the hill and did 1 damage. The other two fired at the Fiends in the woods, but thanks to stealthy they only did 1 damage there as well.

Top of Turn 2

Seeing as Mark was seeming cautious about advancing, I decided to take advantage of the situation and pin him in the corner. This suited me very well, because it meant that I could take the fight to him, while still being in control of the central objective markers.

If Mark had pushed up more aggressively on his first turn, he would have been fighting for the tokens. Instead he now had to kill me AND have enough time to move forward on to the objectives.

Archer regiment (1) shot at the Slave Warrior regiment but only managed to do 1 damage to them. This meant that they were going to take a charge from the Warriors next turn, but I wasn’t too worried seeing as the Warriors were Me5 and the Archers are Def4 and 14/16.

The Fiends (with the Caterpillar Potion) charge out of the woods at Slave Wretch (3), doing 11 damage and wavering them.

The Abyssal Horsemen with the Brew of Strength charged Slave Wretch (2), the ones with the Crystal Pendant of Retribution.

I wasn’t too worried – 18 attacks on 3s and 2s shouldn’t kill the horde, especially with them having Rally (2) just behind them.

The gamble paid off and the Abyssal Horsemen did a good amount of damage to Slave Wretch (2) but failed to rout them. And I had a plan for next turn…

Gargoyle (1) moved forward to block in Slave Wretch (1). This was particularly bad for Mark, because it also blocked in all of this Nightmare hordes behind the Wretches.

On the right flank, the Soulbane charged and killed Katsuchan (2), putting him position to either harass the back of Mark’s main battle lines, or ground the Overmaster stopping him from flanking my units.

I moved the Gargoyles (3) and Abyssal Horsemen with the Brew of Sharpness up behind the Height 6 rock, so that they could threaten the flanks of Mark’s army while remaining out of line of sight of the Overmaster.

In hindsight, I think this was a mistake as I opened up the possibility of Mark moving the Overmaster to the top right of the rocks, out of arc of the Horsemen and out of line of sight of the Soulbane.

This would have meant that the Overmaster could threaten the flanks of my army unopposed.

Luckily for me, Mark missed this.

Bottom of Turn 2

Instead of moving to the top of the rocks, the Overmaster moved to the bottom of the rocks facing the centre of the board. This still meant that he was threatening flanks on all of my army and was safe from being charged by the Abyssal Horsemen with the Brew of Sharpness, but it did mean that my Soulbane had a charge on him – and so had the potential to ground him.

The Slave Warrior regiment charged the Archer regiment (1) and did a worrying 4 damage to them, wavering them. The Katsuchan and Decimators opened up on Butcher horde (1) doing an impressive 9 damage to them even with stealthy.

Slave Wretch (1) charged the Gargoyles (1) that were blocking them in, but they just clipped the woods and were hindered, meaning they were hitting the Gargoyles on 6’s. They only managed 3 damage and wavered them.

Slave Wretch (2) counter charged the Abyssal Horsemen with the Brew of Strength, doing 4 damage but failing to waver them.

Top of Turn 3

The heavily damaged Butchers charged the Decimators in the woods. They were hindered so unlikely to do much damage, but it would at least stop them from shooting next turn.

The Abyssal Horsemen with the Brew of Strength backed away from the Slave Wretch horde (2), in fear of setting off their Crystal Pendant. Instead the Gargoyles (2) charged in, valiantly throwing themselves onto the ratty grenade! Both Summoner Crones joined in on Slave Wretch (2) with their Drain Life, taking the horde up to 15 damage in total. The Gargoyles (2) only managed to waver the horde, but this actually worked out better for me because it kept the Nightmares held up for yet another turn.

The Fiend horde finished off the Slave Wretch (3) horde, and took 3 damage from the Last Breath.

On the right flank, the Soulbane managed to slip through the all important 1 point of damage on the Overmaster, grounding him in place and keeping my army’s flank secure. The Gargoyles (3) charged Katsuchan (3), damaging it but failing to rout.

Bottom of Turn 3

On the left flank, the Decimator horde with the Hammer of Measured Force made light work of the Butcher horde (1) and turned in towards the centre. The Slave Wretch horde (1) again only managed to waver the Gargoyles(1), keeping a good chunk of his army well and truly stuck in place.

The Warrior regiment did 1 more point of damage to the Archer regiment (1) and wavered them again. I would have to start doing something about them soon or risk losing one of my key objective holding units.

Katsuchan (1) and Slave Nightmare (1) & (2) all fired at the Abyssal Horsemen on the hill doing 5 damage to them but luckily failing to waver.

The Overmaster killed the Soulbane in one and was now released to start wreaking havoc on my flanks, but was it too little too late?!

Golekh managed to pull off a nimble charge to join the Slave Nightmare horde (3) going into the Fiends. Combined, they managed to rout them in one. While this was good for Mark, it left him in a dodgey position with Golekh. He couldn’t stay where he was, or else he would be charged in the flank by the Abyssal Horsemen on the hill. So instead he opted to back up D3 and rolled… 3″. This meant that he could be charged in the flank by the other Horsemen instead. Out of the frying pan and into the fire!

Top of Turn 4

Taking advantage of the unexpected opportunity, the Abyssal Horsemen with the Brew Sharpness charged Goleck in the flank, routing him. Unfortunately (for me), the Horsemen had to turn back around to face the Overmaster, giving up the opportunity to flank or rear the rest of Mark’s army.

Butcher horde (3) charged the flank of Slave Nightmare horde (3) but only managed a measly 5 points of damage.

Summoner Crone (1) turned around and Drain Life’d the Warrior regiment, doing enough damage to rout them.

Keen to avoid charging the Slave Wretch horde (2) with the Crystal Pendant, the Abyssal Horsemen with the Brew of Strength pivoted 90 degrees and charged the flank of Slave Wretch (1), routing them.

Gargoyles (2), who had wavered Slave Wretch (2) the previous turn, flew over the top of the horde and charged the Slave Nightmare horde (1) in the flank – only doing 2 damage.

The Summoner Crone and Archer regiment (2) shot the Slave Wretch horde (2) and took it up to 18 damage, but only managed to waver it again – they really didn’t want to die before using their Crystal Pendant on something worthwhile!

Bottom of Turn 4

Nightmare horde (1) ignored the Gargoyles (2) in their flank and decided to charge Gargoyles (1) instead to punish them for holding up the Slave Wretches for so long – finally routing them.

Katsuchan (1) and the Decimator horde shot at the Abyssal Horsemen with the Brew of Strength and took them back to 7 damage… again. Between regeneration and Drain Life healing, the Horsemen had sustained about 15 points of damage at this point and were still going strong.

The Overmaster and Slave Nightmare horde (3) charge the Butchers (3) that had miserably failed to kill the Nightmares (3) – their combined strength broke the Butchers in one. Both the Overmaster and the Nightmares turned round to threaten the flank of the Abyssal Horseman with the Brew of Sharpness.

Top of Turn 5

Butcher horde (2) and Gargoyles (2) charged the Decimator horde, doing a decent amount of damage but failing to break them.

The Archer regiment (2) did 1 point of damage to the Slave Wretch horde (2) and finally broke them. The Gargoyles (3) backed up by Drain Life broke the Nightmare horde (3). The Abyssal Horsemen with the Brew of Sharpness turned around to avoid being charged in the flank by the Overmaster.

On the left, the Abyssal Horsemen with the Brew of Strength killed the Nightmare horde (1) for daring to kill my precious Gargoyles! They turned around to face the middle horde of Nightmares (2).

Bottom of Turn 5

The Katsuchan (1) shot at the Archer regiment (1)… and missed.

The Overmaster charged the Abyssal Horseman with the Brew of Sharpness, doing some damage… but failed to break them.

The Decimators counter charged the Butcher horde (2)… but failed to break them.

The Slave Nightmare horde (2) charged the Abyssal Horsemen with the Brew of Strength… but failed to break them.

There was an unfortunate theme for Mark this turn.

Top of Turn 6

The Gargoyles (3) flew off and landed on the middle objective.

The Nightmares and Decimators were routed on the counter charge – the Overmaster took damage but held. I’d like to tell you it was anyone’s game going in to the bottom of Turn 6, but that wouldn’t quite be true…

Bottom of Turn 6

The Overmaster routed the Horsemen at turned around to face his IMPENDING DOOM!

Katsuchan (1) finally hit the Archer regiment (1)… but failed to break them.

We rolled for Turn 7 and got it – sorry Mark.

Top of Turn 7

Sorry Mark….

After Game Thoughts

Mark was a great opponent using a list that many people consider to be underpowered.

His main issue turned out to be his deployment – his army was so bunched up that when the Wretch hordes wavered, he couldn’t get any of his units in a position to deliver a counter attack. He was also hampered by the amount of stealthy I had in my list.

As I said at the start, this is part one of two battle reports I’ve written up for the Twilight Kin, so I’ll go into more detail on my thoughts on the army and my list at the end of the second game.

My initial impressions with the Twilight Kin are very positive. I do think the lack of actual elves in my list is a shame, but I don’t see a competitive way to change that at the moment. From this game I also learnt how important Drain Life is for the Twilight Kin – their units are strong, but relatively few and the highest nerve value in my list is 18. The healing factor from Drain Life can help to significantly increase the longevity of the list.

Game 2 vs Steve’s Goblins coming in a few days time.

Call to Arms 4 – Round 2 – 19/04/2020

I’ve been wanting to have a go at writing a Kings of War battle report for years, so I thought that while I have some more free time on my hands, now would be the perfect time to start.

To add a bit of extra pressure, I’m going to be doing my first battle report on the game I played against ‘Mr Battle Report’ himself, bone fide internet celebrity and Mantic employee – Kyle ‘Master Crafted’ Przenenski.

Yes that Kyle – from the videos

This was round 2 of a Call to Arms, the tournament being held over Universal Battle which has 146 players from across the world. The scenario for this round was Pillage and all players are using a set six objective makers. The event is using the Northern Kings scoring system (because its the best scoring system in the world).

My list

Kyle’s list

Deployment

Seeing as I’m new at this, I forgot to get a screen shot of my deployment, but you can sort of see what it was based on my turn 1 moves. I changed my plan for deployment half way through because Kyle put the Fiend horde down quite early on. That made me decide to put both Order of Redemption Knights on the left flank, hoping that their combined might along with the Exemplar Redeemer on Winged Unicorn (1) could hold the left two objectives on their own.

It did mean that Kyle had a much stronger right flank than me, so I would have to use my faster speed to keep him boxed in and delayed as long as possible. The hope was that I could kill everything on the left and centre and hold off the right flank as long as possible.

Top of Turn 1

Top of turn 1

I moved up fairly cautiously across the board – I knew Kyle would have to move towards me because he had no long range shooting and a stand off would suit me in long run as it would give me more time to get my flying Redeemers behind his lines.

I out sped him with pretty much all my units, so the plan was to get in a position where I could get multiple charges off against a single target. Kyle had a nice second row set up with his Fiend hordes and Impaler regiments, meaning that when I committed I needed to try and get charges off with as many units as possible to clog up his lines and block his units and try to avoid getting flanked.

The Exemplar Redeemer on Winged Unicorn (1) on the left flank moved up, putting himself in range of the Soulbane but nothing else – if the Soulbane did charge he would be charged by the Knights next turn. If Kyle pushed up fast on the left, I was planning on flying the Redeemer 20″ behind his lines to threaten the middle Spearmen horde (2) the next turn.

Bottom of Turn 1

Bottom of turn 1

Kyle’s movement was quite cautious as well. He moved the Gargoyles (1) up to block my Redemption Knights and moved the Spearmen (1) and Impalers (1) behind them, but not far enough to allow my Redeemer space to land behind them.

The Spearmen (2) in the middle moved up slightly and the two Shadow Hulks moved into the forest (I’m guessing Kyle’s plan was to make the most of their Strider while keeping them safer from charges).

His right flank moved up and turned towards the centre of the board to start putting pressure on my units. He sensibly moved the majority of his army into charge range all at once. I see a lot of people try and stay out of charge range for as long as possible, but when you are slower than your opponent this is often the wrong move as you just find yourself backed into a corner. Better to push forward, take the initial charges and then counter attack.

Top of Turn 2

Top of turn 2

I thought about my charges for quite a while – pretty much my entire army was in range to charge something, but there wasn’t a single charge I could make where there wasn’t a risk of being flanked or counter charged by something nasty.

In the end, I opted to go for what was probably the riskiest charge, but that had the greatest reward if it succeeded. I triple charged the Kindred Spear Horde (2) with the Waters Elementals (1), Exemplar Redeemer on Horseback and the Order of Forsaken Knights. Quick maths told me that even against phalanx they should do a combined 15 damage on average (Waters Elementals 6, Order of the Forsaken w. bane chant 6, Exemplar Redeemer 3), and using Nick Williams excellent rule of thumb that explains why averages aren’t always helpful I knew that I would most likely do -/+2 damage to the average, so roughly 13-17 damage. So with top estimate, I should have been in with a good shot of routing them.

I thought it was worth the risk, because if I managed to break them I would control the centre of the board and effectively split Kyles army in two – taking control of another objective maker and forcing Kyle come to me. Plus, I could reform all of my units in a way that meant I wouldn’t take any charges the next turn.

The Water Elementals (2) and Exemplar Redeemer on Winged Unicorn (2) backed up out of charge range. I wasn’t sure what to do with them, and I’ve lost games in the past by being too rash and charging units in when you’re unsure. So I decided to hold them back and if I did manage to break the Kindred Spearmen, the Water Elemental (2) horde could help keep Kyle pinned on the right hand side of the forest.

Unfortunately, it didn’t quite go to plan.

I failed to cast Bane chant, even with the re-roll from the Conjurers’ staff and the Exemplar Redeemer only managed to do 1 damage after rolling 3 ‘1’s to damage. In all I did 12 damage to horde.

Even though I knew I would now most likely lose the Forsaken Knights to the Shadow Hulks in their flank, I felt putting a good amount of damage on the Kindred Spears (2) was still a positive.

Both Redemption Knights on the left flank double charged the Gargoyles and unsurprisingly routed them. The left ones backed up first and rolled a ‘1’ which kept them in charge range of the troop of Impalers who were in their flank. This meant I couldn’t risk backing up the right regiment as if I rolled more than a 1 it would expose left regiment’s flank. This meant that the Kindred Spears and Impaler troop were both in range to charge the Redemption Knights with Brew of Sharpness in his next turn, but they would at least both be hindered.

The Exemplar Redeemer on Winged Unicorn (1) moved out of arc and into the flank of the Kindred Spearmen horde (1). I knew he was in charge range of the Soulbane, so I made sure to position the Redeemer in such a way that if the Spearmen did charge the Knights, I could pivot past the individual and charge the Spearmen’s rear even if I did lose my fly.

I flew the Pegasus out from behind the building and turned to face the flank of his Spearmen horde (1). The hope was to use him to harass his Crone for a turn for two before flying off to score an objective in later turns.

Bottom of Turn 2

Bottom of turn 2

As expected the Kindred Spearmen (1) and Impaler troop (1) both charged the Order of Redemption Knights with the Brew of Sharpness. Luckily they were both hindered and so only did a combined 9 damage, although this was still enough to waiver the Redemption Knights.

The Soulbane charged the Exemplar Redeemer on Winged Unicorn (1) and only did 1 damage.

The two Shadow hulks flanked the Forsaken Knights and the Crone Hag Drain Life’d them doing 4 damage and healing 4 on the Kindred Spearmen horde (2) (I hate Drain Life with an unholy passion, it is massively overpowered compared to all other spells in the game, is only available to a select few armies and just does too much with very little downside). The Shadow Hulks easily routed the Forsaken Knight – one turned to face the left Water Elementals (1) and the other turned to face the other Water Elementals (2).

The Kindred Spearmen horde (2) counter charged the Exemplar Redeemer on horseback, hoping to kill him and be able to overrun into combat with the Water Elementals (1). Luckily for me, even with the help on Bane chant they only managed to do 6 damage to the Redeemer and waivered him, saving the Water Elementals (1) from taking damage.

The Gargoyles (2) moved to protect the Spearmen horde (2)’s flank.

Top of Turn 3

Top of turn 3

Showing how indifferent they were to these bothersome pointy ears, both the Redemption Knights and Exemplar Redeemer shrugged off their waiver with successful Headstrong roll (both on a ‘6’, they really didn’t care!).

As I’d set up earlier, the Exemplar Redeemer on Winged Unicorn (1) was able to disengage and pivot past the Soulbane to charge into the rear of the Kindred Spearmen (1) – The Redemption Knights with Brew of Strength joined him in the front.

The Redemption Knights with the Brew of Sharpness counter charged the Impaler troop (1) and only managed 5 damage – luckily I rolled a 10 on the nerve and killed them. They also regen’d 2 damage back this turn (keep an eye on how much damage they regen this game).

The Exemplar Redeemer on Winged Unicorn (2) on the right charged the Fiend regiment. I was really hoping I wouldn’t kill them as they were much more helpful to me a road block, holding up his Fiend horde. I did 3 damage and failed to waiver – pretty much perfect.

The Water Elementals (1), Exemplar Redeemer on horseback and the Pegasus all charged the Kindred Spears (2) in the middle doing another measly 6 damage between them. Thanks to the healing from Drain Life and a low nerve roll, I only managed to waiver them. This didn’t look good for the Water Elementals (1) who now had a very angry Shadow Hulk looking straight at their flank.

Bottom of Turn 3

Bottom of turn 3

On the left flank, the Impaler regiment (1) charged out of the woods into the Redemption Knights with the Brew of Sharpness. Unfortunately for Kyle the hindered charge only managed to put another 3 damage on the Knights, taking them up to 10 – he did at least manage to waiver them again.

Incredibly, the Shadow hulk (1) only managed 9 damage in the flank of the Water Elements (1) and they held! The Crone Hag cast Drain Life on the Exemplar Redeemer on horseback but thankfully only managed 1 damage this time and he also held.

The Impaler regiment (2) on the right charged the Water Elementals (2) and the Fiend regiment counter charged the Exemplar Redeemer on Winged Unicorn (2) doing a very respectable 6 damage. Luckily both units held.

The Soulbane decided he’d had enough of this flank and went his full 18″ taking him out of arc of the Order of Redemption and putting him in range of the Men at Arms (1) who up until this point had been sat on an objective minding their own business. The Gargoyles (1) also turned 90 degrees and moved up to threaten the Men at Arms (1). He moved the Gargoyles (1) into charge range of the Men at Arms (1) which I personally thought was a mistake because he could have easily kept them out of range of any of my unit – but as it turns out, it ended up working out for him!

Top of Turn 4

Top of turn 4

The Redemption Knights with Brew of Sharpness failed their Headstrong roll this time, so instead of counter charging they disengaged 1” and spun 180 degrees to cover the Men at Arms (1) and the top most token. They also regen’d 7/10 damage taking them down to 3!

The regiment next to them flanked the Impalers (1) and killed them. They over ran but only rolled 1”. If they have rolled a 3+ they would have been in range of the Shadow Hulk (1) in the centre of the board and it would have been a very different game – sadly it was not to be.

Keen to avoid anymore Drain Life, the Pegasus charged the Crone Hag who had been cowering behind the Shadow Hulk (1). It did the all important 1 point of damage but failed to waiver/kill her.

The Exemplar Redeemer on Winged Unicorn (1) moved across from the left flank into the centre of the board by charging the flank of the Kindred Spearmen (2) that had survived so much punishment so far. An Exemplar Redeemer in the flank proved to be too much for them and the Redeemer picked up his second Spearmen horde of the game, forever gaining himself the moniker of “Spearbane”.

The Water Elementals (1) that I had expected to be killed in the previous turn countered the Shadow Hulk (1) and the Exemplar Redeemer on horseback did a 360 to also join in. They did a respectable 7 damage but with Def5 and -/20 I knew that they were unlikely to kill it. The plan was to do as much damage as possible and hopefully pick it up later with a late game charge.

I got incredibly lucky on my right flank, and for once it was actually a plan not just blind luck! I moved the Druid over to Bane Chant the Water Elementals (2) so that they were damaging on 2s for their counter charge against the Impalers. I knew that if I could waiver or fail to kill the Fiend regiment, I could use it to protect the Water Elemental horde’s (2) flank if they killed the Impalers (2). This would keep the Fiend horde out of combat for yet another turn.

I rolled the Exemplar Redeemer on Winged Unicorn (2) combat 1st and waivered the Fiend regiment – so far so good. The Water Elementals (2) then proceeded to do 6 damage to the Impalers which was the bottom end of average, but rolled a 10 on the nerve and killed them! Because I already knew my flank was protected by the waivered Fiend regiment, I turned to give the Shadow Hulk a front charge feeling quite smug that my plan had actually come off.

The Men at Arms (1) charged the Gargoyles (1) and did 3 damage, waivering them.

Bottom of Turn 4

Bottom of turn 4

This turn despite having front not flank charges, and despite all my clever plans to keep the Fiends out of combat both Shadow hulks decided that they’d had quite enough of the Water Elementals and proceeded to easily kill both units- I suddenly felt a bit less smug!

The Crone Hag valiantly counter charged the Pegasus and was even supported by a Bane chant from the Army Standard Bearer. It was all set to be the upset of the centaury… but sadly she missed with her 1 attack.

Unable to make it into any combats (thanks to my cunning plans that turned out to not matter anyway!), the Fiend horde side stepped to give itself better positioning for the next turn.

Top of Turn 5

Top of turn 5

At the top of turn 5 I started to really think about how I was going to score scenario points. The left half of the board was clear of enemies so I decided to ‘bank’ the two tokens I had over there and leave the rest of my forces to fight over the rest of the objectives. This wasn’t an easy decision because leaving a 280 point regiment of Knights to do nothing but hold a token did mean that I was going to struggle elsewhere.

I spun the Order of Redemption with the Brew of Strength 180 degrees to that they could take the far left token on turn 6. I also turned the Pegasus around and flew it 10” towards the other left hand token. The Crone Hag would survive – this time.

The Men at Arms (1) charged the Gargoyles (1) again and the Brew of Sharpness Redemption Knights charged the Soulbane.

The plan was for the Men at Arms (1) to kill the Gargoyles (1) and then turn so that they could move at the double to capture the middle objective on turn 6 – using their superior unit strength to take it from the Shadow Hulk (1). The Redemption Knights had a very good chance at killing the Soulbane as they had 20 attacks hitting on 2s and damaging on 3s. This would free them up to move onto the top objective in turn 6. If it all went to plan I would have a fairly comfortable win – and there was no reason it shouldn’t all go to plan…

It didn’t quite go to plan – the Knights did a very respectable 10 damage to the Soulbane but only managed to waiver him. Far more importantly the Men at Arms (1) did 5 more damage to the Gargoyles (1) and rolled… a double 1!

The right Men at Arms (2) moved forward, keeping just out of range of the Shadow Hulk (2). The hope was that the Exemplar Redeemer on Winged Unicorn (2) would kill the Fiend regiment this turn so he could over run out of the Shadow hulk (2)’s arc (he only needed 1″ to get out of arc). It shouldn’t be took hard to kill the Fiend regiment, they were already on 8 damage and weren’t Inspired. This would force the Fiend horde to commit or else risk the Men at Arms (2) capturing the right most objective unopposed.

Sadly it was not to be – the Exemplar Redeemer on Winged Unicorn (2) only managed to do 1 damage to the Fiends! He did waiver them again, but this time he was going to get a Shadow Hulk (2) in the flank next turn. Worse of all, it meant that the Fiend horde could safely move left toward the objectives in the centre of the board without having to worry about being charged in the flank by the Exemplar Redeemer (2). My plan to keep them pinned had been scuppered.

In the middle of the board the Exemplar Redeemer on Winged Unicorn (1) and the Exemplar Redeemer on horseback charged the Shadow Hulk (1). It was already on 7 damage so if they could do average damage to it (between 4-8) then they would be in a good position to kill him and take another scoring unit off the board. Again, sadly not. They managed to do 4 damage between them but rolled a 3 on the nerve check.

I was starting to get quite nervous at this point – I’d flubbed three very important and fairly easy combats and my comfortable win had been flipped on its head. It was going to be a mad dash for the objectives at the end of the games.

Bottom of Turn 5

Bottom of turn 5

To add injury to the insult of the double 1 the Gargoyles (1) regen’d 6/8 of the damage on them and then proceeded to do 6 damage to the Men at Arms (1) on the counter charge and killed them! Oh bugger!

As expected, the Shadow Hulk (2) flanked the Exemplar Redeemer on Winged Unicorn (2) killing him easily. The poor Men at Arms (2) now had to deal with a Shadow Hulk (2) and a Fiend regiment on their own.

The middle Shadow Hulk (1) counter charged the Exemplar Redeemer on Winged Unicorn (1), he needed a 10 to kill him (with a re-roll) and he got it! He reformed to face the middle objective.

The Fiend horde moved into the woods to make a late game move for either the bottom or middle objective.

That had not been a good turn for me!

Top of Turn 6

Top of turn 6

The Men at Arms (2) charged the heavily damaged Fiend regiment and with the help of a Bane chant, finally killed them. They turned to face the Shadow Hulk – all they had to do was surive one charge from him and they if the game ended on turn 6, they would hold that objective.

I had a big decision to make with the Exemplar Redeemer on horseback. He could either charge the damaged Shadow Hulk (1) and try and kill him, or charge the Fiend horde and block them from moving onto a token in the bottom of turn 6. Statisitcally speaking I should kill the Shadow Hulk (1) but by this point I was pretty nervous of combats I should win! So I decided to forsake the extra tournament points for killing the Shadow Hulk (2) and charge the Fiend horde as I knew I could definitely block them getting to a token this turn (the Redeemer is Mighty so even if he failed to damage he would block the Fiends).

The Redemption Knights with Brew of Sharpness finished off the Soulbane and reformed so that they were just out of 12” of the Shadow hulk (1).

The Redemption Knights with Brew of Strength and the Pegasus moved onto their objectives, effectively taking them out of the game but ensuring that those points were safe.

I’d done all I could and put myself in as strong a position as possible – so long as the Men at Arms (2) survived the charge, I would win the game if it ended on turn 6.

Bottom of Turn 6

Bottom of turn 6

The Fiend horde counter charged the Exemplar Redeemer on horseback and did 8 damage to him, killing him in one! Clearly they didn’t appreciate being blocked! They over ran but rolled a ‘1’ – this would be big later on!

The Gargoyles (1) flew on to the top objective.

The Shadow Hulk (2) charged the Men at Arms (2) – the ones that needed to survive in order for me to win on turn 6. His to-hit rolls were pretty bad and he only did 5 damage, definitely the lower end what he should have done.

He needed a 10+ to kill them… and rolled a 10! Boo!

At the end of the Turn 6, losing the Men at Arms (2) meant that the game had shifted from a win to a loss. I really, really needed a turn 7….

Salvation!

Top of Turn 7

Top of turn 7

There was a turn 7!

The Redemption Knights charged the Gargoyles (1) in the rear and killed them. I held my breath before rolling the nerve check on them, I was sure it was going to be another double 1, but thankfully not!

My Druid valiantly threw himself under the Fiend bus. He managed to position himself in such a way that the Fiends couldn’t move through him and still leave a 1” gap at the end of their move. So their only chance to get within 3” of an objective was to charge him and over run.

I really took my time moving my Druid and got out spare units to triple check that the Fiends couldn’t make it past. I would say don’t ever be afraid to use spare units to double check things like this. Its one of the great features of Universal Battle, but I’ve found that by doing this online, it has also made me think more about where my opponents units can move on the table top as well.

At the end of my turn 7 my Redemption Knights had taken then top token off the Gargoyles and my Druid had valiantly taken the place of the Exemplar Redeemer as “Chief Fiend Blocker” – preventing them from being able to grab another token.

Bottom of Turn 7

Bottom of turn 7

The Fiend horde charged the Druid and as expected killed him easily. They over ran…. 1”!

We actually checked and even if Kyle had rolled a 6, he would have been out of 3” of the objective by milimeteres (remember when I said it was really important that he only rolled a 1 on his over run against the Redeemer?).

At that was the end of the game!

I won 3-2 by the absolute skin of my teeth! Kyle played an absolutely fantastic game and was a brilliant opponent. The game was incredibly close and really did come down to whether or not there was a turn 7. You can see how close it was by how many points we both killed – I killed 1480 and he killed 1470.

So we both scored +3 for kills, I scored +3 for scenario and Kyle scored +2. The final score was 21-10.