Army Review: Twilight Kin

I am very pleased to share the first in a series of 26 army reviews – that’s right I’m doing them all!

While I am a big fan of the traditional army review format, they usually only show the opinion of one person playing in one particular meta. Even within the same gaming group, there is often a lot of disagreement over which units are top tier and which leave a lot to be desired. So I’ve decided to format these army reviews in a way that captures that debate.  

Each review will be made up of the opinions of four different players; either players who know the army well or regularly plays against it. I’m going to try and ensure that the players who review each army come from a wide variety of different gaming backgrounds and different parts of the world.

A massive thank you to Grant, Marc and Thomarsar for their help with this review.

The ‘Expert’ Panel

Marc
Hello, world!  I’m Marc Taylor, a player based out of Chicago, IL (USA) and member of the Tabletop Titans, and reigning champ of doing pretty well early and then losing in dumb ways mid-event only to circle back up to the upper ranks of events. However, in June 2020, I ran Twilight Kin against 36 players in the Bugeater GT and ran the gamut against strong lists and strong players (Keith Randall, your KOM list still haunts me despite my victory) to take first place.  Twilight Kin called to me for a number of reasons, chief of which is that I’m a special snowflake who is drawn to armies not being played much.  But it was also because I was wanting to paint/build certain units for a physical army I was (and still am…) building, and the unit profiles for Twilight Kin most closely matched the models I was using.  But then the more I played with the list, the more I enjoyed it and toyed around with various interesting builds.  Sadly, not many of them really ever clicked, but now my losses and insight are your gain! 

Elliot
Its my blog and I love Twilight Kin, so of course I was going to jump on the chance to do the the review for this army – don’t worry I wont be contributing to all the reviews. I’ve been playing Twilight Kin for almost a year now and absolutely love them, they fit my playstyle really well and I feel that I’ve been able to get a good range of competitive lists out of them. Thanks to COVID I’ve only been able to take them to one ‘real’ event but managed to come 3rd with them on their first outing at the GT in Cologne.

Grant Alexander
I’ve been playing since 2nd edition, as a Warhammer refugee. I did get the 1st edition signed Kickstarter rulebook although never played that edition as the game didn’t quite grab me and I was quite involved in the Warhammer tournament scene (had a podcast and everything). After the company that should not be named blew up the fantasy world, I went looking for a new rank and flank game. Signed up for my first event and learnt to rules from watching battle reports and a tutorial game from a mate down the gaming club (Bexley Reapers). My first event I took Twilight Kin and surprisingly managed to take out the event. Since then I’ve used Twilight Kin on and off. I’ve taken them to 2 of the Shroud of the Reaper events (tournament I co-host with Mark “Giant Farmer” Cunningham) and managed to somehow come in 3rd at the first event and 2nd at the latest. I’ve painted up a lot of models for the army over the last year and am looking forward to trying to hang on to the Twilight Kin ‘best in race’ icon till the end of the season (doubtful, just nice to have a goal).

Thomarsar
Refugee from the 2015 warhammer exodus. Usually close to the top, but rarely 1st. Played mostly dwarfs and Brotherhood in 2nd, started with TK in erly 3rd and stuck with it. Mixed arms with focus on alpha strike is my favourite playstyle and I’ve made a TK list to match. What drew me to TK was that I really wanted to test Treeherder + forest shamblers, but both main lists for them didn’t interest me and when I got to TK and Mikayel especially I was hooked by the idea for my army. Also as I got a TK army box and the possibility to make my first all Mantic army.

The Rating System

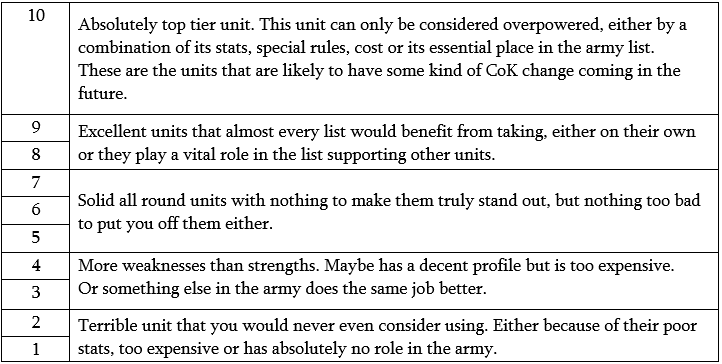
Each unit in the army is given a rating /10 using the scale below.

Note that the score given is how the unit compares to all other units in the game, not just compared to other units in the army. However, each unit should be considered in the context of this particular army e.g. Silverbreeze cavalry in Twilight Kin may be rated differently to Silverbreeze cavalry in Elves.


Impalers

Marc – 7/10
Probably my favourite unit in the army, and yet one of the most frustrating.  They define the general playstyle of the army as a whole, functioning as one of the sturdier glass hammers.  The first thing most players see is the average defensive stats; de4+ and a nerve of 14/16 is admittedly not the best, but it’s far from terrible.  However, their offensive profile more than makes up for that.  Elite on only 15 attacks doesn’t mathematically add too many additional hits (1.25, on average), but it does prevent the amount of missed charges.  Put Brew of Strength or Vicious on them and have a source of Bane Chant nearby, and they can reliably do 8 to 10 wounds per regiment.

…but that’s why I only rank them only a 7.  It will become a familiar refrain throughout this army review, but when enabled, Impalers do amazing work.  The issue is that you can only have so many support pieces in a list, and they can’t support everything.  Impalers require being a second-wave unit (or at least shielded by chaff) and greatly benefit from items and Bane Chant.  They function fine without items, but they absolutely cannot be the unit at the forefront of your deployment.  For me to give a unit an 8 or above, I feel like you need to have a reason not to take it; units like the Soul Snare or Mhorgoth or whatever (which I realize is an unfair comparison, but still).  Impalers require enough additional support that there are very strong and valid Twilight Kin lists that don’t feature them at all.

I personally only take regiments, as troops feel considerably too fragile and if I wanted that profile I’d pay +20pts for a troop of blade dancers.  It’s also worth noting that I’m not a fan of the screamshard option.  I’ve tried it out a lot on the regiments, but more often than not I never get a chance to use it.  If something is punching them, the Imps are either going to get wavered, routed, or it’s chaff that maybe does a wound or two.  I never got my money’s worth out of the scream shard when comparing those 10pts to items.  Still, if you’ve got 10pts left at the end of list construction and have nothing else to spend them on, slap it on there I guess.  Just don’t expect it to meaningfully do much.

Recommended items:  staying stone, dwarven ale, chalice of wrath, mead of madness, chant of hate, brew of haste, brew of strength

Photo credit: Kevin McCusker

Elliot – 6/10
Impalers are…fine. They’re a perfectly decent unit that have a good damage output for an infantry regiment. I know other people really like them, but I’ve never really been very enamoured with them. For me they’re still just a little bit too fragile for their cost, Def4 and 14/16 is just a little bit too easy to waver in my experience. I’d recommend not taking the Screamshard on these guys as they rarely tend to be in a position to use it. I find that Impalers are either fully fresh or dead in one hit, they dont have much in between.

I think if you build your entire list around delivering these guys to the front lines safely and then support them with Bane Chant or Drain Life then they are a decent unit – but for me I find that a little too much investment to make them work.

Grant – 7/10
Solid unit with good amount of Crushing Strength attacks. Held back due to no horde option.

Thomarsar – 6/10
 Decent hitting power, but costy for def/nerve.


Blade Dancers

Marc – 6/10
If lightning bolt wasn’t nearly as prevalent in the game right now, this unit would be an easy 8.  However, there is enough casual LB10+ and all our healing is limited to 6” drain life that it means they either get picked off long before they engage or they’re stuck being screened by units that do their role just as well (horsemen or fiends).  Given that concern, my numerical score for the troop is probably closer to a 5; de3+ and -/12 is really, really easy to casually break.  Fearless is great and it’s what’s keeping their score so relatively high for me, but it’s just not enough in the current meta.

It’s worth noting, however, that when the Dancers are allowed to do their job, they REALLY do their job.  On average, unhindered, 20 elite attacks on 3s will get 15.6 hits, one less than the average 16.6 hits from a 25 attack me3+ unit.  When fully enabled, they’re essentially as damaging as a Soul Reaver regiment, but you need to work hard to let them do it.  A dedicated chaff unit, a summoner crone with veil of shadows, several items to help them get the jump on other units are all great options, but it means you can’t just take this unit as a standalone unit and hope for it to perform.

Photo credit: Kevin McCusker

Recommended items: maccwar’s potion of the caterpillar, sir jesse’s boots of striding, brew of haste, mead of madness, chant of hate, brew of haste, hammer of measured force, brew of strength

Elliot – 7/10
Speed 7 on this unit is very powerful and it’s what separates them from other Berserker style units – but man are they fragile for how much they cost. This is a unit that I’ve found to be a bit all or nothing; taking just one or two regiments makes them an easy shooting target. Taking 4-5 regiments means that something will always get through and when it does, it’s going to do a decent amount of damage.

Grant – 6/10
Lots of attacks but you still pay through the nose, even after the Clash of Kings ’21 points drop. Should have hero type that boosts them. Low defence means they suffer Vs similar units. 

Thomarsar – -/10


Kindred Tallspears

Marc – 8/10
Sadly, being an unlocking infantry horde is justification enough for this score in TKin, it just also happens to be a legitimately amazing unit.  I cannot imagine ever building a strong TKin list without at least one horde, but never more than two.  I would also always put the hammer of measured force on the first horde, and brew of strength on the second and you’ll be able to take a hit and hit back strong.  On average the horde gets 17.5 hits, so any amount of bonus to wound is going to go far.  Beyond that, de4+ 21/23 with phalanx is far from unkillable, but even one source of drain life makes them stay in the fight far longer than it seems that they should.

It might be because it’s our only unlocking horde option, but I personally would only ever take this unit as a horde.  The regiment is 20pts cheaper than an Impalers regiment, and a unit with phalanx isn’t really comparable to a unit with cs(1), but I would still prefer the Impaler regiment.  A de4+ phalanx unit with 14/16 nerve is still very unlikely to survive against anything you’d want charging it (i.e. any sort of cav) especially if that regiment takes 2-4 wounds on the way in.

Recommended items:  hann’s sanguinary scripture, aegis of the elohi, hammer of measured force, maccwar’s potion of the caterpillar, chant of hate, brew of strength, brew of sharpness.

Elliot – 8/10
I love Tallspears, they’re a hammer and anvil unit rolled into one. They can take a charge from almost anything in the game and they can hit back with damage output similar to cavalry regiments. For me the Brew of Strength is a must take on this unit. With it their average damage per round vs Def5 goes up to 8.8 – that’s enough to threaten to kill any large infantry or cavalry unit in one hit. Add in the fact that they’re speed 6 and their threat projection on the board is a beautiful sight to behold. I never leave home without two hordes of Tallspears. The only reason I haven’t scored these higher than an 8 is the fact that I feel they need expensive items attached to them to come up to their full potential. 270 points (the cost of the horde with Brew of Strength) is a big chunk of change to drop on a unit, but its always been worth it for me so far. 

Grant – 7/10
Solid unit. They like both the Brew of Strength or Hammer of Measured Force. Good nerve so are useful as central tarpit unit that can dish out some damage. 

Thomarsar – 5/10
They are all right, but I rarely get positive surprises. 


Kindred Archers

Marc – 5/10
Elf archers have been dissected to death since the drop of 3rd edition, and I don’t have a lot to add to that discussion.  They’re only 120pts for the regiment, so they can act as a higher-priced chaff unit that can walk forward and shoot while being a 14/16 blocking unit or staying back acting as objective holders.  They’re far from terrible (I feel most people rate them at a 3 or 4), but they also rarely make it into my lists.  Still, I don’t hate 1 or 2 regiments of them in a list, but they’d be high on the list of units to cut if I’m looking to make more room.

Recommended items:  none

Elliot – 4/10
If you look at them purely for their ability to shoot things, then they’re a terrible unit. However, speed 6, Def4 and 14/16 are all excellent stats for a unit that only comes in at 120 points. Take them as regiments or not at all in my opinion. 

The best role for these units is to sit back on an objective all game and take the odd pot shot whenever they can. What is frustrating is that they sit on an objective just as a well as a Zombie regiment does, but they cost 50 points more.

Grant – 4/10
Hitting on 5s as a base sucks. Even with elite. If they gave them Steady Aim it would be thematic and match the rest of the list.

Thomarsar – 8/10
Good objective holder, unlocks, cheap enough to be chaff in a pinch.


Kindred Gladestalkers

Marc – 6/10
They’re archers, but better!  But also so, SO much more fragile.  Having scout and pathfinder means they can scout forward into a forest and into cover before turn 1 which helps, but at de3+ and 10/12 nerve for the troop and 14/16 nerve for the regiment, they can get quickly shredded if anything even casually looks at them.  They are one of only a handful of units in the army with terrain mitigation built-in (pathfinder), which is often very relevant.  They’re also notably one of the only units in the list that have full elite, and not just elite(melee) or elite(ranged).  On paper they have a lot going for them, but even when you live the dream and let them charge a flank they don’t really do a ton.  Even the regiment against the flank of a de5+ unit (which, IMO, is pretty close to the standard profile in the game) only does 3, probably 4 wounds.  Granted, those wounds CAN be pretty critical if you’re also doing 10 wounds in the front from an Impaler regiment, but also it’s also very challenging to orchestrate that scenario against even a casually experienced player.

It’s worth noting that as of Clash21 they unlock now, which definitely helps them have a place in most lists. However, at 175pts for a regiment, they’re still a little too pricey for me to include too many of them in a list.  I would also only ever consider regiments of them, as 130pts for a troop is the same cost as a troop of Silverbreeze Cavalry.  Those cav have better speed, defense, nerve, and also have nimble.  All of that more than makes up for the one less attack, especially for that low amount of attacks.

Recommended items:  none

Elliot – 5/10
Becoming regular was a nice buff for them and definitely opened up some more options in an army like Twilight Kin that is so often starved of unlocks. But Gladestalkers are an example of a unit that pays for so many competing special rules that it’s unlikely to ever make its points back.

Steady Aim is made somewhat irrelevant by Scout and 24” range. If you’re using your Elite in melee, it means that you’re not utilising all those points they pay for their shooting attacks. All this adds up to a unit that is fairly costed, but just a little too expensive for my taste. 

Grant – 7/10
Good unit for long range harassment. They work better on boards with a good amount of difficult terrain, else they struggle to make back their points.

Thomarsar – 4/10
Way better damage than archers, but too costly, especially due to low survival.


Therennian Seaguard

Marc – 6/10
This unit really feels like a horse designed by committee.  The points reduction from the Clash21 adjustments certainly helps, but without steady aim their bows are unlikely to ever be overly useful.  If the horde survives to turn 5 or 6, I can see them being very useful though.  However, my single biggest issue is that Twilight Kin are SO unlock starved that I have a hard time justifying this unit over a spear unit.  I realize it doesn’t need to be either/or, but if you’re putting in a horde of each then I still feel like you’re missing out on the unlock potential of two regular hordes.  

Even though they’re most often lambasted for not having either steady aim or that they’re limited to only elite(melee), I still think they’re not a bad option.  If they were an unlocking unit they would probably replace spear hordes entirely for me, and if you wanted to play a list that focuses much more on the Elven units then they aren’t out of place.  Likewise, if you’re wanting to build more of a gunline, I don’t hate them being present either.  However, I feel like they are outshone by many other similar units in the army.

Recommended items:  chant of hate, dragonshard shield, hammer of measured force, brew of strength

Elliot – 6/10
With their updated price point, Seaguard are a unit that I think people need to pay closer attention to. They’re a unit that can take part in every turn of the game, but unlike Gladestalkers they don’t pay so much for their ranged attacks, as to make it a waste when they get into combat.

I like taking these as regiments. They’re a nice solid unit to hold down a flank or an objective. They’ll never set the world on fire, but they’re pretty good now. 

Grant – 6/10
I prefer these over archers as at least they can defend themselves a bit. The price drop helped them massively.

Thomarsar – 4/10
This unit tries do two things at once and is a bit meh at both.


Cronebound Gargoyles

Marc – 8/10
What’s left to say about gargoyles that hasn’t already been said?  They’re up there with best chaff in the game.  The only reason they’re not 10/10 is because of the previously mentioned LB proliferation and how quickly they can get surprise routed long before they’re useful.  

It’s important to note that gargoyles shouldn’t just be seen as a speedbump.  Speed 10 nimble fly is definitely great for blocking LoS and charge lanes as highly mobile chaff should do, but that can just as easily be used to run around a flank to get flank/rear charges, and with 10 attacks hitting on 4s, flank and rear charges can be really punishing if you also have any bane chant available.  For example, if you were to rear charge a de5+ unit, that’s an extra 5 wounds even without any bane chant.  Acting as a flanking charger is still definitely not their primary purpose, but don’t lock your thinking into them only being great throwaway chaff.

Recommended items:  lol no 

Photo credit: Kevin McCusker

Elliot – 10/10
Gargoyles are too good. Plain and simple. Not because of their stats, but because they’re so cheap. I debated for a long time about whether Gargoyles should be a 9 or a 10, but I settled on 10 because there will never ever be a list that doesn’t benefit from taking at least two troops of gargoyles. 

I would still take them is they didn’t have any unit strength.
I would still take them if they didn’t have any attacks.
I would still take them is they were 100 points.

They will AWAYS be worth taking for 85 points, in any list, in any build, in any scenario. I think that has to make them a 10/10.

Grant – 9/10
Almost every list will have 2 units. The only reason I’ve not rated them a 10 is due to the nerve hit they took in 3rd Edition so you can easily kill them with one good round of shooting from a single unit. 

Thomarsar – 8/10
Great chaff piece that can also easily be a worrysome flanker. However they’re very vulnerable to Mind Fog/ Lightning Bolt and puts them down a bit.


Cronebound Butchers

Marc – 8/10
The original thicc chaff.  If you don’t know how great the unit is by now, then you’re probably new to the game, in which case: they’re great.  Butchers are worth taking as regiments for that sweet sweet thicc chaff or as hordes as a great anvil.  They’re also one of the only units in the army that comes with at least two points of damage modifier (crushing strength (2)), which gives them a solid spot in any army.  Do keep in mind that hitting on 4s means that they can do some reliable and meaningful damage, but they won’t act as a primary hammer (unless you invest a lot into them).  

Recommended items:  player’s choice

Elliot – 8/10
I personally don’t tend to use Butchers that often, preferring my Cronebound units to be a little faster and harder hitting. But I totally recognise how good they are. This is a unit that works both as regiments or hordes, although both fulfil quite different roles in the army. 

Losing Fearless in CoK21 was definitely the right way to go for them, as it is they’re still unbelievably good value and fill a role in the Twilight Kin list.

Grant – 7.5/10
Straddles the border between a 7 and an 8 due to losing Fearless in CoK21. Also, this is a unit that you would happily pay the extra 5pts to have Mindthirst. 

Thomarsar – 8/10
Great in regiments and hordes as thick chaff/damage dealers.


Cronebound Shadowhounds

Marc – -/10
I’ve never played with them or against them.  They seem like you could build a good list with them, but without actual experience I’d hate to theorize.

Elliot – 4/10
In a Nightstalker review, I would rate Shadowhounds higher but I think of all the Nightstalker units brought into the Twilight Kin list, Shadowhounds are the ones that suffer the most from losing Mindthirst, as their natural habitat is out on the flanks harassing enemy units. Twilight Kin will never have the spare Inspiring available to baby sit them.

For me, I will always find the extra points to upgrade them to Horsemen. Or save the points and ‘downgrade’ them to Gargoyles.

Grant – 6/10
Overpriced and kind of lack a role in the list that isn’t performed better elsewhere. 

Thomarsar – -/10


Cronebound Abyssal Horsemen

Marc – 7/10
…and Crone Bound Fiends. I can’t discuss one of these units without directly referencing and comparing to the other.  To me, you pick one of these two units, but never both.  At their core, both units are sp8 cavalry that average 12 hits on a front charge when unhindered with at least crushing strength (1).  The Horsemen are an unlocking unit, which can be a huge point in their favor, but are 30 points more for the full-sized unit (regiment of Horsemen vs a horde of Fiends).  When it comes to offensive potential they are essentially tied although the Fiends have a higher potential given their 6 more attacks compared to the Horsemen, but I personally rank vicious on the Fiends higher than the thunderous charge (1) of the Horsemen.  It is also critically worth mentioning that, when using standard terrain, Fiends can see (and be seen) over hills, though with that cutting both ways that’s possibly a net neutral difference.  

The biggest difference is in their defensive profile, and this is where it comes to what your meta is.  Horsemen have higher defense, regen, and fury, but have two less nerve and no stealthy.  In my experience, de5+ and nerve 14/16 is unfortunately easy to break.  But honestly, I mostly value the stealthy of the Fiends, as most of my opponents seem to want to bring at least two war engines, and sometimes up to five.  That amount of firepower evaporates units, but cutting their accuracy from hitting on 5s to hitting on 6s trivializes all of those points.  And being height 4 guarantees that you will block line of sight to the rest of your army.  As you can tell, I prefer Fiends, but that does not mean that Horsemen are any worse of a pick.  It all depends on what ancillary benefit you need from your cavalry hammer.  

One last thing I want to note is when taking more than one regiment/horde of Horsemen/Fiends: all too often I see people putting maccwar’s on one and the jboots on the other.  To me, this is overkill and entirely unnecessary.  With even a little foresight, it should be more than possible to deploy the non-terrain mitigating unit free of terrain such that they shouldn’t ever be at risk of being hindered.  Therefore, one should absolutely get maccwar’s or jboots, and the other should get some other item.
Recommended items:  maccwar’s potion of the caterpillar or sir jesse’s boots of striding, mead of madness, blessing of the gods, chant of hate, brew of haste, wine of elvenkind (Horsemen only), brew of sharpness (IMO Fiends only, but some like it on the Horsemen too)

Elliot – 8/10
Probably my favourite unit in the list, I absolutely love these guys. Solid damage dealers with a high number of CS/TC attacks, but what really makes these guys shine is the combination of Def5, Fury, Regen and Drain Life from the Summoner Crones. These rules in tandem make then an incredible point efficient unit that’ll hang around for longer than they have any right to. Add in the fact that they can take regiment level artefacts and you have a very powerful unit. 

I’ve only rated them an 8 because I feel like they have two things that keeps them from being a totally top tier unit. The nerve of 14/16 does put them in a slightly vulnerable position to be taken off in one shot by a determined unit (these guys hate being shot at by war engines). The second thing is that they’re pricey. I think the cost on them is perfectly fair, but to stretch to a 9 or a 10 I’d say a unit would need to be a little cheaper than a fully kitted out regiment of Abyssal Horsemen.

Grant – 8/10
Great unit even if a tad pricey. Most armies will have at least 1 unit. 

Thomarsar – 7/10
Cavalry that unlocks, surprisingly fragile if hit by hammers, performs well against trickle damage and a good alpha strike unit.


Silverbreeze Cavalry

Marc – 5/10 or 8/10 (I’ve gone with 8/10 for the average score – Elliot)
So I guess this conversation goes here: I hate ranged attacks without piercing.  When you’re reliably able to hit de4+ or lower units, they can do some serious work, but if you’re going into a wall of de5+ or de6+ then those shots feel almost entirely useless.  That’s what makes it hard for me to give a reliable rating for this unit, because it entirely depends on what they’re up against.  If they’re able to work (de4+ and below) they become an easy 8/10, maybe 9/10, but if they’re up against de5+/de6+ then they dip to 5/10.  Especially considering that the meta largely seems to be de5+ with wound removal being not uncommon, doing 2-3 wounds per SB unit (average wounds vs de5 when hitting on 4’s = 2.72 wounds) never feels worth the points to me especially when that can sometimes be casually removed from low amounts of Heal or Radiance of Life or Regeneration or Life Leech.  Even focusing fire, two regiments do 4.5 wounds, which against even a 14/16 unit is still unlikely to even waver them.  Over two turns that’s 9 wounds dealt, so that’s not bad, but that’s also 400pts for your two regiments to half kill one def5 regiment by the time the lines start to clash.  

Image may contain: outdoor
Photo credit: Kevin McCusker

I do need to mention though, that against those high defense builds, the SB should instead be flanking chargers.  But I’ve found that even then, it makes them feel ‘not worthless’ and not ‘still valuable’.  Assuming an unhindered flank charge, that regiment averages 4.67 wounds on a de5 unit.  That’s not bad!  But would I rather those 200pts plus 10pts of other random stuff instead be another Fiend horde…?  In that situation, very much yes.  

If you use troops as your mobile chaff, that’s still points decently spent, but then you’re talking 130pts per troop, and you’re going to want probably at least 3 troops… so that’s 390pts for chaff and 21 total elite(ranged) attacks.  That *can* be worth it, but that’s a very meaningful investment compared to three gargoyle troops (255pts).  Now, the SB troops are considerably more resilient (de4 11/13 vs de3 8/10) and also have those bows, but still.  I, personally, if I was going to include any SB in a list, would take two regiments or possibly one regiment and two troops.  I would never take just the one regiment, and I would need to have a very solid plan for more than two regiments.

So, to summarize, I don’t think people are ever wrong in taking Silverbreeze.  When they can target even medium defense units they can feel almost overwhelmingly punishing.  But if you’re playing in a five-round tournament and you’re spending 400pts of your 2,000pt army (or 20%) on units that will decreased to only being maybe not entirely useless in at least two of your games (which in my experience, you’ll face easily at least three if not four all de5/de6 armies)… I find it hard to fully recommend them in a competitive build.  They can definitely be in a competitive list, but IMO you want reliably always useful units for a truly competitive list, and given their variance they just barely get pushed out of it for me.

Recommended items:  chant of hate (regiment only)

Elliot – 6/10
A unit that I haven’t experimented much with, but that I can definitely see the potential of. They don’t tend to fit in with how I personally play Twilight Kin, but I can see they’re a good unit. For me I’d stick to the troops in Twilight Kin, because if you’re dropping 200 points on a non-Cronebound unit, you need it to be regular.

Grant – 7/10
These are great if you build a list around the hit and move tactic.

Thomarsar – -/10


Cronebound Fiends

Marc – 7/10
See Cronebound Abyssal Horsemen.

Elliot – 7/10
I love these guys in regiments and my current list has three regiments as a fast, relatively hard hitting front line that can chaff and hold units in place whilst the rest of my army moves forward. They’re also wonderful at finding unexpected flanks as they criss-cross across the board. 

I’m not as big a fan of the hordes as I find them just a little bit too squishy for the amount of points that you need to invest in them, but I know that other Twilight Kin players swear by them.

Grant – 7/10
These are a unit that requires a lot of investment as without items or Bane Chant these guys are so hit and miss with 4+ to hit. 

Thomarsar – 5/10
Ok, but nothing special other than peeking above hills.


Cronebound Needle-fangs

Marc – 7/10
Pretty good chaff, but so long as you can also take gargoyles there’s no reason to take needlefangs instead. In a world where we don’t get gargoyles, needlefangs would absolutely dominate our chaff game.

Recommended items:  none

Elliot – 5/10
They’re a decent enough unit for their cost but I rarely find myself taking them. As regiments, I find that Gargoyles fill in the chaff role far better. As hordes, they’re actually quite a nice little unit and can add some much needed cheap bodies to a usually very small and elite army. Nothing wrong with them, but other stuff in the list tends to do the job better.

Grant – 4/10
Gargoyles just do it better.

Thomarsar – -/10


Bolt Thrower

Marc – 6/10
It’s hard to hate bolt throwers, really.  For 90pts, they’re not terrible at all, but even hitting on 4’s with elite(ranged) base they’ve never really done a lot for me.  Often you’re going to be hitting on 5’s from cover which still means you should reliably hit once for blast d(3), but… eh?  In the end, is that really worth 90pts?  Even taking a battery of two or three of them… I dunno.  I’m personally not impressed, but I don’t hate the idea of dropping some in if you feel strongly about them.

Elliot – 6/10
I think that Bolt Throwers are under rated as a War Engine as two Ra4 shots with Elite is really quite reliable damage. The big issue here is unlocks. Twilight Kin struggle for unlocks and if you have to choose between a War Engine and a Monster, the Monster is almost always going to win.

Photo credit: Kevin McCusker

Grant – 6/10
Good solid ranged option.

Thomarsar – -/10


Dragon Breath

Marc – 7/10
If Twilight Kin had more unlock slots for heroes/monsters/war engines, at least two Dragon Breath would be the first thing I would slot into my lists.  I feel like people really sleep on them, but 90pts for 12 elite shots is pretty alright especially as a chaff clearing.  Yes, it’s only sp 6 range 12”, but that’s still a walking threat of 18”.  The main reason I value these so high is because Twilight Kin can struggle with having a high volume of attacks from units that aren’t from high-cost units, and these provide just that.  As I insinuated though, I rarely find myself having the unlocks due to a high reliance on regiments to provide unlocks and how great our heroes and monsters are, but these are definitely worth considering.

Elliot – 5/10
Exact same issue regarding unlocks as the Bolt Thrower. Plus I find that the old breath attack style War Engines have taken a serious hit in V3 as they can now take multiple penalties to hit. Shooting at a Stealthy, Individual in Cover seriously dampens the potential of these units.

Grant – 5/10
Use to be better in 2nd edition, but with the change from Breath attacks to Ra4 Steady Aim, its now probably not worth the points.

Thomarsar – -/10


Cronebound Mind-screech

Marc – 8/10
If you’ve never played against three of these things putting out a reliable gunline, then you probably don’t fully understand how annoying these can be.  I would never take just one of them; if you’re taking a Mindscreech then you need to take as many as you possibly can.  A simple tactic is, with the Mindscreech being height 5, you can park them immediately behind a height 2 unit (like a spear horde) and fire over them without suffering cover penalties.  They’re also great to hang back on objectives while the rest of your force marches forward.  Only other thing really to note is that windblast and mindfog should not be forgotten; often on turns 5 and 6 these are much more valuable than lightning bolt.

Elliot – 9/10
What can I say? It’s stupidly good and we all know it. 

The excellent combination of spells combined with height 5 would make it a top tier unit in its own right. But then add in to the equation that it has decent Defence, Nerve and is Stealthy. And then add in the fact that it has Unit Strength 1, Fly, Nimble and Pathfinder. Oh and it’s only 150 points…

The only (and I mean only) issue with them in a Twilight Kin list is that they can be tricky to unlock, often limiting the number you can take.

Grant – 9/10
Expect to see at least 1 in every list.

Thomarsar – 10/10
 For the insane versatility.


Cronebound Shadow Hulk

Marc – 7/10
If you’re wanting a solid tank, look no further.  The Shadow Hulk falls into a similar category as the Mindscreech in that you never take just one of them; if you’re going to take any, take two.  Run them side by side (as most people can possibly alpha-strike to kill one giant; they cannot kill two) with Impalers behind them and you have a small fortress of destruction.  Plus taking two makes their offensive potential more reliable, as 2d6 has an expected value whereas 1d6 is true random.

Elliot – 7/10
Super tough block of high defence, Fearless nerve in a relatively compact footprint. They’re no slouch in combat either and they pair really nicely with the 18″ heal from the Summoner Crone’s Drain Life.

The only reason they’re not higher on my list is the fact that they’re competing with the Mindscreech for the monster unlock slot and 220 is just a little on the expensive side.

Grant – 7/10
Statistically one of the best giants in the game.

Thomarsar – 7/10
Good damage soaker and damage dealer.


Cronebound Banshee

Marc – 6/10
Banshees really aren’t bad at all.  If you’re going with triple Mindscreeches, I could see maybe taking one or two of them if you really wanted to try and go full gunline/windblast annoyance.  However, you’re going to run into the same issue we had with the Dragon Breath, in that your non-troop unlock slots get filled very fast, and it becomes very hard very fast to justify taking them over other options.  Still, I don’t hate them, but unless you’re somehow swimming in hero slots I end up avoiding them.
Recommended items:  boots of levitation, boots of the seven leagues

Elliot – 4/10
Another unit that I would rate far higher in a Nightstalker list than in a Twilight Kin one. As it is I find the Banshee just too expensive an option for a unit that doesn’t Inspire and is taking up one of my precious unlock slots. If I had the spare points, didn’t need Inspiring and had a free unlock slot… I’d just find 10 more points and take another Mindscreech.

Grant – 6/10
I can only see a use for her in very specifically built lists.

Thomarsar – -/10


Cronebound Archfiend

Marc – 5/10
 Man… I really, really want to like the Archfiend.  I have two of them and would love to put them on the table, but they consistently disappoint.  

I mean, look at this.  I know it’s not fair to compare units between armies, but still:

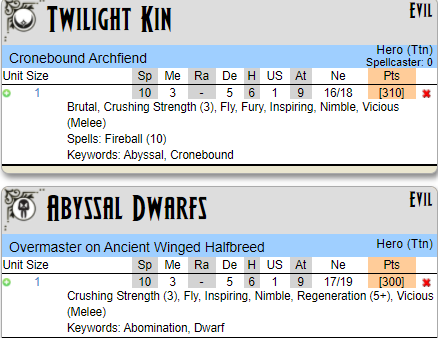
If I was given that choice, I would take the Overmaster every single time.  Yes, you lose brutal, fury, and fireball, but you gain regen(5+) and +1/+1 nerve, and let me tell you just how much the Archfiend loves to die.  Spoilers: it’s a lot.  One thing I will give it that is a common complaint is that it only has 9 attacks instead of the ‘standard’ 10 of other dragon-types.  Brutal, on average, essentially offsets the loss of that attack on average, even if you’re charging something in the rear.  That one attack hitting on a 3 and wounding on a 2 equals 0.55 wounds.  On an unhindered flank charge, brutal is still effectively equal and it’s not until you get to an unhindered rear charge that the 1 less base attack is potentially mathematically relevant.

Let’s talk about its fireball attack now.  Despite my love for the Dragon Breath, the fireball on the Archfiend largely feels like a waste.  Maybe possibly I wouldn’t hate it as much if the Archfiend was full vicious and not just vicious (melee)?  Requiring your dragon to park itself 12” away from its target will almost always put it in charge range of something, even if it’s something trivial.  But even gargoyles charging a dragon in the front are likely to do at least one wound, disorder/grounding it.  ”So then just put it even further out on a flank” you say?  Sure, I agree that helps keep it safe, but now one of your few sources of inspiring has run away.  And sure, you could take two Archfiends to run around being jerks and two Standard Bearers to give you inspiring coverage, but now that’s four unlocks of your probably 5 to 6 unlocks, so you’re going to lose out on your great monster/titans.  If ever Twilight Kin gets cheap(er) unlocking hordes then it becomes much easier to justify the hero slots, but as is… it’s a huge sacrifice.

Now, one thing that’s critical to mention that I haven’t yet is the Summoner Crone’s “Wicked Miasma” ability; being able to apply the wound removal aspect of drain life up to 18 inches away on units with the cronebound keyword is definitely a part of this conversation.  But that requires more heroes to support your heroes in an army that cannot casually add heroes, and even trying to couple two Archfiends with two or three Crones might mean the Archfiends survive longer, but at a noticeable drop in army-efficiency as a whole.  Even for a single Archfiend/double Crone package, with no additional options, that’s 500pts invested for drain life (12) and the Archfiend; best case we’re talking 25% of the army on a dragon-type unit and keeping it alive (for longer, I’m not convinced it doesn’t still die quicker than you can heal).

Despite all of my complaints and frustrations, it’s truly not unusable but I definitely don’t view it as a competitive option.  I love the models I have for them and my complaints likely won’t stop me from bashing my head against that wall trying to make the Archfiend actually work, but I’m truly not seeing the build that’s actually competitive featuring any of them.  It’s probably better than I’m rating it, but the ‘right’ build needs to be found to really make them work.

Recommended items:  staying stone, healing brew, blade of slashing, hann’s sanguinary scripture, mead of madness, trickster’s wand, brew of haste, crystal pendant of retribution

Elliot – 7/10
As Dragon equivalents go, the Archfiend is probably one of the less popular choices, but that doesn’t mean it isn’t still a good unit. Used well, an Archfiend can control an entire flank of the table. Its one of those units that doesn’t ever need to charge to make its points back, the distraction factor alone can be huge. Being Cronebound is a nice touch, letting a Summoner Crone keep it healthy even when its off harassing a flank or behind the lines.

Grant – 7/10
A lot of points for what is Twilight Kin’s only ‘dragon’ type unit. I really miss having the two dragon types from second edition…

Thomarsar – 4/10
Not tested, but seems too expensive.


Twilight Assassin

Marc – 5/10
If they had inspire(self) they would easily be a 7/10.  As-is, they’re far too fragile and easily routed, especially in a lightning bolt-rich meta.  When your opponent doesn’t have even a small amount of LB and the Assassin can run around freely it can be a constant thorn in your opponent’s foot, but almost every (competitive) list will have a tool to deal with them long before you get your value out of them.  I’d love for them have some form of inspiring, or fearless, or even a horse option, but alas here we are.  They also fall into the same trap as the Archfiend where you don’t get nearly enough unlock slots to really warrant spending them on a unit like this.

Recommended items:  blade of the beast slayer, inspiring talisman, boots of levitation, wings of honeymaze

Elliot – 6/10
I’m a big fan of the Assassins and I really want them to be good. What is really good about them is that they can realistically be doing damage for all 7 turns of the making them very point efficient – they’re excellent at chipping away at key targets. Sadly once again though, they’re competing for very in demand hero unlock slots and as they don’t Inspire, you’re having to give up quite a lot to fit an Assassin into your list.

Grant – 4/10
Overpriced. A wasted opportunity which is a shame as its a unit that had heaps of potential.

Thomarsar – 6/10
Fun to play with, can both be MVP and a major let down.


Soulbane

Marc – 8/10
With the loss of/change to the Scepter of Shadows on the Summoner Crone, the Soulbane becomes my hands down favorite hero in Twilight Kin.  The mount is almost mandatory to this unit, purely because it pushes them to sp9.  I don’t know how much experience you have with speed 9 units, but in a game that most frequently has speed 5/6, speed 8, and speed 10, having a disrupting unit that’s faster than most of those is incredibly valuable.  

Photo credit: Kevin McCusker

They’re also one of the few units in the list that I feel like can work perfectly fine without items, though having some doesn’t hurt.  I rarely invest more than 15pts in items on one, but the crystal pendant can be very annoying and effective.  The crystal pendant is typically more a mental deterrent than anything, as no player wants to charge it with their soul reavers or tyrants and take those 2d6 hits when you’ve got plenty of units behind that to finish off whatever gets caught in the explosion.  I’m not saying I strongly recommend the crystal at all, but it’s definitely something to consider.

In terms of use, they make amazing backline hunters, dragon hunters, and pseudo-chaff, and at de5 and 13/15 it’s typically unlikely that anything you’d use it to chaff against (i.e. cav units) will rout it on the countercharge.  Almost critically, being a highly mobile source of dread is a close second in the list of reasons to take one.  It may not be able to solo/one-round kill much, but it will absolutely excel in a hit-and-run style disrupting unit.  

My one major complaint is that they absolutely love to get wavered.  They very rarely get killed in one charge, but it seems like almost every time they manage to get charged they get wavered.  So make sure you have a plan for if, and likely when, that happens.  Try and think not just what you want to charge/disrupt with it this turn, but both what retreat lane it will take if wavered but also where and what it will charge into next. Its mobility is its strength, and to stay entrenched for too long typically means death.

It’s worth noting that it is commonly compared to Mikayel as they are very similar units.  That discussion is under Mikayel’s section, but the TLDR is that my preference is to take two mounted Soulbanes rather than Mikayel.

Recommended items:  blade of slashing, mace of crushing, staying stone, chalice of wrath, dwarven ale, mead of madness, sir jesse’s boots of striding, brew of haste, mournful blade, blade of the beast slayer, crystal pendant of retribution

Elliot – 8/10
Excellent unit that acts as a force multiplier. Mounted on a horse, the Soulbane can throw himself in wherever he is needed, bringing some reliable damage, Inspiring and Dread. I take mine with the Mace of Crushing to help keep him reliable, but I’ve also used him in the past with the Mournful Blade and the Blade of the Beast Slayer.

The reason I’ve not scored the Soulbane any higher than an 8 is actually the exact same as the horsemen. It’s fairly costed and it’s nerve is just one point too low to make it truly survivable.

Grant – 9/10
A great character that can consistently add damage to a fight.

Thomarsar – 5/10
He’s ok.


Summoner Crone

Marc – 7/10
Well here it is, the singular unit I feel that Twilight Kin as an army list are balanced and built around… and it honestly disappoints me.  Please don’t read that as I think it’s bad; it’s really not.  It does, however, feel that it isn’t impactful enough for what role I feel like the army list assumes it will do.  

The Crone has the Wicked Miasma ability, which allows it to heal any keyword cronebound unit within 18” rather than 6” when removing wounds from drain life.  With the change in Clash21, if you take the Scepter of Shadows [1] upgrade then Wicked Miasma lets you remove wounds on any friendly unit within 18”.  In addition, Crones have inspiring(cronebound only).  On paper, that sounds really great, and honestly it’s really not bad at all.  But you still only have drain life (6) per Crone.  I am not recommending this, but taking max (three) Crones is 285pts for max 18 drain life which, assuming you can cast them all in a turn against de4+, will deal/heal 6 wounds, and only 4 or 5 total against de5+.  Not bad, honestly, but also… eh?  It’s more than 300 points after the invariable item(s) added, and three of your hero slots, and you’re currently only inspiring cronebound units.  It’s worth mentioning possibly that the only unlocking cronebound unit are Horsemen, so chances are good that you’ve got a lot of core units that don’t currently have any sources of inspiring. 

To be clear (again), I do not hate Crones and I’m not asking for them to be buffed up to Mhorgoth levels of power.  I do feel, however, that Twilight Kin as a list was constructed with the idea that Crones will act as the core, and honestly they’re just kinda… not?  I mean, they can be, but they’re nowhere near impactful enough to be a highly rated unit.  They are definitely useful, and I don’t hate having one or two of them in a list, but I’m also not going to negatively judge a player for building a list with no Crones in it.  I would play them a lot more if they had elite or vicious on their spells (like the Magus in Varangur) or even if they could take weakness, but that isn’t to say they’re not worth including currently as-is.

I do want to discuss their spell options briefly as well.  With how much CS(1) Twilight Kin have, it’s very tempting to add bane chant to their spell list and I’m here to tell you that’s a mistake.  If you are close/engaged enough that you would want to cast bane chant, you’re almost always better off doing a few extra wounds/healing from drain life instead.  If you’re in a war engine or ranged attack heavy meta, I really don’t hate Veil of Shadows but only if you’re giving the crone a horse, levitation, or the wings so that it can keep up with the units it needs to protect while they run and the Crone is stuck just advancing.

Recommended items:  summoner’s staff, piercing arrow, boots of levitation, wings of honeymaze

Elliot – 8/10
A really good Wizard with a very strong default spell, a decent selection of additional spells, Inspiring to Cronebound units and a truly fantastic special rule that can help an otherwise small and elite army seem much more durable than it otherwise might.

I’ve rated them an 8 because for Summoner Crones to work well you need to invest heavily into them. This also means that they limit your other army choices – if you’re paying lots of points into Summoner Crones, you pretty much need to also be taking lots of Cronebound units. My annoyance with the Summoner Crone is less based around her stats, and more the fact that when you take one you’re pretty much forcing your list down a very specific funnel. I explore this more in my first impressions article about Twilight Kin.

Grant – 9/10
Expensive but almost essential in every single list.

Thomarsar – 9/10
Must have for most lists, Drain Life (6) is very good, coupled with “free” Inspiring on many units in the army.


Elven Prince

Marc – 5/10
The prince suffers the same fate as the Assassin, sadly.  If we had plentiful hero unlocks then I could see taking a couple of them as cheap disruptors, but there’s just too much demand on those hero slots.  Still, if you ever do take them, absolutely take the mount upgrade and nothing else.
Recommended items:  none

Elliot – 4/10
My score of a 4 is probably a bit harsh. The unit itself isn’t awful, it’s more that I don’t think it’ll ever find a place in a Twilight Kin list. Twilight Kin are an army where every unlock counts, they’re also an army that can struggle for Inspiring sources.

All the Prince does in my opinion is take up a valuable unlock slot without bringing much needed Inspiring to the table. Just upgrade him to a Soul Bane or spend the points on Gargoyles.

Grant – 4/10
The Soulbane or the Army Standard Bearer just does the same roles, but better.

Thomarsar – -/10


Army Standard Bearer

Marc – 7/10
It’s a standard bearer, not much else to say.  I don’t hate the heal or lightning bolt items, but it’s far from a primary option.  

Recommended items:  lute of insatiable darkness, shroud of the saint, the boomstick, 

Elliot – 7/10
It’s a cheap Inspiring source with decent enough nerve and speed 6 to get it where it needs to be. Plus having Me4 and Elite (melee) is just funny and has been used to sit a dragon down on two occasions so far.

Grant – 9/10
“Cheap” inspiration. Fairly standard…

Thomarsar – 6/10
 Does what ASB does, ME 4 and Elite is slightly better than other ASBs.


Mikayel, Lord of Nightmares

Marc – 8/10
I’m expecting my opinion to be slightly contentious, especially given my rating: Mikayel is good, but I don’t ever take him.  Objectively, he does a lot of work; he’s a super-juiced mounted Soulbane that gains an attack, one nerve, fearless, iron resolve, and bumps up to CS(2), but also doubles his attacks when charging heroes, monsters, and titans.  It’s hard to hate that at all, and I really don’t… except.   Then there’s the matter of his price.  For the price of one Mikayel (260pts), you can instead get two mounted Soulbanes (310pts).  Yes, that difference of 50pts is very meaningful, but IMO being able to get two activations and two different sources of inspiring and dread makes up for that.  

Photo credit: Grant Alexander

It can be argued that I’m comparing apples and oranges in that they don’t function the same, and I don’t entirely disagree.  The Soulbane can only ever hope to ground a dragon to hold it up for a turn while a real unit positions to knock it out the turn after while Mikayel most likely wins the solo fight against a dragon, especially if he gets the first charge.  So to a point it depends on what you want your melee solo to do.  My style of play is to not have so many points wrapped up in a single individual and I would much rather set up a one-two punch with a Soulbane than hope that I don’t flub one round of attacks with Mikayel and have him die before he can take out the opposing dragon.

And then there’s the quasi-valid concern of what happens if you’re facing a list without any monsters or titans, are you wasting points on a power you’re not using, but I really don’t put much stock in that.  Yes, that could be true and not uncommon to face lists without monsters/titans, but they’re almost always going to have heroes (mayyyyybe Nightstalkers won’t take a hero? maybe?), but it does turn him into an overpriced Soulbane with duelist.

So again, he is objectionably powerful, but for how I build lists and play my games, he never gets table time.  But if that’s your jam, have at it!

Elliot – 5/10
Oh Mikayel… I want to love you, I really do. On paper Mikayel is an absolute beast with a fantastic stat line and a really cool special rule that makes Dragons sit up and pay attention to him. But he’s 105 points more expensive than a mounted Soulbane. 105!

Every time I think about taking him, I decide that a mounted Soulbane could fill the same role almost as well and I invest those 105 points somewhere else. Shame because he’s such a cool unit.

Grant – 8/10
My personal favourite character in the game. At the substantial price you pay he needs to be in the right place vs correct enemy. He can be star player if allowed to shine. 

Thomarsar – 9/10
Very expensive, but worth every penny.


Summary

Overall Average Rating /10 – 6.5/10

Most agreed upon unit(s)- Shadowhulk, Bolt Thrower (all four players agreed)

Least agreed upon unit(s) – Soulbane, Kindred Archers, Mikayel (4 points of difference between the top and bottom ratings)


beer-image

Elliot’s Beer Fund

If you’ve enjoyed the blog and you’re feeling generous, you can buy me a pint. Please dont feel any obligation to do so, I’ve started this blog because it’s fun, not to make any money. Any money received will go towards hosting costs. Or my beer fund… ok mainly my beer fund.

£3.00

Road to Cologne – the Twilight Kin march to war

It’s been quite a while since I last posted anything on here. In between an international global pandemic and much more mundane real life stuff, I haven’t had as much time to sit down and write out a blog post for a couple of months now.

But in 10 days time I’m going to be setting off to an actual real life Kings of War tournament. And not just any old tournament, this is going to be my first trip abroad for Kings of War (or any wargame for that matter) – I’m going to Cologne, Germany.

The Kings of War scene in Germany has been slowly growing pace over the past few years with several one day tournaments taking place across the country. The Kings of War Germany GT, run by The Privateer Poza Boyz wargaming club is going to be the country’s first two day GT style tournament which is a massive milestone in growing the game.

The tournament is 5 games at 2000 points using the blackjack scoring system.

As this is my first tournament since the start of lockdown and my first international tournament, I’ve decided to keep a of record of the build up and the event itself here on my blog.

In this first post I’m going to go over how I came up with my list, including a bit of a breakdown of each unit I’ve taken.

Then in future posts I’ll show you updates on my painting (I’ve currently painted 2/19 units…), some of the ‘cultural exchange’ gifts I’m putting together to take with me and finally photos and reports from the tournament itself.

My List

I always knew that I wanted to paint a brand new army to this event because weekend GTs have always been my main motivator to get painting – sadly that motivation hasn’t really kicked in this time so now its more going to be a panicked rush to the finish to get them all done.

I started thinking about what army this would be months ago and decided that this would be the perfect opportunity to take the Twilight Kin off Universal Battle and proxy bases and into a real physical army.

The list I’ve gone with is the current iteration of my constantly evolving Twilight Kin. You can see some similarities to my first few Twilight Kin lists but I’ve actually moved the bulk of it around.

The biggest change for this tournament is the inclusion of the Shadow Hounds. To fit them in I’ve had to drop a troop of Gargoyles and the Bolt Thrower – the Bolt Thrower was an easy decision in the end, the Gargoyles I may live to regret.

The list isn’t designed to be uber competitive and there are definitely a few unit choices that are in there more because I think they’re cool rather than being the ‘best’ choice. But its a good solid all round mixed arms list that I have a lot of fun using and showcases Kings of War at its best in my opinion.

Bolt Throwers (that have now been dropped)
I still believe in Bolt Throwers, I think they’re incredibly reliable damage dealers that can be fairly well trusted to do a couple of points of damage every turn. They’re best suited to either picking off chaff or piling in with other shooting to tip nerve checks over the edge.

But there were a few things that held them back in my list.

The two Tallspear hordes mean that I have two very wide foot prints blocking the Bolt Thrower’s line of sight. As most chaff is height 2 (Gargoyles, Gur Panthers, Snow Foxes etc) this meant that the Bolt Throwers couldn’t effectively do their chaff clearing role without me having to position my entire army in a way to give them clear shots.

The Bolt Thrower also couldn’t do its second role of adding on to other shooting, because I haven’t really got that much shooting in this list. At least not above 6-12″.

I haven’t fallen out of love with Bolt Throwers and I’m sure I’ll add them back in future Twilight Kin lists, but for now they’re out.

Kindred Tallspears & Army Standard Bearer w. Lute
Who needs Palace Guard hordes when you can have Tallspear hordes with Brew of Strength?!

I love these two units they’re absolute work horses in the list acting as both hammer and anvils. Thanks to phalanx and high nerve they can absorb a charge from pretty much anything (so long as they’re not too badly multicharged) and backed up with Bane Chant and Drain Life, there isn’t much in the game that they can’t kill in one go.

Combine that with Speed 6 and between them they can threaten a huge area of the board at a time. I’ve bundled them together with the Army Standard Bearer with the Lute because they’re pretty much always going to be together – Bane Chant tips these hordes over the edge in terms of killing power.

These two units form the battle line that the rest of my army plays around, so they’re probably my most important units in terms of deployment.

Abyssal Horsemen
Two regiments of Abyssal Horsemen are the only thing that has stayed completely consistent in every Twilight Kin list I’ve used, I love these units that much.

The two Horsemen regiments are the main mobile punch in my list. They can’t take a charge anywhere like as well as the Tallspears, and at 14/16 they’re surprisingly vulnerable to shooting. But when they get an unhindered charge off they hit like a train. Yet again when stacked with either Drain Life, Bane Chant or the Soul Bane these units can one shot pretty much any threat – notice a pattern emerging?

I’ve gone for the Brew of Sharpness and Blessing of the Gods on mine, rather than the usual Pathfinder/ Strider you see on a lot of cavalry options. The reason for this is that I like to get the maximum efficiency out of my items, especially when using Twilight Kin because they’re usually so out numbered. Sharpness/ Elite do something for you every single combat you’re in whether you’re hindered, counter charging or charging ‘cleanly’. Pathfinder/ Strider are both excellent rules but you’re paying points for something that only works some of the time – I prefer to take something that works all of the time.

I tend to run one regiment alongside the Tallspear hordes and one out on the flank with the Soulbane. I’ve had quite a few games where a regiment of Horsemen and the Soulbane have managed to hold a whole flank down on their own the entire game – even if not they tend to take a lot of stuff down with them.

Soulbane
A slightly more paired down Soulbane than I’m used to because I didn’t have any points left for the bells and whistles. But even without any artefacts or upgrades he’s still one of the best mounted individuals in the game.


He’s just an all round solid and reliable combat character. The best part about him is definitely his Dread special rule, letting him contributes to multiple combats at once. Like lots of stuff in this army, he’s all about being as efficient as possible.

Twilight Assassin
I love the Assassin, I think it might be more heart than head, but I love them.

Fitting with the theme of being an incredibly point efficient unit the Assassin has the very real possibility of doing a consistent 2-3 damage for 7 turns of the game. That’s if I can learn to use them properly and keep them out of harms way!

The turn 1, 14″ Scout charge is very tempting but it is usually the wrong tactical decision…

Summoner Crone
I absolutely love Summoner Crones. In terms of game play and fluff wise they’re one of my all time favourite units in Kings of War.

In previous lists I’ve had as many as three fully tooled up Crones, but I’ve paired that back considerably here, simply because I’ve reduced the amount of Cronebound units in my army.

The value of the Summoner Crones is directly proportional to the amount of Cronebound units you’re taking and when I was running three Summoner Crones, I also had two Cronebound Butcher hordes and a horde of Cronebound Fiends.

I’ve talked in the past about how the Summoner Crones can cause ‘list design funnelling’ for the Twilight Kin, pushing you away from the Elf choices in the list. Who knows, maybe that’ll change in the next Clash of Kings book…

This time round I’ve gone for one Crone with the Sceptre of Shadows (for Drain Life (9)) and the Boots of Levitation. I always find it a fairly 50/50 toss up between the Boots or the Wings of Honeymaze on the Summoner Crone. I went for the Boots this time because the extra 2″ range and +1 Defence is nice, and I already have a decent amount of Inspiring in the list so I’m less likely to need to be flying 20″ in order to Inspire an at risk unit

Cronebound Shadowhound
These are a brand new unit for me so I’m not sure how they’ll work. On paper I really like the look of them.

I added them into my list to try and solve a problem. All of my units are very very killy but also very expensive – this means that I’m constantly outnumbered and have to use expensive units to kill cheap ones. The Shadow Hounds are there to go chasing after the stuff that isn’t worth the Horsemen’s time but is too important to ignore. I’m thinking of things like a Zombie regiment sat at the back of the board on an objective, or a troop of archers that are plinking wounds off here and there. Add in to that the potential for a cheeky 18″ nimble flank charge and the fact that they’re unit strength 3 – I think these may be a really helpful addition to my list.

Gargoyles
Probably still the best chaff in the game – what else can I say about them that hasn’t already been said.

I’m going to regret dropping down to one troop, I know I am, but I really wanted another combat unit in the list and the Gargoyles were the only ‘spare’ points I had without totally compromising the list elsewhere.

But I know there’s going to be a moment in the tournament where I’ll kick myself for not having two troops…

Cronebound Mindscreech
I’ve included one Mindscreech in the list to act as a chaff/individual hunter – one Lighting Bolt (6) isn’t going to do anything to a regiment/ horde but is just enough to pick off some key targets.

The biggest strength of the Mind-screech isn’t actually its Lightning Bolt, its the flying unit strength. The Mindscreech is able to fire pot shots all game and then fly out at the end and claim an objective – yet again very efficient unit that is adding value every single turn.


So that’s the list. Hopefully I’ll be back in a few days time with a painting update – wish me luck!


Battle Report – Kings of Herts UB tournament – Round 1 – Twilight Kin vs Varangur

I’m back with another Kings of War battle report. This time its my round 1 game of the Kings of Herts online Universal Battle tournament. This is a four round tournament at 1995 points.

I decided to bring Twilight Kin as I’ve been having a lot of fun using them lately and I’ve just taken the plunge and ordered a load of models for them. They’re going to be my first 100% Mantic army!

My opponent was Minor Internet Celebrity and Benevolent Overlord of the Kings of War Fanatics, Jonathan Faulkes. For those of you that don’t know Jon (shame on you!) he’s been around in Kings of War since the very beginning.

Jon brought his Varangur with a couple of allied Nightstalker Butcher regiments for ‘thicc chaff’ – he’s clearly been taking notes whilst doing the commentary on Dash28.

The scenario for this round was a slightly modified version of Raze, where the tokens on either board side were woth 2VPs and the one in the centre is still only worth 1VP.

Jon livestreamed the game on the Four Foot Snake YouTube channel. I’ve linked the video below and if you have the time I really recommend you give it a watch. Seeing as there is a video record of the game, I’ve gone into less detail in this battle report than I normally would – instead I’ve focused more on why I made the moves I did.


The Twilight Kin


The Varangur


The Battlefield

For this tournament, every game in the round uses the same battlefield map that has been designed specially by the TO. I really like this idea as it lets the TO be a little more inventive with terrain whilst making sure that it is balanced for the scenario.

Its a concept that we’ve discussed introducing at a Northern Kings event, but Universal Battle lends itself to the idea very well.

Because of how objective markers are deployed in Raze, you’re always going to have at least one objective on both halves of the board (left to right). What I really liked about this map was the double forest in the middle of the board as it pretty effectively splits the table into two corridors of play – I’ve labelled them Zone A and Zone B. I knew that there was going to be two tokens in one zone and one in the other. I needed to make sure that my two tokens weren’t in the same Zone as Jon’s two tokens.

Jon has a fairly small elite army, so my hope was to engage the majority of it in one Zone and use my numerical advantage to capture the objectives in the other Zone relatively unopposed. The hope was that the double forests would keep units from being easily able to cross between Zones.


Deployment

I placed my two objectives in the opposite Zone to where Jon placed his. This allowed me to take advance of the higher number of units I had over Jon.

I was nervous going in to this game, Jon had four hammer units each of which could one-shot every single unit in my army. I knew that the game wouldn’t be decided in a grind (which is where my Butchers, Horseman and Drain Life usually excel), it was going to be decided in head on charges and exchanging units in one round of combat.

As Jon started to deploy his army, I came up with a plan. It became clear early on that he was planning on dedicating the majority of his forces on the right of the board (Zone B) opposite two of his objectives. I therefore did the same, deploying most of my army in Zone B facing off against him- however I made sure to hold back enough units to guarantee that I could quickly grab the two tokens on the left in Zone A.

The plan was fairly simple;

Zone A, capture my two tokens on the left as fast as possible. Even if he moved his units up to contest, the Impalers had more unit strength (US) than the Draugr and the Fiends and Gargoyles together had more US than the Fallen.

Zone B, I planned to throw my entire army at him one unit at a time to delay him as long as possible to make sure that he wouldn’t have enough time to cross into Zone A and grab the 3rd token in the top left corner. I also planned to hold the Gargoyles back in reserve and if he ever left his bottom right token undefended, they were going to swoop in and take it.

Don’t forget that in this modified version of Raze, the tokens on the 6″ line are worth 2 points and the one n the middle is worth 1. So if I could capture all of the tokens on Jon’s side and defend just one of mine, I could still win the game without worrying about taking the middle token.


Top of Turn 1

Jon won the roll for first turn and opted to pass it to me.

On the left I moved up as far as possible whilst staying out of 16″ range of the Fallen.

On the right I was more cautious, moving up slowly. I placed the Abyssal Horsemen in 20″ range of Magnilde.

This was a risk because if she charged, she would pin the Horsemen in place and allow them to be charged (and most likely killed) by the Mounted Sons next turn. But I was nervous about how I was going to deal with Mags – I had no plan for taking her out and left unattended she could be a real issue for my plan to hold the Gargoyles in reserve to grab the objective late game.

So I left the Horsemen there as bait – 265 point Horsemen bait to protect Gargoyles! I was fairly confident that between the Horsemen and Drain Life I could kill Mags in one turn on the counter charge, so at least they’ll get some of their points back.


Bottom of Turn 1

Mags took the charge on the Horsemen, doing a couple of points of damage but more importantly blocking them in place for the Mounted Sons to come finish off next turn.

The Magus’ Lightning Bolt did a couple of points of damage to Butcher horde (2).


Top of Turn 2

Jon had left his bottom right token unprotected – the Gargoyles we’re going to have that! On the left, the Impalers moved forward to capture the far left objective.

I charged both Butcher hordes into once of his thicc chaff regiments, which in hindsight was a mistake. I made this charge so that I could hold him up in the corner as long as possible – I would have been better to charge one horde in and held the second back for a further turn of delaying.

The Abyssal Horsemen killed Magnilde on the counter charge (woo!) but the Horsemen’s sacrifice was no longer needed because the Gargoyles had been able to grab the token much sooner than expected.

The Gargoyles on the left charged the Fallen and the Fiends moved up behind them. I put the Fiends in a position so that the Fallen couldn’t corkscrew charge the Fiends without being hindered over the wall.

Abyssal Horsemen w. Elite damage count: 1

End of turn score: Elliot 4 – 0 Jon


Bottom of Turn 2

The turn of pain!

Boom, boom and boom! Both Butcher hordes, both Gargoyles and the Abyssal Horsemen with Brew of Sharpness were routed – just a mere 825 points gone!

This highlighted my mistake with the Butcher hordes, I needn’t have lost both hordes and could have had a spare horde ready to keep the Frostfangs stuck in the corner.

The Draugr charged the Impalers and did a couple of points of damage, but they held.

Abyssal Horsemen w. Elite damage count: 1

End of turn score: Elliot 4 – 0 Jon


Top of Turn 3

The Abyssal Horsemen with Elite had their choice of charge targets and seeing as everything in front of them was ‘only’ 15/17 they had a fairly good shout of killing any of them in one go.

I decided to stick with the plan – I charged the Mounted Sons so that anything that came after them would be drawn as far away as possible from the top left objective. Thanks to Drain Life the Horsemen killed the Mounted Sons in one and turned to face their inevitable doom.

The Fiends charged the Fallen and between Dread and Drain Life they almost managed to waver them but fell one short.

The Impalers killed the Draugr and turned to face the last objective.

End of turn score: Elliot 4 – 0 Jon


Bottom of Turn 3

The Fallen killed the Fiends in one- it wasn’t unexpected but still a shame. I knew from the very beginning that I couldn’t expect to survive a single round of combat against any of Jon’s units, but in practice it was really hurting.

The Magus wavered the flying Crone with a Lighting Bolt, taking her Drain Life out of the game for a turn.

Other than that nothing much of note happened this turn…

Other than the Horseman taking 18 damage from the Frostfangs and rolling double 1s! While this was a pain for Jon, it wasn’t the end of the world. He’d blow through them next turn and be in a position to capture the top right token after the reform, so it shouldn’t impact him too much.

Abyssal Horsemen w. Elite damage count: 19

End of turn score: Elliot 4 – 0 Jon


Top of Turn 4

The Soulbane charged the Fallen and in combination with Drain Life finished them off. The Impalers moved forward and captured my remaining objective.

The Abyssal Horsemen regiment, flush from their miraculous survival counter charged the Lord on Frostfang. I picked the Lord simply because it was the choice that put me the most in the way to block both units from easily walking on to the top right objective.

End of turn score: Elliot 6 – 0 Jon


Bottom of Turn 4

Jon finally started to move the Butcher (2) and the Lord on Frostfang towards the centre of the board, ready to cross into Zone A and the top left objective that the entire game would swing on – en route they captured the middle objective.

The Frostfang horde with Elite moved into the trees. They were going to make my life much more difficult as it meant Jon has three units that could threaten the top left objective and I only had two units left that could easily block them – the Impalers and the Soulbane (who is Mighty).

Out on the right the Frostfang horde flanked the Horsemen, doing another 22 damage to them! Now all he had to do was not roll another double 1….

You can guess what happened next – poor Jon.

This double 1 was a much bigger deal. It not only opened up a rear charge on his other units, it meant that the Frostfang horde with Vicious would need another turn to grab the top right objective, effectively taking them out of the game.

Abyssal Horsemen w. Elite damage count: 41

End of turn score: Elliot 6 – 2 Jon


Top of Turn 5

The Abyssal Horsemen (who had absolutely no business being alive at this point) rear charged the Frontfang horde in the woods, along with the Soulbane in the front. Despite being hindered and devastated they managed to break them in one.

The flying Crone put a couple more damage on the Lord on Frostfang – I was in a decent place to finish him off in Turn 6 if both Crones focused their Drain Life on him.

The Impalers moved up to defend the top left token.

End of turn score: Elliot 6 – 2 Jon


Bottom of Turn 5

Jon pushed the Lord on Frostfang forward as far as possible making a last push for the top left token. The Frostfang horde with Vicious side stepped into range of the top right objective.

The Magus fired his Lightning Bolt 7 at the HEAVILY damaged Abyssal Horsemen unit… and did zero damage to them!

End of turn score: Elliot 6 – 4 Jon


Top of Turn 6

This turned added a bit of insult to injury. The Soulbane moved up to put himself in range of the Lord on Frostfang with his Dread – thanks to Dread the Drain Life managed to break the Lord.

The flying Crone put four damage on the Magus and wavered him as well – it looked like the Horsemen were going to live!

To really cement just how invulnerable the Horseman were, between two turns of regeneration and Drain Life heal they ended the turn on 9 damage – that’s 32 damaged recovered!

All I had to do now was survive a Butcher regiment charge and the game was mine.

End of turn score: Elliot 6 – 4 Jon


Bottom of Turn 6

The Butcher regiment charged the Impalers but for the first time in their history, the Impalers held.

And that was the game!

End of game score: Elliot 7 – 4 Jon


After Game Thoughts

So I think this game can be quite nicely summed up in one convenient meme that I made just for this occasion…

I’m not going to be self deprecating and say that I would have definitely lost if it wasn’t for the double 1’s, but they really REALLY helped.

Looking back through the game whilst writing this battle report, I think that if Jon hadn’t rolled two double 1’s I might have had a chance of winning on turn 6, but I would definitely have lost if the game went to turn 7. It would have entirely depended on how well I could block his units getting into Zone A with the few units I had left – either way it would have been much closer than it ended up being.

For the most part I stuck to the plan – I took all the objectives in Zone A and managed to delay Jon’s army in Zone B. I made a big mistake by sending both Butcher hordes in early and that should have cost me much more than it did – as it was, the double 1s gave me back the turns of delay I’d lost through my mistake with the Butchers.

All in all it was an excellent game and if you watch the live stream you’ll see that we’re both laughing all the way through it, exactly how a good game should go. Jon is a brilliant opponent and was a pleasure to play against – if you haven’t already I strongly recommend you watch the FFS live stream of the game and check out Jon’s other live streams.


Keep an eye out for more Twilight Kin battle reports coming soon as I play the next round of the Kings of Herts tournament. Or check out my other Twilight Kin articles below-


Elliot’s Beer Fund

If you've enjoyed the blog and you're feeling generous, you can buy me a pint. Please dont feel any obligation to do so, I've started this blog because it's fun, not to make any money. Any money received will go towards hosting costs. Or my beer fund... ok mainly my beer fund.

£3.00

Battle Report – Free Dwarfs vs Ratkin – 24/05/2020

I’m back with another Kings of War battle report. This time it is my Free Dwarfs vs Si Brand’s Ratkin – we played Push at 2000 points. Si was practicing for his Call to Arms game so we used the fixed two tokens each, plus one in the middle.

My track record with Free Dwarfs so far has been… patchy.

You can read about my initial impressions of the Free Dwarfs here.

You can watch Dash28’s live stream of my Call to Arms game using Free Dwarfs here.

I’m up to 12 games with them now and my win rate is holding at a respectable 50%. But this is still lower than I would usually expect with other armies – in the 2018 Masters season I had a 75% win rate at tournaments and I’d say that I can usually hold that level of win rate or above regardless of the army I play.

In all my games with Free Dwarfs so far, I feel like I’ve been playing with one arm tied behind my back. Every other army just seems to have better tools than the Dwarfs in every category – I can’t really think of anything the Free Dwarfs do better than anyone else.

I know I’m not using the more optimised list that I could. In V2, competitive Dwarf builds lent heavily on Brock and Rocks style lists with a wall of Def6 backed up by loads of Brock Rider. I’m sure there is a competitive Free Dwarf list down that path, but I want to try and include some actaul Dwarfs in my Dwarf list.

I also admit that I’m still fairly new with the army and its possible that my win rate is due to my inexperience. Although in the other new army I’ve started playing with recently (the Twilight Kin), my win rate has already exceeded 75%. Twilight Kin don’t have trouble winning, they have trouble with variety – Free Dwarfs have lots of variety, it just doesn’t seem very good!


So why am I bothering with them? Because they’re damn fun.

For all of their limitations and challenges, I’ve had a really good time playing the list. Its fun and its different to anything I’ve played before – for now at least, that’s enough to keep me engaged with the stunties.

This is the current iteration of my list. Its developed over time as I’ve started to get to understand the Free Dwarfs – I certainly don’t think I’ve cracked it yet but I’m happier with this list than I was with the previous iterations of it.

The two Ironclad hordes have replaced the Shieldbreaker hordes. I’ve come to the conclusion that the Shieldbreaker hordes are a bit of a trap, one of those units that looks great on paper but just doesn’t deliver on the tabletop for one reason or another. They have excellent combat potential and Pathfinder and Scout are great rules, but their low speed prevents them from being able to utilise that potential.

Ironclad hordes with items have a fairly similar damage output, but they maintain the Def5 and the Headstrong. Seeing as these hordes are so rarely going to get the first charge off, I decided to value the defensive stats higher than the offensive stats.

I’ve really enjoyed the two Ranger troops. They’re a very flexible unit with a good damage output in both shooting and combat. I was initially put off by their relatively low defense and 10/12 nerve, but I’ve found that they’re small enough to go largely ignored by most opponents.


The Ratkin

Si’s Ratkin list is really interesting – Ratkin without a single infantry horde.

Overall its a really tough list with several hammer units and a good amount of Rally and support pieces. I’m out sped and out gunned in combat, so I need to ensure that my shooting thins out some of his units before we get into combat or else I’m going to be outmatched.


Top of Turn 1

Because I’m an absolute amateur at this, I once again forgot to take a screen shot of deployment, but I only shuffled my army forward so you can pretty much see where it started.

I experimented with splitting the tokens across two unit this game – its something I never normally do so wanted to give it a try to see how it ‘feels’. I worry sometimes that things become the norm just because everyone does them, not because its necessarily the best way to play.

The Berserker Lord flew up in to the woods to ensure that the Night Terror couldn’t use the trees to hide out of line of sight. Everything else shuffled forward, preparing themselves to receive the incoming wave of rats!

Both Cannons fired at the Tunnel Runners but all their shots missed. However, the Rangers made up for it doing an impressive 6 damage to the Tunnel Runners between them – they failed to waver so on to Si’s first turn.


Bottom of Turn 1

The Night Terror moved up around the forest, putting itself in a position where it could see the Brocks, but they couldn’t see him – sneaky rat.

The majority of Si’s mainline moved up slowly. The Tunnel Runners turned 90 degrees left and gave themselves some cover from the Rangers.

The Tangle put Weakness on to the Berserker Lord – limiting what he was likely to do next turn. The Broodmother Drain Life’d the Vermin Tide, healing 4 damage back on the Tunnel Runners.


Top of Turn 2

Cry havoc and let slip the Mastiffs of war!

I decided to target the Shock Troop regiments with the Throwing Mastiffs as their def4 and relatively low nerve made them fairly soft targets. Between all of the throwing dogs, Rangers and cannons I had a fairly solid chance on wavering or killing two of the three units, which would seriously help me to even out the odds in future combats.

Both Cannons missed again, but with all the other combined shooting I managed to put 7 damage on both middle Shock Troops, wavering one of them.

On the right, the Berseker Lord charged the Tangle and the Brocks backed up, trapping the Night Terror (or so they thought). I charged the Berserker into the Tangle, not expecting to kill it but hoping that the Berserker would be in a good spot next turn to finish off any units that were damaged by my shooting.


Bottom of Turn 2

Between Radiance of Life and Drain Life, the Rats managed to reverse a good chunk of the damage I had done the previous turn.

The Tunnel Runners turned the face the centre of the board and everything else shuffled forward slightly.

On the right hand side of the board, the Night Terror managed to use his speed 9 and nimble to barely squeeze out of the Brock Rider’s arc by just a few pixels, threatening the flank of my army and my cannons!


Top of Turn 3

At the start of Turn 3 I was fairly happy with the way the game was going. I hadn’t been too outmanoeuvred (except by the Night Terror but he could see too much of my army) and my plan to thin his line had started well. Between the Ranger, Cannons and remaining throwing dogs, I should quite comfortably break two of his units this turn leaving me in a good place for the inevitable combat.

I did decide that I needed start putting pressure on his token carriers – in hindsight this was a big mistake and at least a turn too early.

I made (what later proved to be the mistake) of putting both Brock Rider regiments into their respective forests. I knew that this meant that they could both be charged, but in my mind they were still tanky units that can adsorb charges…

I fired two more Mastiffs and a troop of Rangers into Shock Troop regiment (2) but only managed 3 damage (That’s 16 shots on 4s and 3s and 10 shots on 4s and 4s – I’d hoped for more like 8 damage). To make matters worse they didn’t even waver. The rest of the shooting was tied up trying to stop the Night Terror hitting my flank – the plan to thin him out before combat was suddenly not going so well.

In an effort to save themselves, both Cannons fired at the Night Terror. One of them finally managed one hit (it only took 12 shots!) and did a not very impressive 2 damage. But the BSB with the Diadem and the Rangers pulled it back doing another 4 between them, wavering the Night Terror.


Bottom of Turn 3

Look at all those charge lines! I always knew that I was going to take the first charge because I was out sped everywhere, but I had at least hoped to have taken out one of his units with my shooting first!

The Hawpacks and the Brute Enforcer charged the Brocks on the left, doing 9 damage between them. That hurt but it wasn’t too bad – the Brocks should mince the Hawpacks on the counter charge and then would only be threatened by a hindered 3 attack Brute. In order to pull off this double charge he’d needed to drop his tokens so I was happy with the exchange.

The Mutant Rat Fiend charged the Brocks on the right and did 9 damage to them. This was entirely expected and to be honest I have no idea what I was thinking exposing them to that charge! Unlike on the left flank, I wasn’t putting any pressure on tokens and had no counter charge planned.

The biggest hit was in the middle though. By less than a millimetre, Si just managed to get the Nightmares AND Tunnel Runners with Brew of Sharpness into the right hand side Ironclad horde, blowing through them in one go. This was very good play from Si – I’d assumed that there was no way that he would be able to create a clear path for the Tunnel Runners, I was wrong.

Losing the Ironclad horde was huge because not only had I lost the unit, I had very little way of stopping those units steamrollering through my lines.


Top of Turn 4

Rangers (2) on the hill charged the Tunnel Runners to block them charging the other Ironclad horde. The Ironclad horde with Elite charged and killed Shock Troop regiment (3).

The Berseker Lord decided to disengage from the Tangle and charge the Shock Troop regiment (2) that was on 9 damage. My thinking here was to start killing as much unit strength as possible that was hanging around the two loot tokens in the bottom left corner.

The right Brock Riders did a very respectable 10 damage to the Mutant Rat Fiend but he held. I’d made a silly mistake with them and was going to lose them next turn as a result.

The left Brock Riders should wipe out the Hawpacks and then be in a position to cover the tokens, effectively pinning them on Si’s half of the board. With my remaining shooting, I was pretty confident that I could finish off Shock Troop regiment (1) that was on 7 damage.

Best laid plans….

Between the Brew of Sharpness and a Bane Chant the Brock Riders did 14 damage to the Hawpacks… and rolled double 1.

The Rangers (10 shots, 4s and 4s) and Pack Master (6 shots, 4s and 3s) shooting at Shock Troop (1) managed to do a combined… zero damage.

Bugger. I was now definitely going to lose both Brocks, had no way to put pressure on the tokens on the left and all of my shooting units were in range to be charged next turn.

Just to add to how well this turn went, both cannons missed with all their shots -again.

Ignoring the ineptitude of his comrades, the Banner Bearer with the Diadem of Dragonkind continued to set fire to the Night Terror, putting two more damage on him and wavering him for a second time.


Bottom of Turn 4

Not many surprises this turn. Both Brocks inevitably died allowing the Hawpacks and the Mutant Ratfiend to turn inwards, pincering my lines.

The Tunnel Runners killed the Rangers in their way and healed up some more damage through Drain Life and Radiance of Life. They turned to face the remaining bulk of my forces.

Shock Troop (1) that had managed to dodge all my arrows (and throwing dogs) last turn charged and killed the remaining Mastiff pack, backing up onto the tokens for good measure.

The Nightmares holding the two tokens slipped past the Ironclad horde, taking themselves into my half of the board and to safety.


Top of Turn 5

Things were looking very grim and I knew at this stage that I was unlikely to win the game. I decided therefore to try and score as many points as possible while putting myself in a position where I could win if everything suddenly starting going my way with ridiculous dice rolls.

I turned the Rangers (1) on the hill to look at the Nightmares carrying the tokens and opened up on them with everything I had left. One of the Cannons hit with one of their shots (taking them up to two hits out of twenty shots!), doing 2 damage the Rangers and Diadem each added one more and…

Double 6 -boom! Too little too late, but still nice to see!

The Berserker Lord charged the Tunnel Runners to delay the inevitable.

The Packmaster had another go at shooting off the token carrying Shock Troops (1) but despite doing a couple of points of damage, he failed to waver or break them. The Standard Bearer charged the Hawpacks on 15 damage. He managed to hit them… but failed to damage.

It was pretty much all over by this point.


Bottom of Turn 5

Look at all those routed units…

The Hawpacks nimbled around into the rear of my Rangers (1), taking them out and reforming to face the rear of the Ironclad. The Berserker and both Cannons were picked up on the right hand side.


Top of Turn 6

I knew I had pretty much no chance now, but never one to give up entirely I went for the only plan I could.

The plan was; move the Ironclad horde so that it was facing left and across the half way line. Use the Packmaster to finally finish off the Hawpacks and pray that the little shooting I had left could waver the Tunnel Runners. Then if the Standard Bearer could break the Shock Troops (I did say it was an unlikely plan) I could potentially charge and grab the left tokens on turn 7.

It was a very last ditch plan, but I do think its always worth doing something, even if its very unlikely to succeed.

In reality, the Diadem did amazingly and managed to waver the Tunnel Runners and the Packmaster killed the Hawpacks (finally!).

It wasn’t a good situation, but it was probably the best I could have reasonably asked for.


Bottom of Turn 6

The Night Terror rushed to the middle of the board to grab the two tokens that were out in the open and the Shock Troops (1) that had survived so much shooting casually walked across the half way line in front of the Ironclad horde.

If there was a turn 7, I now couldn’t even pull it back to a draw. But mercifully the game ended at turn 6.

Free Dwarfs 1 – 8 Ratkin


So What Went Wrong?

I got a fairly sound thrashing there, so I thought it’d be helpful to break it down into what went wrong. I’ve boiled it down to three parts;

  • Si played very well
  • I played very badly in parts
  • My shooting failed to even the odds in the centre of the board

Si played an excellent game, especially in the movement phase. He managed to pull off a couple of moves and charges that were millimetre precise – full credit it to him for this. I thought that he was being over cautious at first and perhaps he was, but I made the mistake of not letting him make a mistake… if that makes any sense? He was playing very cautiously but I pushed my Brocks up and forced him to engage – I should have held back and shot until I had absolutely no other option.

I made a couple of silly mistakes, but the biggest one was my use of the Brock Riders. In my mind, Brock Riders are still tanky units that can absorb a lot of damage and then do a mountain of damage back.

I need to keep reminding myself that THIS IS NOT TRUE.

Now their nerve has reduced to -/18, their Def4 means that they’re actually one of the softer cavalry options in the game. Equally 26 attacks on 4s is roughly equivalent to 18 attacks on 3s (very roughly, don’t yell at me!), which is good but not great, especially with only TC1.

In my next game I’m going to use my Brocks as more of a close support unit, rather than think they can hold a flank on their own.

With the exception of the single Double 6 at the end of the game, my shooting really let me down this game – especially in the middle of the board. The cannons hit 2/20 shots and those Shock Troop regiments just refused to die! I did a good amount of damage early on, but this didn’t translate to any routed units all game. In future I need to remember to focus all my fire on one unit until it is definitely dead and then (and only then) move on to a new target.

The day after this, I played another game using the Free Dwarfs this time at 2300 points. Look out for that report coming in the next few days to see if I learnt anything from this game.


Twilight Kin – First Impressions Count

Twilight Kin are an army that I have always liked the look of, simply because they’re just plain cool. But I was a little put off in version 2 because I didn’t want to build an army that was likely to be completely redesigned in version 3, so I never got round to actually playing any games with them.

By the time V3 finally rolled around, I’d forgotten all about Twilight Kin because I was enticed by the shiny new Order of the Green Lady. However, after playing my round two game of a Call to Arms against Kyle ‘Master Crafted’ Przenenski and his really nice Twilight Kin list, I was reminded of just how cool the army is and decided to have a go at making a list myself.

I’m now seven games in with Twilight Kin (thanks to Universal Battle, I can basically play a game whenever I like at the moment) with 5 wins and 2 loses, so I thought this would be the perfect opportunity to share my initial impressions on Twilight Kin.

This is where I’m currently at with my Twilight Kin list. I’ve tweaked it slightly in each game and each time I’ve slowly ramped up the investment in Drain Life – so far its been worth it every time. The downside with taking three Summoner Crones and investing all those points into Drain Life, is that it basically means that the bulk of my army has to be made up of Cronebound units. Otherwise, I just wouldn’t be getting the value out of all the special rules the Summoner Crone pays for in her rules – more on that later.

The Good

Pick n’ Mix Unit Combinations

Twilight Kin have access to some of the most solid units in the game in a combination that isn’t available anywhere else (without relying on allies). Butcher, Fiends, Abyssal Horsemen, Gargoyles, Mindscreeches and Silverbreeze are all excellent choices in their parent army and the ability to take them mixed together in one list is a real strength of the Twilight Kin.

Dark Magic

One excellent unit unique to Twilight Kin is the Summoner Crone. Drain Life is an incredibly powerful spell and in my opinion no Twilight Kin general should leave home without at least one source of it – preferably more. Due to their high average unit cost, Twilight King armies are almost always going to be outnumbered. Drain Life is an incredible force multiplier as it lets you keep your precious few units alive for longer, whilst also damaging your opponent.

Check out my battle report against Steve’s Goblins to see Drain Life in action. It tipped the odds of half a dozen combats in my favour, letting me break units in one round of combat so that I didn’t need to endure the counter charge. The unit of Abyssal Horsemen that won me the game took almost 20 points of damage over the course of game, but thanks to Drain Life and Regeneration they ended the game without a scratch on them.

The Crone comes with built in Inspiring and the ability to throw her Drain Life heals 18″ which is massive. This does only applies to Cronebound units though – see the section on ‘List design funneling’ below.

Add in to that the fact that she’s Stealthy and has a really solid 11/13 nerve and you have an all round excellent unit.

Compared to similar spellcasters, I would say she is a little under costed. However, as Cronebound Nightstalker units lose the Mindthrist special rule for only a pitiful 5 point discount, I see any undercosting in the Crone as recompense for the greater discount Twilight Kin should receive for losing Mindthirst.

The Bad

Unlocks, unlocks and unlocks

It is seriously hard to get unlocks in this list – at least if you want to build a list that is at least semi-competitive.

More than any other army in Kings of War, Twilight Kin feel like they’re paying an ‘unlock tax’ being forced to take subpar units in order to unlock the ones that actually do some work. I would say that this amounts to at least 300 points you’re having to pump into suboptimal unit choices. If you happen to come up against an army that has an abundance of excellent unlock choice (Undead for example) and hasn’t had to pay the ‘unlock tax’ then you’re effectively starting the game ~300 points worse off than your opponent.

And to make matters worse, the units that can unlock are pretty much all regiments so are only providing one unlock slot each.

AND they’re all so bloody expensive, so each regiment you add in to provide some unlocks takes up a significant proportion of your overall list.

To give a comparison from another army, I know that in V3 Orcs were given the Young Ax regiments because there was a concern that their cheapest unit available to provide unlocks was a standard Ax regiment at 130 points.

The cheapest unlock that Twilight Kin have access to that can actually contribute to combat is 140 points.

This means that Twilight Kin players have to decide – use Kindred Archers as your unlocks but accept that you’re going to have to ‘dilute’ your pure combat army and resign yourself to the fact that ~10% of your list is going to have to sit back and stay out of the way all game. Or, invest heavily in Kindred Archers and go for a gunline. Or, use Kindred Tallspears as your unlocks and accept that you have the most expensive unlocks in the game (10 points more expensive than the Orcs, that were deemed so expensive they had to introduce a whole new unit to fix the problem!).

There are a few armies that struggle with unlocks in the game at the moment, (Ratkin Slaves is the other big one that springs to mind) but none have it quite so bad as the Twilight Kin. The problem is so bad at the moment that it almost completely invalidates the first good point about the army – their pick n’ mix nature. Twilight Kin have solid options in every unlock slot; heroes, monsters and war engines. But there is little chance to bring any of that to the table without hamstringing yourself elsewhere.

All these restrictions and lack of viable unlocks options inevitably leads to…

List Design Funnelling

When your unlocks are limited to the extent that Twilight Kin’s are, then the inevitable result is list design funnelling.

Put simply, this is where a player is forced to take a list in a very particular direction. It doesn’t mean its the only possible direction you can go, but if you want to build at least a semi-competitive list than its the direction you’re forced in to.

A really good example of list funnelling appeared in Trident Realms at the end of V2. 90% of lists you saw were some variation of-

  • Fury of the Sea formation
  • 2x either Depth Horrors or Gigas
  • Eckter and the Siren
  • 2 x Knuckers

There was lots of adjustments within that basic formula, but the core look of the army was exactly the same every time. That doesn’t mean that there wasn’t other Trident Realm builds available, but they were just no where near as good.

Twilight Kin feel like they’re in a similar spot at the moment.

The list building conversation I have with myself-

“The Summoner Crone is an excellent unit and one of the few units unique to Twilight Kin. Plus her Drain Life it pretty much essential for keeping valuable units alive. Ok, I’ll take two and put upgrades on them make sure that they can make the use out of their Drain Life. But I’m paying all those extra points for special rules that only effect Cronebound units – I better take Cronebound Abyssal Horsemen regiments as the unlocks for the Crones, that way I can make the most of her special rules.

Ok, I need some more heavy hitter to make up the centre of my battle line. I could take some Elf units, but if I did I would need to spend points on another source of Inspiring, because the Crones only effect Cronebound units… guess I’ll take Cronebound Butchers instead seeing as they’re just as killy as Impalers, more durable than Kindred Tallspears and benefit from all the great special rules of the Summoner Crones.

Oh and a couple of troops of Croneboun Gargoyles for chaff…”

So that’s… 1420 points spent with not a single unlock slot remaining.

And I get to this point every single time I try and write a Twilight Kin list – 65% of my list looks pretty much identical and then its fill in the blanks around it. I have a solid core of four combat units, 2 support casters and some chaff. In any other army this would be the point where I start looking at some monsters, or war engines – other pieces to play around the core of my army.

But I can’t do that, because I have no fecking unlocks!

You might argue that its just me and that I have no imagination in list building or that I’m too focused on building a certain style or list – you might be right. But what really brought home to me just how funnelled an effective Twilight Kin list is, was a conversation we had on the Northen Kings’ group chat.

I mentioned to the guys that I’d really enjoyed my game against Kyle and that I was going to build a Twilight Kin list to try out on Universal Battle. I went away to EasyArmy and started list building, eventually coming up with the list I took against Mark’s Ratkin Slaves.

Turns out my fellow Northern Kings had also gone to EasyArmy to try their own hand at building a Twilight Kin list. By pure coincidence we all shared the lists we’d come up with in the group chat within seconds of each other. And they were… pretty much identical. Three lists, built completely independently by three players with wildly different playstyles – more than 90% of the elements were identical across all three lists.

The Elves (well… some of them)

Impalers are fine I guess. They’re Palace Guard by another name, and how often do you see Elf players taking Palace Guard regiments? They’re a decent enough unit that I might consider if I really get fed up with taking the Archers for unlocks, but Twilight Kin have other units that do combat better and at 170 points they’re an expensive way of getting unlocks into your list.

If they could be taken in a horde, now that would be a different matter.

Blade Dancers are a very poor unit in my opinion. They’re just simply no where near as good as Nightstalker Reapers or Orc Morax (I just went to check EasyArmy to look at Blade Dancers and Morax side by side. I’d assumed they were a similar price and I still thought Morax were better. But no – Morax are 30 points cheaper!).

I can see a use for troops, but yet again you fall into issues with unlocks. Every time I’ve thought about adding Blade Dancers into my list, I take one look at Fiends and change my mind. Fiends fill the exact same role in the list (lots of attacks, good at chewing through high nerve, low defense and good speed) but they’re just better at it… and they can be healed from 18″ away by the Summoner Crone.

Summary

I’ve really enjoyed my games with Twilight Kin, and they’re definitely an army that can win games. I’ve won 5/7 games with them so far, and the games I lost were down to player skill (or lack of!) not because of the list.

I’m going to keep on with them and try and bring in more Elf elements into the list. The shame is that I think this will make the list worse not better.

Twilight Kin are definitely a cool army, but at the moment they feel like a fairly one dimensional army.

What Would Make It Better?

I’ve been lucky enough to have been involved in playtesting for the last few Clash of Kings books and the 3rd edition rule book (I even have my name in the credits of the rulebook – how cool is that!). One of things I’ve learnt from playtesting and putting suggestions forward for ways to improve armies is that small changes tend to have big impacts and that often a small nudge here and there can make a massive impact on how an army plays.

So, with that in mind I have put together a few suggestions for how I think Twilight Kin can be pulled right up into the mix as a competitive army, and far more importantly open up a much greater variety of feasible builds.

Regiments are fine, horde are incredible

Goodie two shoes Elves get Palace Guard hordes, hippie Elves get Forest Guard hordes, so why don’t the bad boys of Pannithor get Impaler hordes?

Giving Impalers a horde option would have a massive impact on the range of lists that Twilight Kin could build. No only would it give them an actual powerful Elf option that can’t be found elsewhere in the Cronebound sections of the list, it most importantly gives them an infantry horde worth of unlocks that doesn’t feel like an ‘unlock tax’.

This one change alone would have a huge positive impact on the variety of lists that Twilight Kin could build.

A cheap unlock, a cheap unlock. My kingdom for a cheap unlock!

Lets give the Twilight Kin the Orc treatment and give them a brand new unit that is cheap and cheerful and can be used to provide unlocks.

Call them something like Twilight Initiates and a stat line like this-

These would be a really interesting addition to the game. They’d be something unique to Twilight Kin, and no other ‘Shieldwall’ equivalent unit in the game comes with built in Elite. And again, a unit like this would unlock so much of the potential currently locked in the Twilight Kin list.

Also Mantic, you know how you added in Shield Watch to the Elf list so that people would buy more hand weapon and shield Elf models? Well… Twilight Initiates would be an excellent way of encouraging people to buy a horde of them *hint* *hint*

Black Magic Woman

As I’ve said , the Summoner Crone is an excellent unit for the Twilight Kin. But when you take her you’re forced to take your army down a very particular path – or accept that you’re paying for special rules that you’re not able to use.

I agree that there should never be a unit that can do everything all of the time, but it would be great if the Crone could be ‘upgraded’ to benefit either Elves OR Cronebound.

My suggestion would be to add the following:

“The Summoner Crone may choose to replace the Wicked Miasma special rule with Aura: Stealthy (Elf only)”

Boom – she’s instantly a fantastic support piece for the Elf element of your list, but doesn’t push your Cronebound units over the top at the same time. Plus a stealthy aura would be very in keeping with the Twilight Kin’s background lore.

I’d still say to keep her Inspiring limited to Cronebound only – I think spell casters that Inspire entire armies should be kept to a minimum.

This last one if probably the most wishlisty of my three suggestions but I still feel that it would be a subtle enough change to boost certain elements of the list without going over board.

Throwing Down the Gauntlet

So here’s my promise to the Rules Committee, Matt Gilbert, Kyle Przenenski and the other guys at Mantic – make the changes above in the Clash of Kings 2021 book and I promise to buy, build and paint and entirely 100% Mantic Twilight Kin army and bring it to Clash of Kings 2021 – spindly Elves and all!

C’mon guys, Twilight Kin are so close to being awesome, lets unlock their potential!

What do you think? Have I been overly critical on the Twilight Kin or am I being over optimistic about them?

And do you think my suggested changes would make them a more rounded army?


Call to Arms 4 – Round 2 – 19/04/2020

I’ve been wanting to have a go at writing a Kings of War battle report for years, so I thought that while I have some more free time on my hands, now would be the perfect time to start.

To add a bit of extra pressure, I’m going to be doing my first battle report on the game I played against ‘Mr Battle Report’ himself, bone fide internet celebrity and Mantic employee – Kyle ‘Master Crafted’ Przenenski.

Yes that Kyle – from the videos

This was round 2 of a Call to Arms, the tournament being held over Universal Battle which has 146 players from across the world. The scenario for this round was Pillage and all players are using a set six objective makers. The event is using the Northern Kings scoring system (because its the best scoring system in the world).

My list

Kyle’s list

Deployment

Seeing as I’m new at this, I forgot to get a screen shot of my deployment, but you can sort of see what it was based on my turn 1 moves. I changed my plan for deployment half way through because Kyle put the Fiend horde down quite early on. That made me decide to put both Order of Redemption Knights on the left flank, hoping that their combined might along with the Exemplar Redeemer on Winged Unicorn (1) could hold the left two objectives on their own.

It did mean that Kyle had a much stronger right flank than me, so I would have to use my faster speed to keep him boxed in and delayed as long as possible. The hope was that I could kill everything on the left and centre and hold off the right flank as long as possible.

Top of Turn 1

Top of turn 1

I moved up fairly cautiously across the board – I knew Kyle would have to move towards me because he had no long range shooting and a stand off would suit me in long run as it would give me more time to get my flying Redeemers behind his lines.

I out sped him with pretty much all my units, so the plan was to get in a position where I could get multiple charges off against a single target. Kyle had a nice second row set up with his Fiend hordes and Impaler regiments, meaning that when I committed I needed to try and get charges off with as many units as possible to clog up his lines and block his units and try to avoid getting flanked.

The Exemplar Redeemer on Winged Unicorn (1) on the left flank moved up, putting himself in range of the Soulbane but nothing else – if the Soulbane did charge he would be charged by the Knights next turn. If Kyle pushed up fast on the left, I was planning on flying the Redeemer 20″ behind his lines to threaten the middle Spearmen horde (2) the next turn.

Bottom of Turn 1

Bottom of turn 1

Kyle’s movement was quite cautious as well. He moved the Gargoyles (1) up to block my Redemption Knights and moved the Spearmen (1) and Impalers (1) behind them, but not far enough to allow my Redeemer space to land behind them.

The Spearmen (2) in the middle moved up slightly and the two Shadow Hulks moved into the forest (I’m guessing Kyle’s plan was to make the most of their Strider while keeping them safer from charges).

His right flank moved up and turned towards the centre of the board to start putting pressure on my units. He sensibly moved the majority of his army into charge range all at once. I see a lot of people try and stay out of charge range for as long as possible, but when you are slower than your opponent this is often the wrong move as you just find yourself backed into a corner. Better to push forward, take the initial charges and then counter attack.

Top of Turn 2

Top of turn 2

I thought about my charges for quite a while – pretty much my entire army was in range to charge something, but there wasn’t a single charge I could make where there wasn’t a risk of being flanked or counter charged by something nasty.

In the end, I opted to go for what was probably the riskiest charge, but that had the greatest reward if it succeeded. I triple charged the Kindred Spear Horde (2) with the Waters Elementals (1), Exemplar Redeemer on Horseback and the Order of Forsaken Knights. Quick maths told me that even against phalanx they should do a combined 15 damage on average (Waters Elementals 6, Order of the Forsaken w. bane chant 6, Exemplar Redeemer 3), and using Nick Williams excellent rule of thumb that explains why averages aren’t always helpful I knew that I would most likely do -/+2 damage to the average, so roughly 13-17 damage. So with top estimate, I should have been in with a good shot of routing them.

I thought it was worth the risk, because if I managed to break them I would control the centre of the board and effectively split Kyles army in two – taking control of another objective maker and forcing Kyle come to me. Plus, I could reform all of my units in a way that meant I wouldn’t take any charges the next turn.

The Water Elementals (2) and Exemplar Redeemer on Winged Unicorn (2) backed up out of charge range. I wasn’t sure what to do with them, and I’ve lost games in the past by being too rash and charging units in when you’re unsure. So I decided to hold them back and if I did manage to break the Kindred Spearmen, the Water Elemental (2) horde could help keep Kyle pinned on the right hand side of the forest.

Unfortunately, it didn’t quite go to plan.

I failed to cast Bane chant, even with the re-roll from the Conjurers’ staff and the Exemplar Redeemer only managed to do 1 damage after rolling 3 ‘1’s to damage. In all I did 12 damage to horde.

Even though I knew I would now most likely lose the Forsaken Knights to the Shadow Hulks in their flank, I felt putting a good amount of damage on the Kindred Spears (2) was still a positive.

Both Redemption Knights on the left flank double charged the Gargoyles and unsurprisingly routed them. The left ones backed up first and rolled a ‘1’ which kept them in charge range of the troop of Impalers who were in their flank. This meant I couldn’t risk backing up the right regiment as if I rolled more than a 1 it would expose left regiment’s flank. This meant that the Kindred Spears and Impaler troop were both in range to charge the Redemption Knights with Brew of Sharpness in his next turn, but they would at least both be hindered.

The Exemplar Redeemer on Winged Unicorn (1) moved out of arc and into the flank of the Kindred Spearmen horde (1). I knew he was in charge range of the Soulbane, so I made sure to position the Redeemer in such a way that if the Spearmen did charge the Knights, I could pivot past the individual and charge the Spearmen’s rear even if I did lose my fly.

I flew the Pegasus out from behind the building and turned to face the flank of his Spearmen horde (1). The hope was to use him to harass his Crone for a turn for two before flying off to score an objective in later turns.

Bottom of Turn 2

Bottom of turn 2

As expected the Kindred Spearmen (1) and Impaler troop (1) both charged the Order of Redemption Knights with the Brew of Sharpness. Luckily they were both hindered and so only did a combined 9 damage, although this was still enough to waiver the Redemption Knights.

The Soulbane charged the Exemplar Redeemer on Winged Unicorn (1) and only did 1 damage.

The two Shadow hulks flanked the Forsaken Knights and the Crone Hag Drain Life’d them doing 4 damage and healing 4 on the Kindred Spearmen horde (2) (I hate Drain Life with an unholy passion, it is massively overpowered compared to all other spells in the game, is only available to a select few armies and just does too much with very little downside). The Shadow Hulks easily routed the Forsaken Knight – one turned to face the left Water Elementals (1) and the other turned to face the other Water Elementals (2).

The Kindred Spearmen horde (2) counter charged the Exemplar Redeemer on horseback, hoping to kill him and be able to overrun into combat with the Water Elementals (1). Luckily for me, even with the help on Bane chant they only managed to do 6 damage to the Redeemer and waivered him, saving the Water Elementals (1) from taking damage.

The Gargoyles (2) moved to protect the Spearmen horde (2)’s flank.

Top of Turn 3

Top of turn 3

Showing how indifferent they were to these bothersome pointy ears, both the Redemption Knights and Exemplar Redeemer shrugged off their waiver with successful Headstrong roll (both on a ‘6’, they really didn’t care!).

As I’d set up earlier, the Exemplar Redeemer on Winged Unicorn (1) was able to disengage and pivot past the Soulbane to charge into the rear of the Kindred Spearmen (1) – The Redemption Knights with Brew of Strength joined him in the front.

The Redemption Knights with the Brew of Sharpness counter charged the Impaler troop (1) and only managed 5 damage – luckily I rolled a 10 on the nerve and killed them. They also regen’d 2 damage back this turn (keep an eye on how much damage they regen this game).

The Exemplar Redeemer on Winged Unicorn (2) on the right charged the Fiend regiment. I was really hoping I wouldn’t kill them as they were much more helpful to me a road block, holding up his Fiend horde. I did 3 damage and failed to waiver – pretty much perfect.

The Water Elementals (1), Exemplar Redeemer on horseback and the Pegasus all charged the Kindred Spears (2) in the middle doing another measly 6 damage between them. Thanks to the healing from Drain Life and a low nerve roll, I only managed to waiver them. This didn’t look good for the Water Elementals (1) who now had a very angry Shadow Hulk looking straight at their flank.

Bottom of Turn 3

Bottom of turn 3

On the left flank, the Impaler regiment (1) charged out of the woods into the Redemption Knights with the Brew of Sharpness. Unfortunately for Kyle the hindered charge only managed to put another 3 damage on the Knights, taking them up to 10 – he did at least manage to waiver them again.

Incredibly, the Shadow hulk (1) only managed 9 damage in the flank of the Water Elements (1) and they held! The Crone Hag cast Drain Life on the Exemplar Redeemer on horseback but thankfully only managed 1 damage this time and he also held.

The Impaler regiment (2) on the right charged the Water Elementals (2) and the Fiend regiment counter charged the Exemplar Redeemer on Winged Unicorn (2) doing a very respectable 6 damage. Luckily both units held.

The Soulbane decided he’d had enough of this flank and went his full 18″ taking him out of arc of the Order of Redemption and putting him in range of the Men at Arms (1) who up until this point had been sat on an objective minding their own business. The Gargoyles (1) also turned 90 degrees and moved up to threaten the Men at Arms (1). He moved the Gargoyles (1) into charge range of the Men at Arms (1) which I personally thought was a mistake because he could have easily kept them out of range of any of my unit – but as it turns out, it ended up working out for him!

Top of Turn 4

Top of turn 4

The Redemption Knights with Brew of Sharpness failed their Headstrong roll this time, so instead of counter charging they disengaged 1” and spun 180 degrees to cover the Men at Arms (1) and the top most token. They also regen’d 7/10 damage taking them down to 3!

The regiment next to them flanked the Impalers (1) and killed them. They over ran but only rolled 1”. If they have rolled a 3+ they would have been in range of the Shadow Hulk (1) in the centre of the board and it would have been a very different game – sadly it was not to be.

Keen to avoid anymore Drain Life, the Pegasus charged the Crone Hag who had been cowering behind the Shadow Hulk (1). It did the all important 1 point of damage but failed to waiver/kill her.

The Exemplar Redeemer on Winged Unicorn (1) moved across from the left flank into the centre of the board by charging the flank of the Kindred Spearmen (2) that had survived so much punishment so far. An Exemplar Redeemer in the flank proved to be too much for them and the Redeemer picked up his second Spearmen horde of the game, forever gaining himself the moniker of “Spearbane”.

The Water Elementals (1) that I had expected to be killed in the previous turn countered the Shadow Hulk (1) and the Exemplar Redeemer on horseback did a 360 to also join in. They did a respectable 7 damage but with Def5 and -/20 I knew that they were unlikely to kill it. The plan was to do as much damage as possible and hopefully pick it up later with a late game charge.

I got incredibly lucky on my right flank, and for once it was actually a plan not just blind luck! I moved the Druid over to Bane Chant the Water Elementals (2) so that they were damaging on 2s for their counter charge against the Impalers. I knew that if I could waiver or fail to kill the Fiend regiment, I could use it to protect the Water Elemental horde’s (2) flank if they killed the Impalers (2). This would keep the Fiend horde out of combat for yet another turn.

I rolled the Exemplar Redeemer on Winged Unicorn (2) combat 1st and waivered the Fiend regiment – so far so good. The Water Elementals (2) then proceeded to do 6 damage to the Impalers which was the bottom end of average, but rolled a 10 on the nerve and killed them! Because I already knew my flank was protected by the waivered Fiend regiment, I turned to give the Shadow Hulk a front charge feeling quite smug that my plan had actually come off.

The Men at Arms (1) charged the Gargoyles (1) and did 3 damage, waivering them.

Bottom of Turn 4

Bottom of turn 4

This turn despite having front not flank charges, and despite all my clever plans to keep the Fiends out of combat both Shadow hulks decided that they’d had quite enough of the Water Elementals and proceeded to easily kill both units- I suddenly felt a bit less smug!

The Crone Hag valiantly counter charged the Pegasus and was even supported by a Bane chant from the Army Standard Bearer. It was all set to be the upset of the centaury… but sadly she missed with her 1 attack.

Unable to make it into any combats (thanks to my cunning plans that turned out to not matter anyway!), the Fiend horde side stepped to give itself better positioning for the next turn.

Top of Turn 5

Top of turn 5

At the top of turn 5 I started to really think about how I was going to score scenario points. The left half of the board was clear of enemies so I decided to ‘bank’ the two tokens I had over there and leave the rest of my forces to fight over the rest of the objectives. This wasn’t an easy decision because leaving a 280 point regiment of Knights to do nothing but hold a token did mean that I was going to struggle elsewhere.

I spun the Order of Redemption with the Brew of Strength 180 degrees to that they could take the far left token on turn 6. I also turned the Pegasus around and flew it 10” towards the other left hand token. The Crone Hag would survive – this time.

The Men at Arms (1) charged the Gargoyles (1) again and the Brew of Sharpness Redemption Knights charged the Soulbane.

The plan was for the Men at Arms (1) to kill the Gargoyles (1) and then turn so that they could move at the double to capture the middle objective on turn 6 – using their superior unit strength to take it from the Shadow Hulk (1). The Redemption Knights had a very good chance at killing the Soulbane as they had 20 attacks hitting on 2s and damaging on 3s. This would free them up to move onto the top objective in turn 6. If it all went to plan I would have a fairly comfortable win – and there was no reason it shouldn’t all go to plan…

It didn’t quite go to plan – the Knights did a very respectable 10 damage to the Soulbane but only managed to waiver him. Far more importantly the Men at Arms (1) did 5 more damage to the Gargoyles (1) and rolled… a double 1!

The right Men at Arms (2) moved forward, keeping just out of range of the Shadow Hulk (2). The hope was that the Exemplar Redeemer on Winged Unicorn (2) would kill the Fiend regiment this turn so he could over run out of the Shadow hulk (2)’s arc (he only needed 1″ to get out of arc). It shouldn’t be took hard to kill the Fiend regiment, they were already on 8 damage and weren’t Inspired. This would force the Fiend horde to commit or else risk the Men at Arms (2) capturing the right most objective unopposed.

Sadly it was not to be – the Exemplar Redeemer on Winged Unicorn (2) only managed to do 1 damage to the Fiends! He did waiver them again, but this time he was going to get a Shadow Hulk (2) in the flank next turn. Worse of all, it meant that the Fiend horde could safely move left toward the objectives in the centre of the board without having to worry about being charged in the flank by the Exemplar Redeemer (2). My plan to keep them pinned had been scuppered.

In the middle of the board the Exemplar Redeemer on Winged Unicorn (1) and the Exemplar Redeemer on horseback charged the Shadow Hulk (1). It was already on 7 damage so if they could do average damage to it (between 4-8) then they would be in a good position to kill him and take another scoring unit off the board. Again, sadly not. They managed to do 4 damage between them but rolled a 3 on the nerve check.

I was starting to get quite nervous at this point – I’d flubbed three very important and fairly easy combats and my comfortable win had been flipped on its head. It was going to be a mad dash for the objectives at the end of the games.

Bottom of Turn 5

Bottom of turn 5

To add injury to the insult of the double 1 the Gargoyles (1) regen’d 6/8 of the damage on them and then proceeded to do 6 damage to the Men at Arms (1) on the counter charge and killed them! Oh bugger!

As expected, the Shadow Hulk (2) flanked the Exemplar Redeemer on Winged Unicorn (2) killing him easily. The poor Men at Arms (2) now had to deal with a Shadow Hulk (2) and a Fiend regiment on their own.

The middle Shadow Hulk (1) counter charged the Exemplar Redeemer on Winged Unicorn (1), he needed a 10 to kill him (with a re-roll) and he got it! He reformed to face the middle objective.

The Fiend horde moved into the woods to make a late game move for either the bottom or middle objective.

That had not been a good turn for me!

Top of Turn 6

Top of turn 6

The Men at Arms (2) charged the heavily damaged Fiend regiment and with the help of a Bane chant, finally killed them. They turned to face the Shadow Hulk – all they had to do was surive one charge from him and they if the game ended on turn 6, they would hold that objective.

I had a big decision to make with the Exemplar Redeemer on horseback. He could either charge the damaged Shadow Hulk (1) and try and kill him, or charge the Fiend horde and block them from moving onto a token in the bottom of turn 6. Statisitcally speaking I should kill the Shadow Hulk (1) but by this point I was pretty nervous of combats I should win! So I decided to forsake the extra tournament points for killing the Shadow Hulk (2) and charge the Fiend horde as I knew I could definitely block them getting to a token this turn (the Redeemer is Mighty so even if he failed to damage he would block the Fiends).

The Redemption Knights with Brew of Sharpness finished off the Soulbane and reformed so that they were just out of 12” of the Shadow hulk (1).

The Redemption Knights with Brew of Strength and the Pegasus moved onto their objectives, effectively taking them out of the game but ensuring that those points were safe.

I’d done all I could and put myself in as strong a position as possible – so long as the Men at Arms (2) survived the charge, I would win the game if it ended on turn 6.

Bottom of Turn 6

Bottom of turn 6

The Fiend horde counter charged the Exemplar Redeemer on horseback and did 8 damage to him, killing him in one! Clearly they didn’t appreciate being blocked! They over ran but rolled a ‘1’ – this would be big later on!

The Gargoyles (1) flew on to the top objective.

The Shadow Hulk (2) charged the Men at Arms (2) – the ones that needed to survive in order for me to win on turn 6. His to-hit rolls were pretty bad and he only did 5 damage, definitely the lower end what he should have done.

He needed a 10+ to kill them… and rolled a 10! Boo!

At the end of the Turn 6, losing the Men at Arms (2) meant that the game had shifted from a win to a loss. I really, really needed a turn 7….

Salvation!

Top of Turn 7

Top of turn 7

There was a turn 7!

The Redemption Knights charged the Gargoyles (1) in the rear and killed them. I held my breath before rolling the nerve check on them, I was sure it was going to be another double 1, but thankfully not!

My Druid valiantly threw himself under the Fiend bus. He managed to position himself in such a way that the Fiends couldn’t move through him and still leave a 1” gap at the end of their move. So their only chance to get within 3” of an objective was to charge him and over run.

I really took my time moving my Druid and got out spare units to triple check that the Fiends couldn’t make it past. I would say don’t ever be afraid to use spare units to double check things like this. Its one of the great features of Universal Battle, but I’ve found that by doing this online, it has also made me think more about where my opponents units can move on the table top as well.

At the end of my turn 7 my Redemption Knights had taken then top token off the Gargoyles and my Druid had valiantly taken the place of the Exemplar Redeemer as “Chief Fiend Blocker” – preventing them from being able to grab another token.

Bottom of Turn 7

Bottom of turn 7

The Fiend horde charged the Druid and as expected killed him easily. They over ran…. 1”!

We actually checked and even if Kyle had rolled a 6, he would have been out of 3” of the objective by milimeteres (remember when I said it was really important that he only rolled a 1 on his over run against the Redeemer?).

At that was the end of the game!

I won 3-2 by the absolute skin of my teeth! Kyle played an absolutely fantastic game and was a brilliant opponent. The game was incredibly close and really did come down to whether or not there was a turn 7. You can see how close it was by how many points we both killed – I killed 1480 and he killed 1470.

So we both scored +3 for kills, I scored +3 for scenario and Kyle scored +2. The final score was 21-10.